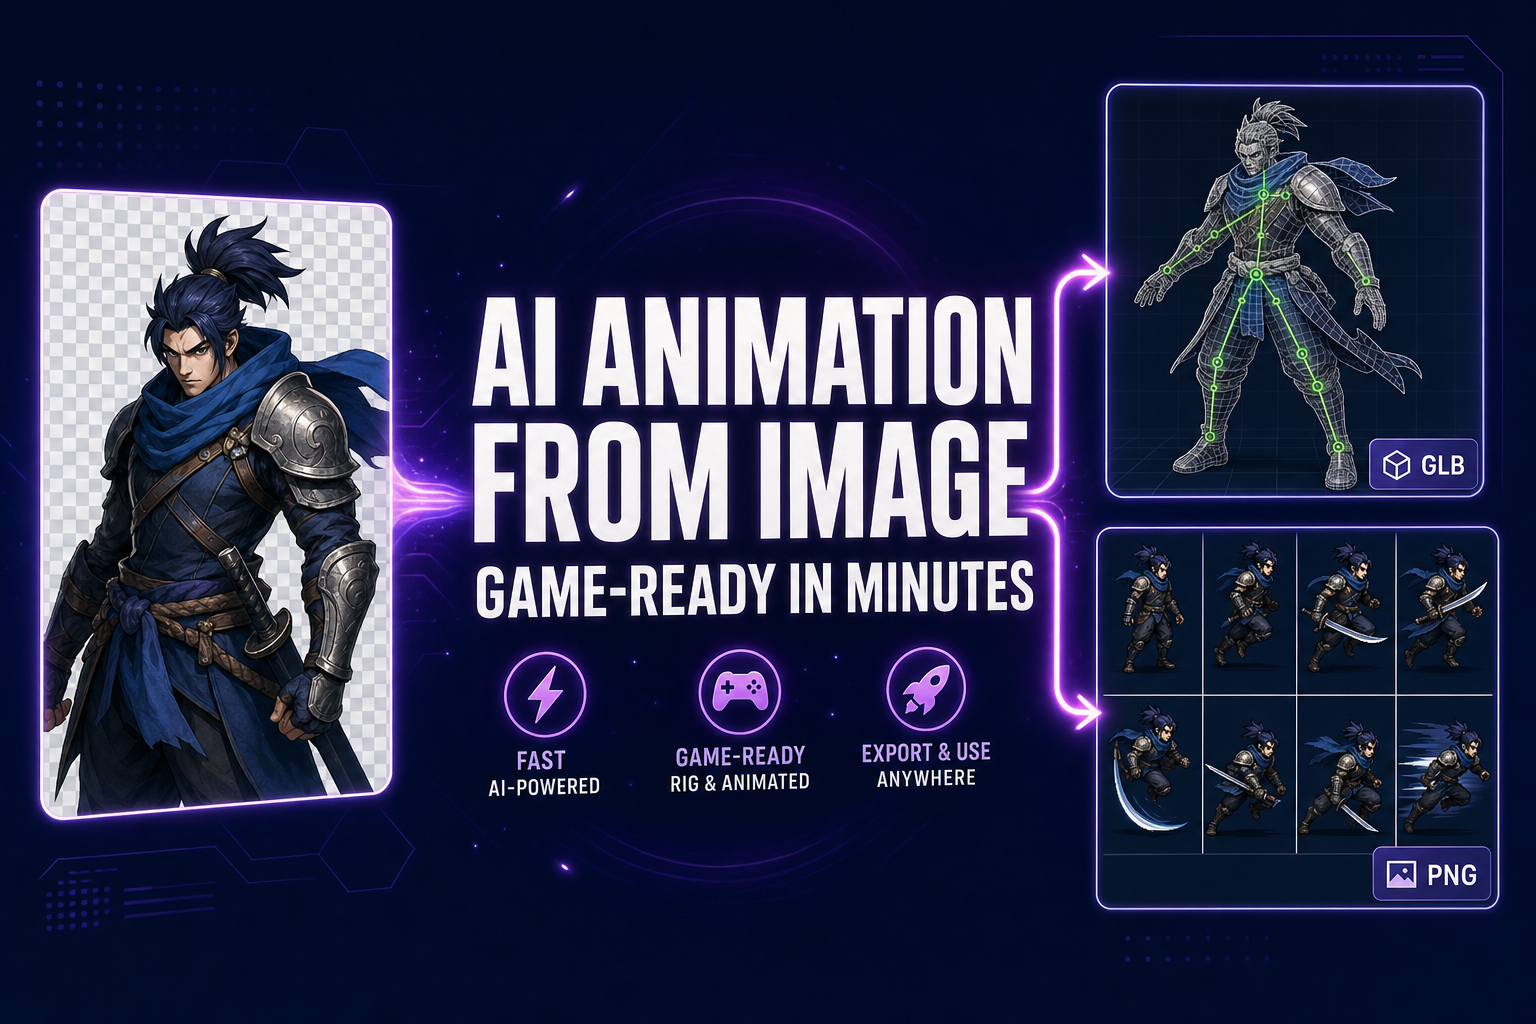
Animating a character used to mean a rig built by hand, a motion-capture suit, and a week of cleanup per cycle. Then a hundred dollars an hour for a contract animator who could nail a believable run cycle on the second pass. Then another week to wire the clips into the engine, blend the transitions, and tune the IK pass so the feet stop sliding through the floor. The 2026 alternative collapses the whole sequence into a browser tab and a single source image. Feed one still picture into an AI animation generator from image, pick whether the output is a rigged 3D mesh or a 2D sprite sheet, and ship the result into your engine in roughly twenty minutes.
How an AI animation generator from image works in 2026
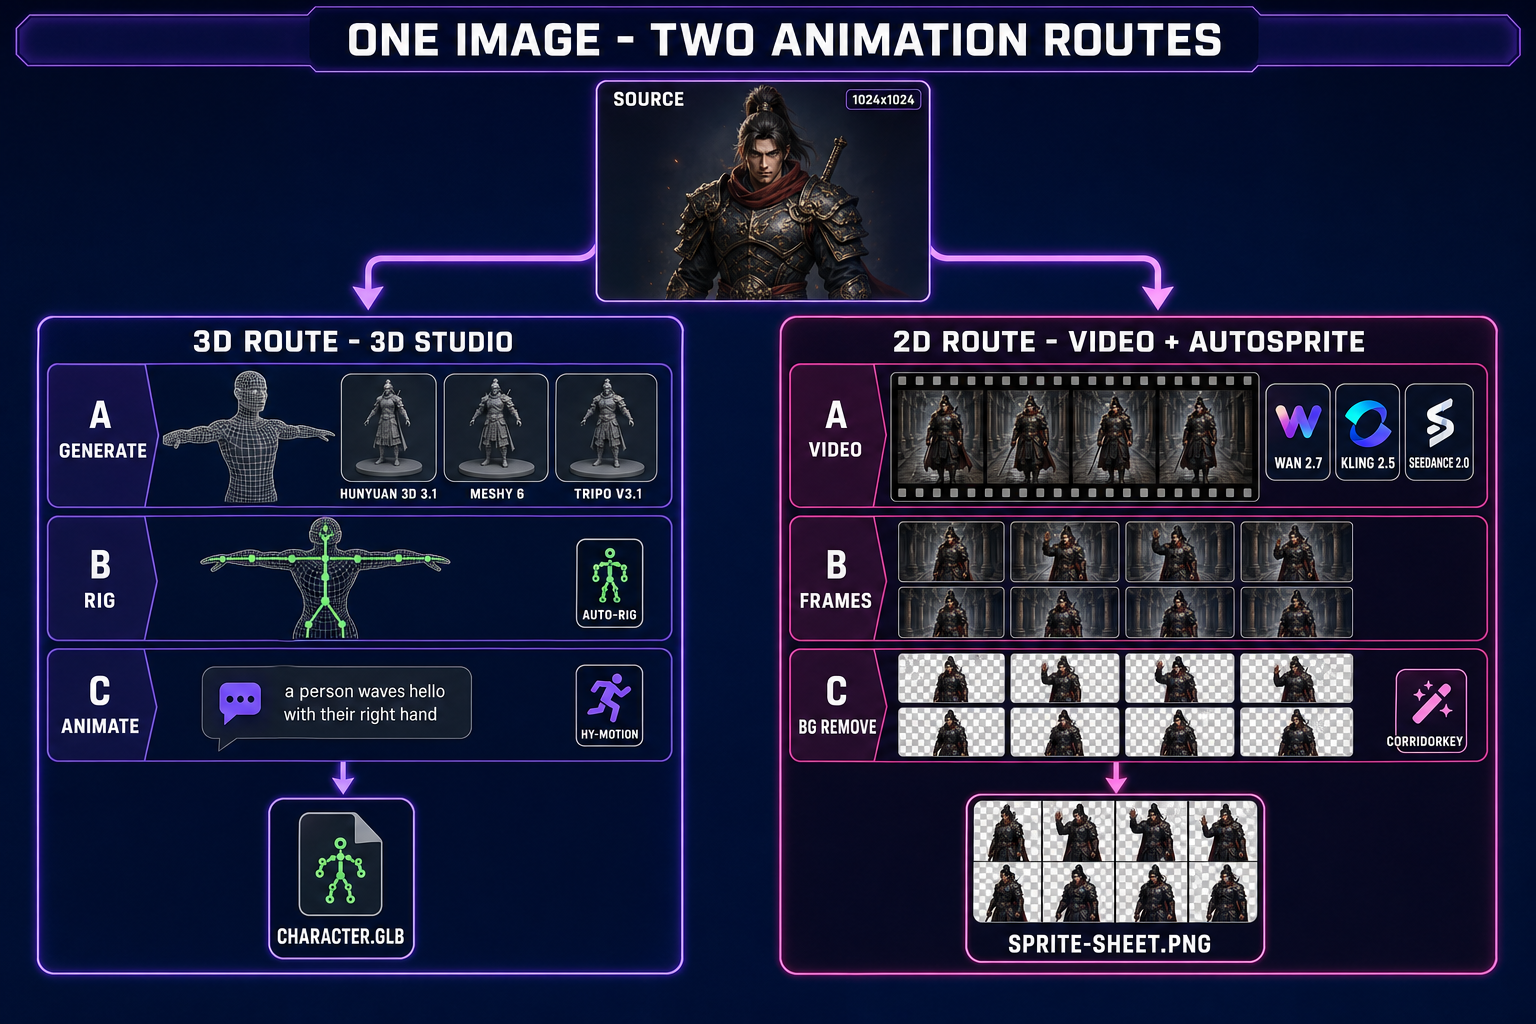
The phrase “AI animation generator from image” covers two completely different pipelines that happen to share the same input. Both start with a single still picture of the character. They split immediately afterward into a 3D route and a 2D route, each backed by a different family of models, each producing a different kind of game asset, and each suited to a different kind of game engine. The Sorceress stack runs both routes in the browser without an install, and the choice between them is a one-line decision at the top of the workflow.
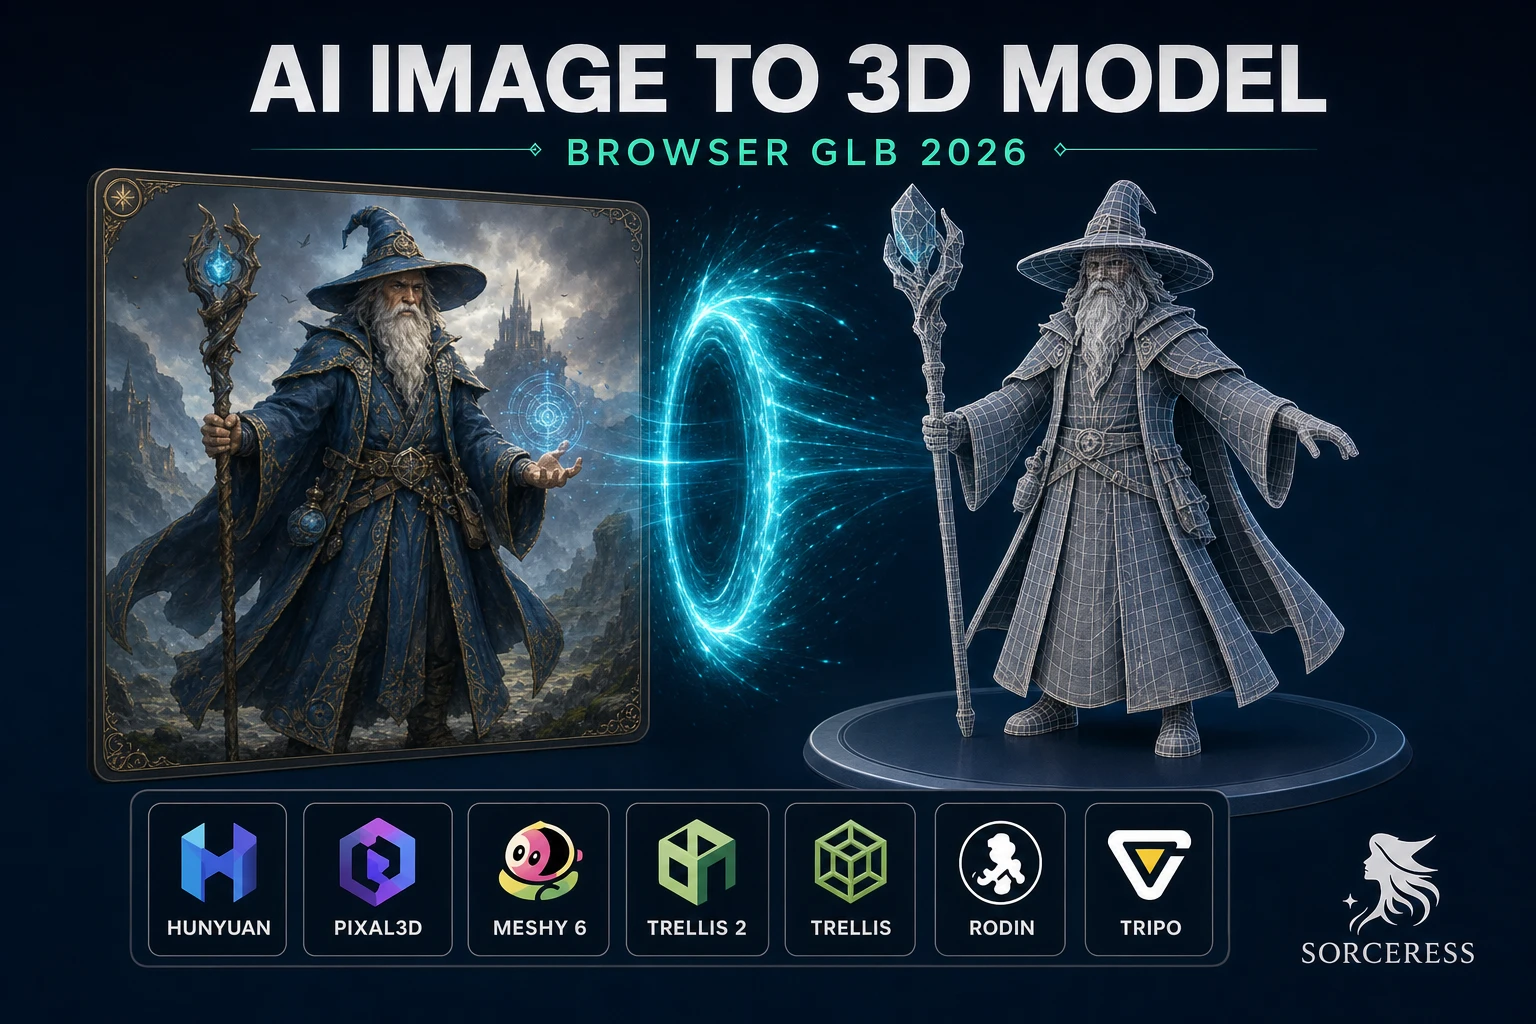
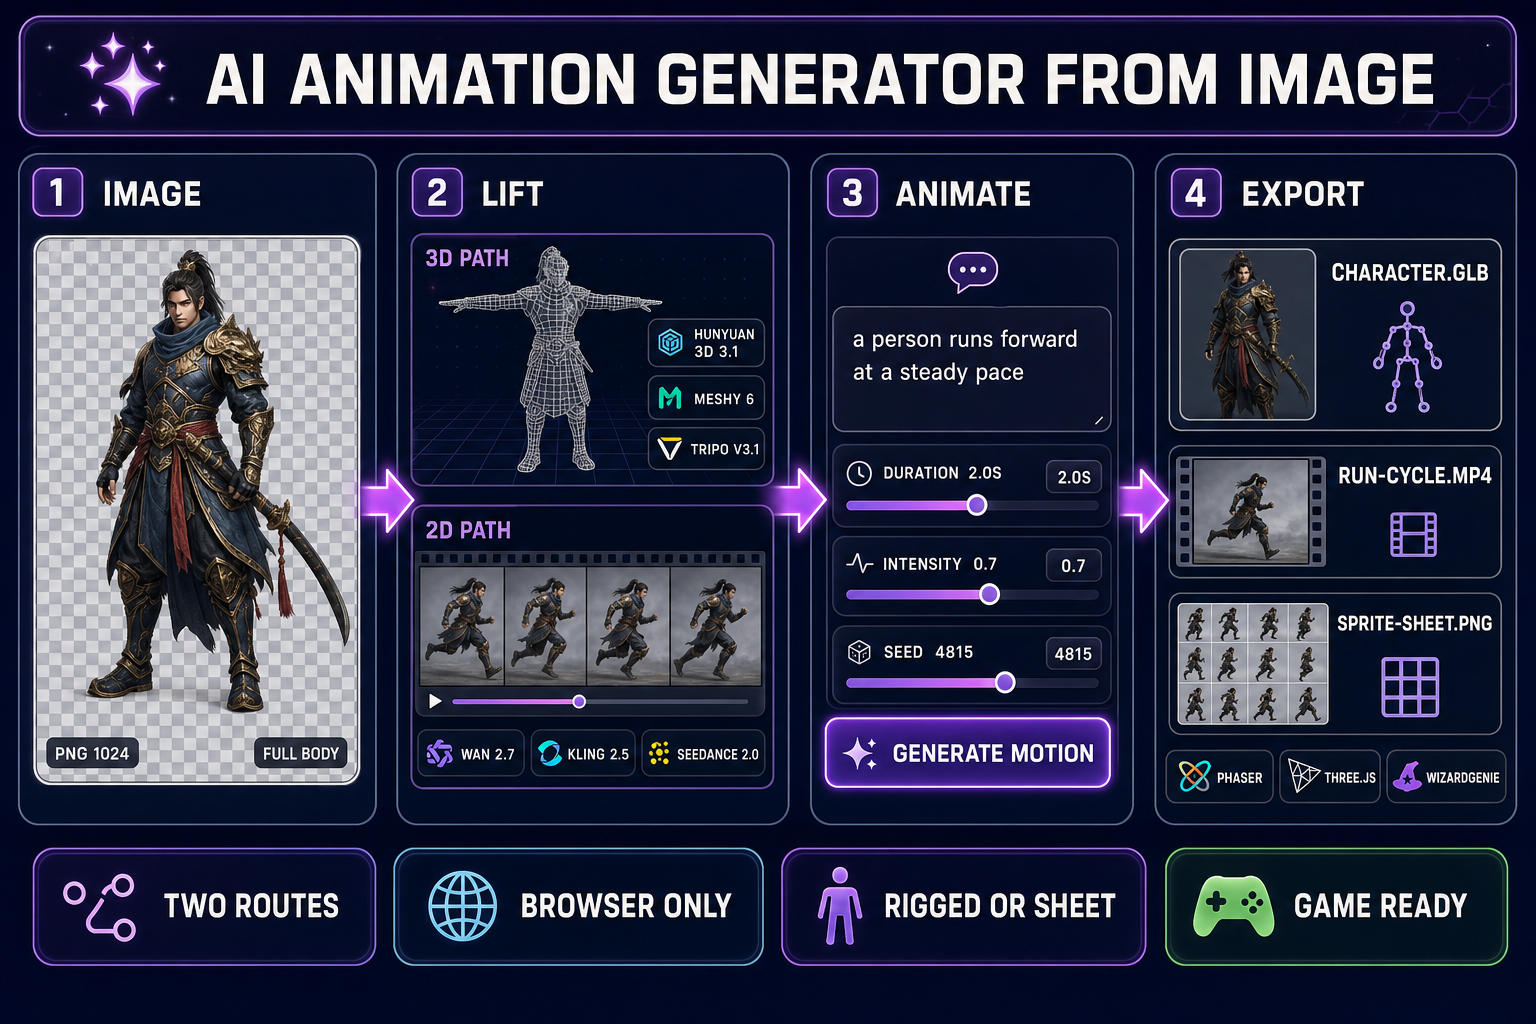
The 3D route lives in 3D Studio. The Generate tab takes the source image and lifts it into a textured 3D mesh through one of seven image-to-3D models — Hunyuan 3D 3.1, Meshy 6, Meshy 5, TRELLIS, TRELLIS 2, Rodin 2.0 (Hyper3D), or Tripo v3.1 — verified May 9, 2026 against src/lib/threed-models.ts. The Rig tab auto-rigs the resulting mesh with a humanoid skeleton. The Animate tab drives that rig with HY-Motion, a text-to-motion engine that turns a prompt like a person runs forward at a steady pace into a baked animation clip with adjustable duration, intensity, classifier-free guidance, and seed.
The 2D route uses two tools in sequence. The Video page animates the still as a short clip through one of the AI video models — Wan 2.7, Kling 2.5 Turbo Pro, Kling 3.0, Seedance 2.0, Seedance 2.0 Fast, Seedance 1.5 Pro, Wan 2.2 Fast, or Grok Imagine Video — with a text prompt describing the motion. AutoSprite V2 takes the resulting video, extracts frames at the chosen FPS, removes the background through CorridorKey, and exports a clean transparent sprite sheet ready to drop into Phaser or any 2D engine. Verified May 9, 2026 against src/lib/video-models.ts and src/app/autosprite-v2/page.tsx.
Pick the route that matches your engine, not the route that sounds cooler
The honest decision is not “3D is more advanced therefore 3D is better”. The honest decision is which output format your engine actually renders at runtime, and which kind of animation cost your engine can afford per frame. Spending a week on the wrong route is the most common mistake teams make at this stage, and the cost shows up as a sprite that does not blend, a rigged mesh that the 2D engine cannot draw, or a runtime budget that the chosen route blew past on a test scene of three NPCs.
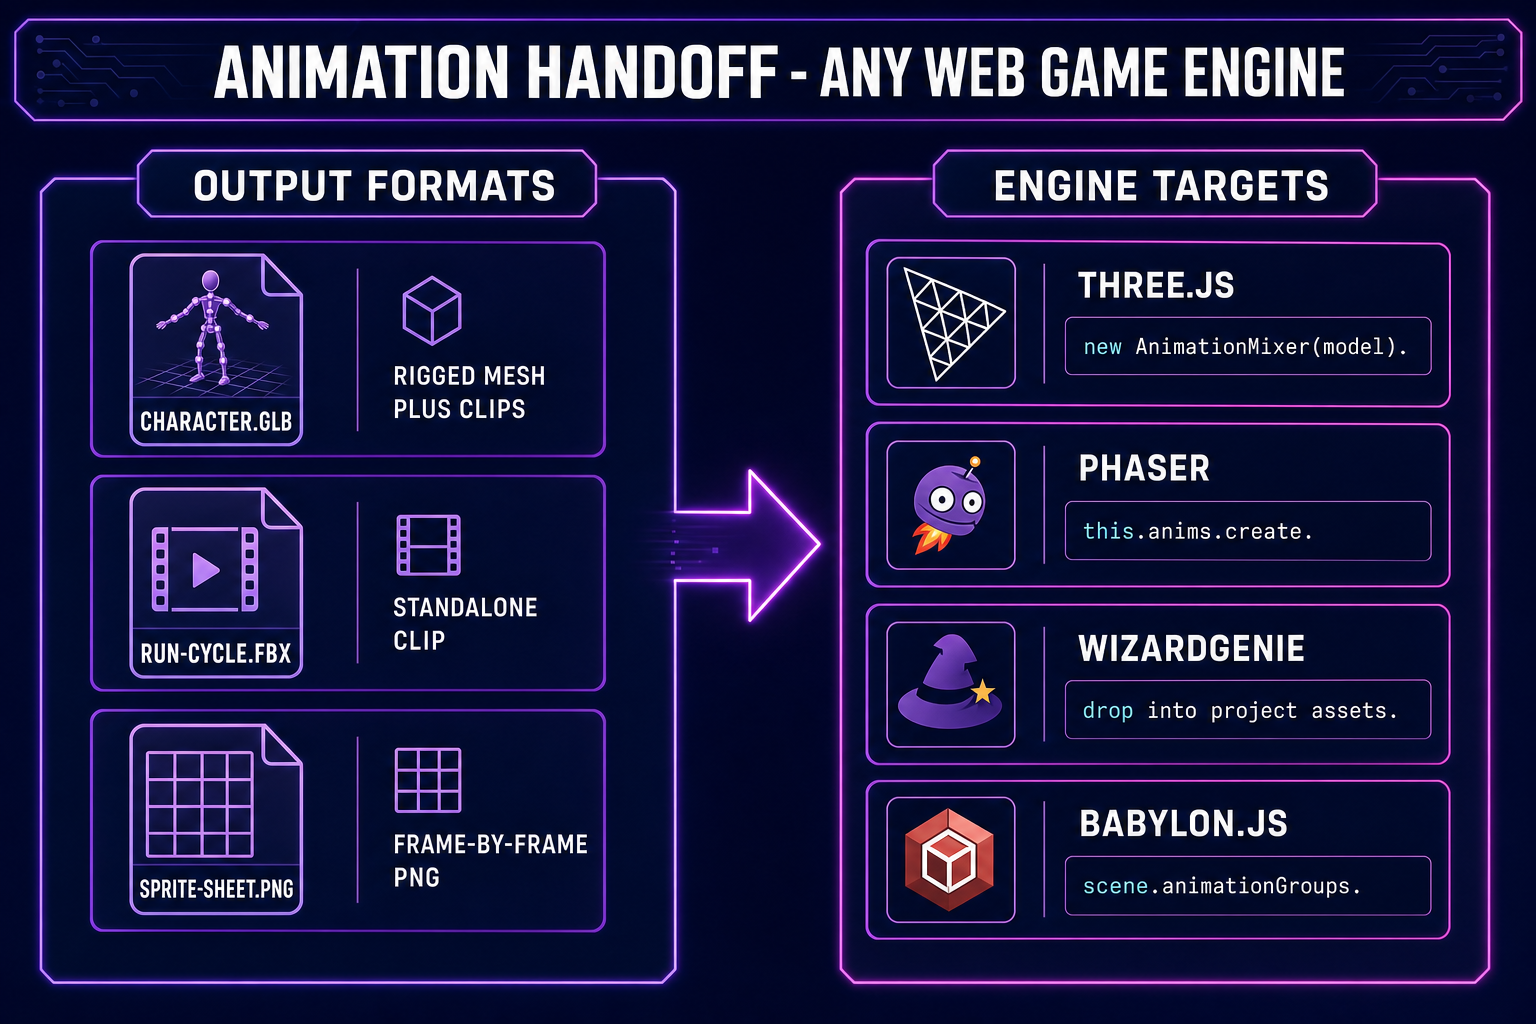
- Three.js, Babylon.js, or a custom WebGL engine — pick the 3D route. The same rigged mesh plays arbitrary clips at runtime, blends between them through AnimationMixer in Three.js or
animationGroupsin Babylon.js, and supports procedural overrides like IK for foot-on-ground placement. One mesh plus four clips is a fully functional character. - Phaser, a 2D canvas engine, or a tile-based engine — pick the 2D sprite-sheet route. Sprite sheets render at native 2D speed without a 3D pipeline cost, the frame-by-frame animation is exactly what 2D engines are built around, and the asset format (a transparent PNG plus a metadata JSON) is the format every 2D engine expects.
- WizardGenie projects — both routes work because WizardGenie can scaffold either a Phaser game or a Three.js game from a single prompt. Match the chosen route to whichever stack the agent picked for the project, then drop the export into the project asset library and let WizardGenie wire the playback. The platformer walkthrough in the browser platformer guide shows the 2D handoff, and the 3D side is documented in the image-to-3D pipeline post.
- Mixed 2.5D rendering — almost always means run the 3D route first and snapshot it through a sprite-sheet recorder rather than running both pipelines in parallel. Do not double-run; the silhouette consistency comes from a single source-of-truth rig.
The 3D route: image to rigged mesh to text-prompted motion
Open 3D Studio and start in the Generate tab. Drop the source image onto the canvas. The model picker shows the seven image-to-3D models with credit costs and per-model parameter panels. The honest pick depends on the look the game needs and the budget for the character:
- Hunyuan 3D 3.1 — the recommended default at 25 credits per generation. Strong silhouette fidelity, clean PBR textures, and adjustable face count from 40,000 to 1.5 million. The right choice for a hero character that the camera will spend time on.
- Meshy 6 — 50 credits base, 75 with texture, 88 with remesh. The animation-friendliest output: a Force T-Pose flag, a Quad topology option for cleaner edge flow, and a remesh pass that produces uniform polygons the rigger can grab. If the character is going to animate, Meshy 6 with quad and remesh is the safest source.
- Tripo v3.1 — 30 credits without texture, 40 with HD texture. Standout HD texturing detail and a Detailed geometry quality knob that captures fine surface features the other models smooth over. The right pick when the character has visual filigree, armor etching, or detailed cloth folds.
- Rodin 2.0 — 50 credits. The cleanest quad mesh in the lineup with a forced T/A-Pose flag and PBR or Shaded material output. The strongest base for a fully rigged production character.
- TRELLIS / TRELLIS 2 — 8 credits and 35 to 45 credits respectively. The fastest budget option for prototyping; TRELLIS 2 adds a higher-resolution structure pass and a remesh option for cleaner topology. Use these to iterate on character silhouette before committing credits to a longer Meshy or Hunyuan pass.
- Meshy 5 — 31 credits, the older Meshy generation kept available for pose-locked characters where the v6 generation behavior changed.
For animation, turn the Force T/A-Pose flag on regardless of which model you pick. The T-pose exists because every rigging algorithm assumes the limbs are extended along clear primary axes — arms straight out, legs straight down. A character generated in a dramatic pose will rig, but the bone alignment will be off by enough degrees that the Animate tab’s motion clips will read as awkward.
After the mesh lands, switch to the Rig tab. Auto-rigging adds a small flat cost and produces a humanoid skeleton with twenty-something bones in the standard biped layout. Confirm the bone placement on the preview, then move to the Animate tab. The PromptPanel exposes a chat-style input for the motion prompt and ten preset motions — Walk, Run, Jump, Kick, Punch, Wave, Dance, Idle, Sit Down, Crouch — each with a recommended duration. The four sliders below the prompt are Duration (in seconds), Intensity (a strength multiplier on the motion magnitude), Seed (for reproducibility), and CFG Scale (classifier-free guidance, controlling how literally the engine reads the prompt). A typical clip generates in under two minutes.
For a complete character, the standard motion pack is six clips: Idle, Walk, Run, Jump, Attack, and one character-specific (Cast for a wizard, Aim for a ranger, Roll for a rogue). At a few credits per clip, a full motion pack lands well under fifty credits beyond the base mesh cost. Each clip bakes into the mesh as a named animation track so the engine can call it by name at runtime.