Image to 3D Model: From Prompt to Rigged Character

By Arron R.8 min read
Modern image to 3D model reconstruction turns a single 2D image into a fully textured mesh — no multi-angle photogrammetry needed. Sorceress 3D Studio chains it

Image to 3D model conversion is the single biggest unlock in indie game-dev pipelines right now. One AI-generated character portrait, one click, and you have a textured 3D mesh you can rig, animate, and drop into Unity, Unreal, Godot, or Three.js. No turntable photography, no Blender sculpting, no week of weight-painting. This is what the 2026 image-to-3D pipeline actually looks like end-to-end.

Pipeline diagram: image to 3D model to auto-rig to animation, four panels
The complete pipeline: a single image becomes a textured 3D mesh, gets auto-rigged with humanoid weights, and animates from a text prompt.

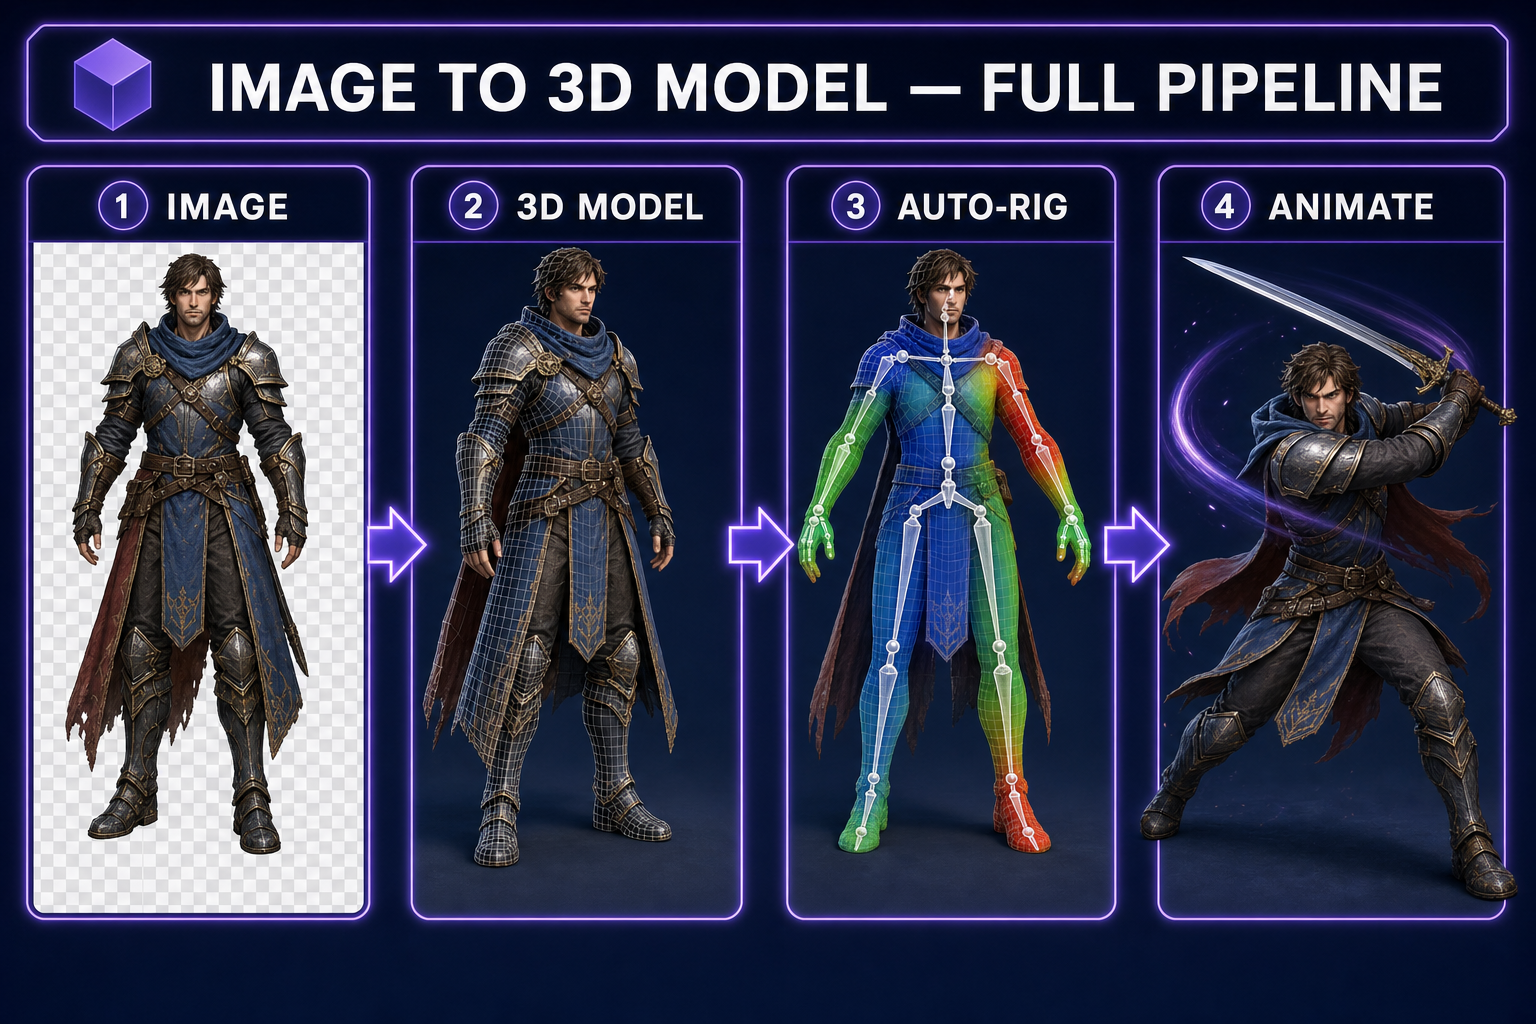
Image to 3D model in 2026

  • Modern image-to-3D models reconstruct a fully textured 3D mesh from a single 2D image — no multi-angle photogrammetry required.
  • The output (mesh + texture + UVs) is the input for the next two steps: auto-rigging and text-to-animation.
  • End-to-end: one prompt → playable rigged 3D character in 3–8 minutes.
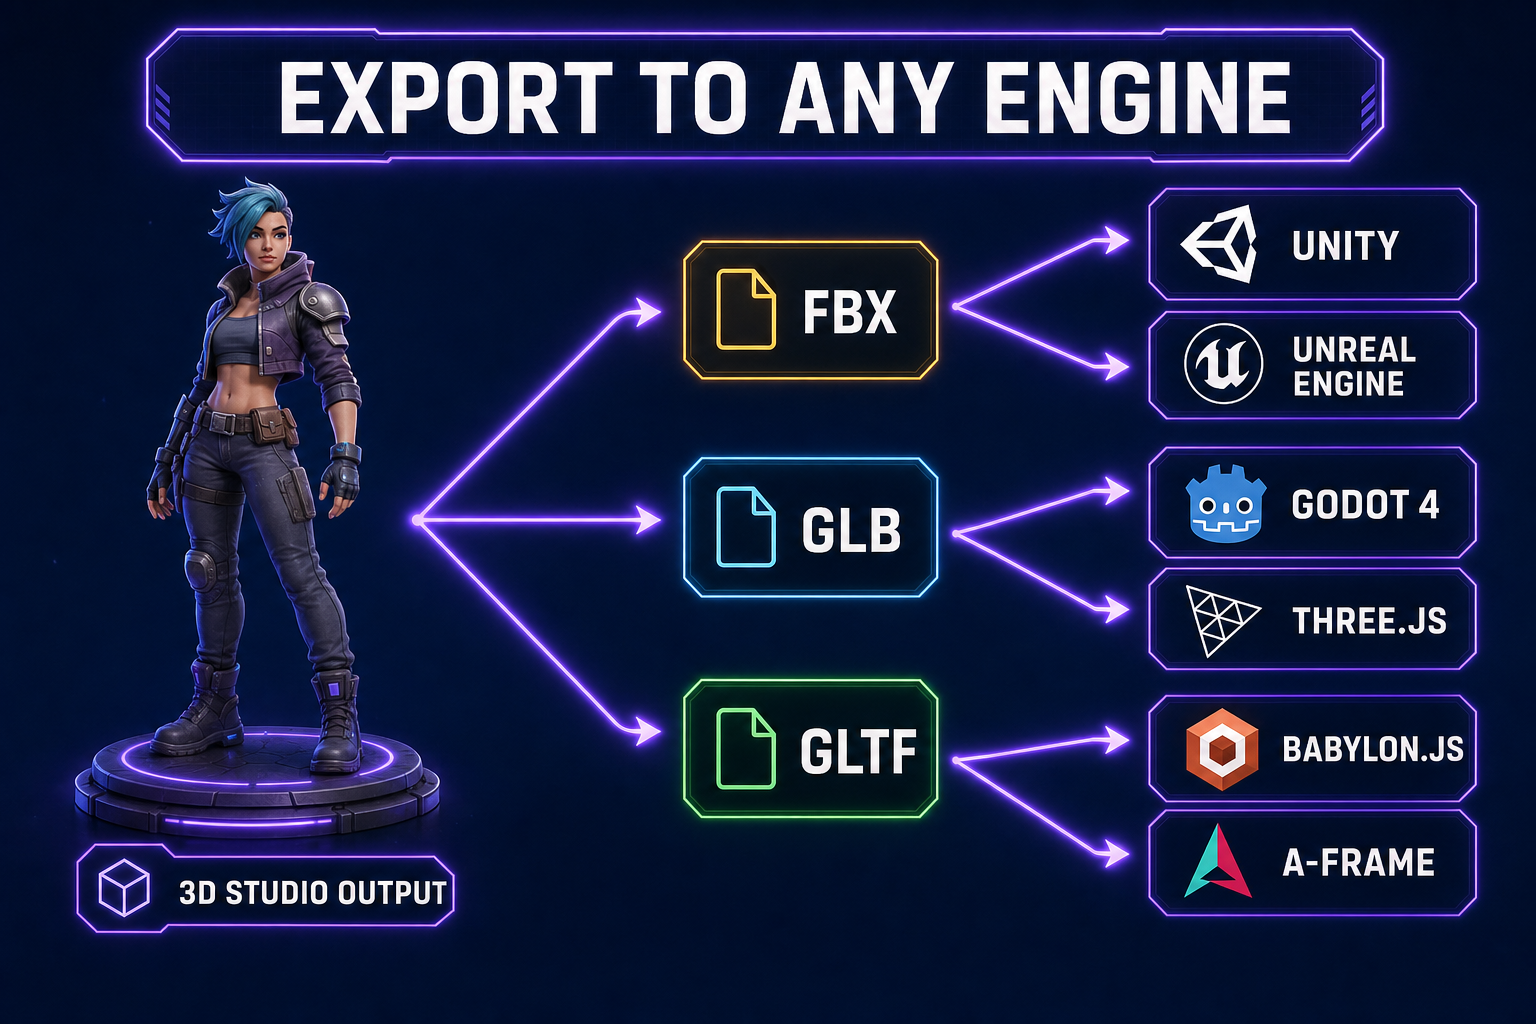
  • Sorceress 3D Studio chains the whole pipeline on one surface: generate, lift to 3D, auto-rig, weight-paint, animate, export to FBX, GLB, or GLTF.

What “image to 3D” actually means in 2026 (and what it doesn’t)

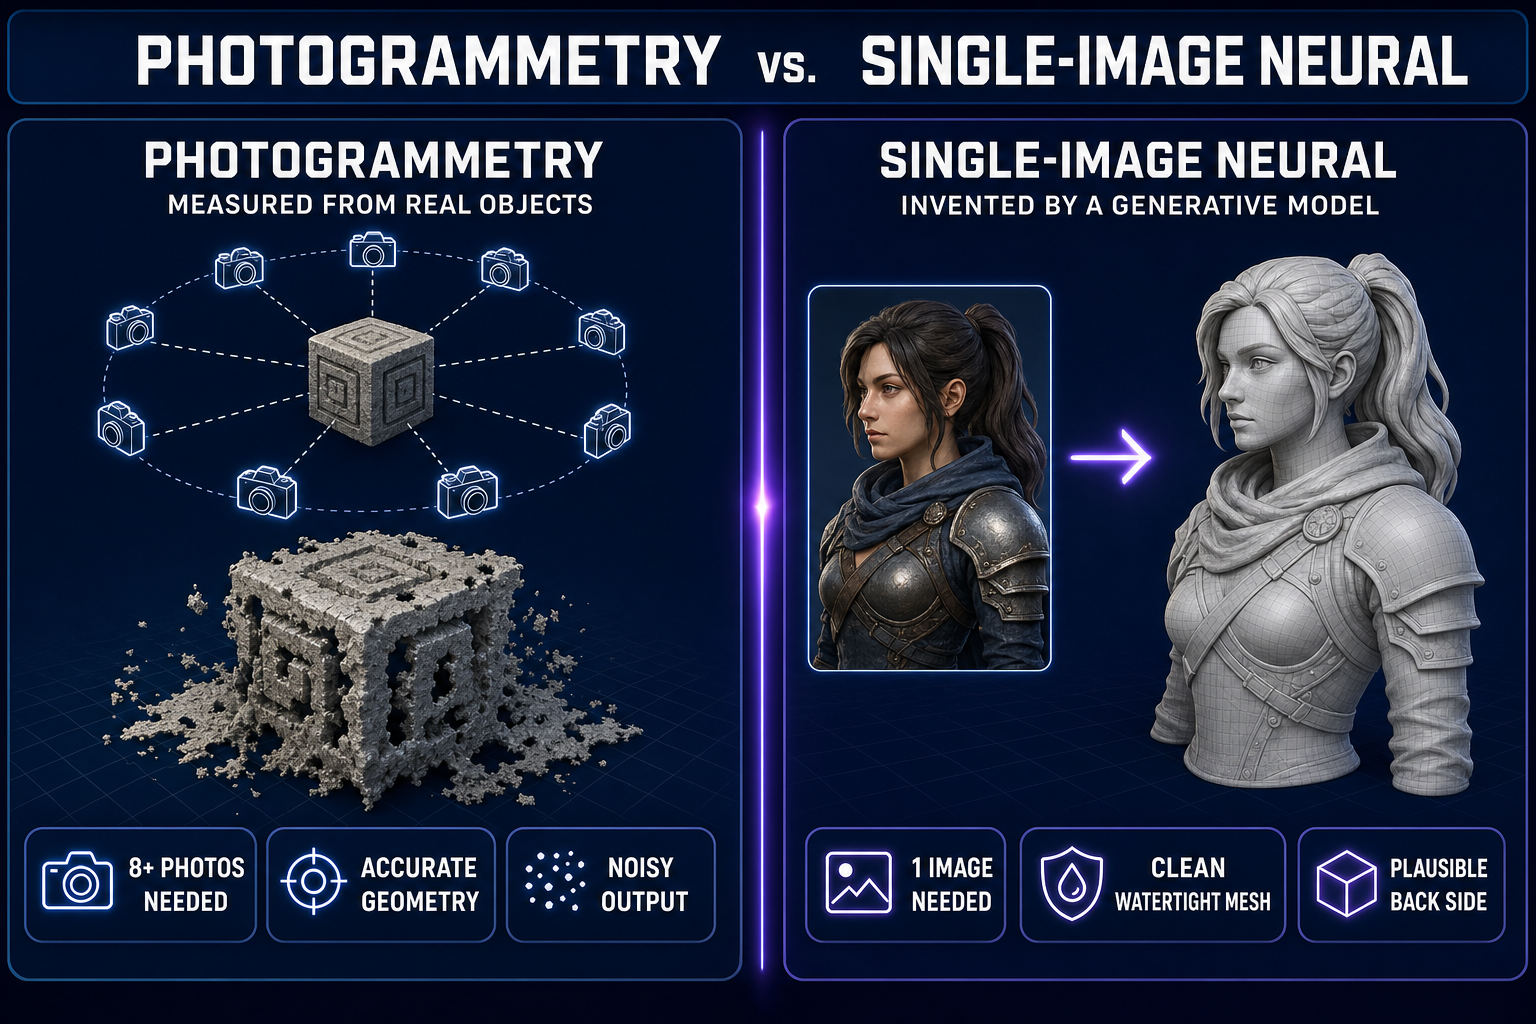
Two different technologies share the name “image to 3D” and they are not the same thing. Knowing which one your tool runs determines what kind of asset you get.

  • Photogrammetry takes many photos of the same physical object from different angles, finds matching feature points, and triangulates a point cloud. The output is geometrically accurate to the real object but typically noisy, hole-ridden, and badly UV-mapped. This is what apps like RealityCapture and Polycam do. It needs ten or more photos and gives you a static prop. Good for scanning real-world reference; bad for clean game assets.
  • Single-image neural reconstruction uses a generative model to invent the back of a character based on a single front-facing image. The output is geometrically plausible rather than measured-accurate, but it’s clean, watertight, and ready for rigging. This is what 3D Studio runs and what most game-dev pipelines now use.

For indie game dev the choice is obvious: you don’t have the back of your character to photograph because you just generated it from a prompt thirty seconds ago. Single-image neural reconstruction is the only thing that works at the front of the pipeline.

Comparison diagram: photogrammetry multi-photo workflow versus single-image neural reconstruction
Photogrammetry needs ten or more photos of a real object. Single-image neural reconstruction invents the back from a single front-facing image — the right tool when the character only exists as a generated portrait.

The Sorceress 3D Studio pipeline (the four-step chain)

Every step of the image-to-3D pipeline lives in 3D Studio. You don’t move between tools, upload exports, or babysit a render queue. The four steps:

  1. Generate the source image. Prompt a character in any of the seven image models in AI Image Gen — the same workflow we covered in our character-generator guide. Pick a strong front-facing portrait. This will become the front face of the 3D model.
  2. Lift to 3D. One click. The image-to-3D model produces a fully textured mesh — geometry, UV-mapped texture, normals — typically in 30–90 seconds. Output is a clean GLB with proper alpha and PBR-friendly materials.
  3. Auto-rig. Identify the character’s silhouette as humanoid (or quadruped), drop a skeleton in, run automatic weight painting to attach the mesh to the bones. Refinable: you can tweak weights manually if a deformation is off, but for most jam-scale work the auto-rig ships clean.
  4. Animate (text-to-animation). Describe what the character should do in plain English (“wave hello”, “draw sword and slash”, “victory pose”). The model produces a keyframe animation on the rig you just built. Stack multiple animations on the same character: idle, walk, run, attack, death.

End-to-end on a humanoid character: 3 to 8 minutes from prompt to fully rigged, animated, exportable 3D character.

From single image to textured 3D model (what the model is actually doing)

The technical details are worth understanding because they tell you when the output will be reliable and when it’ll need cleanup.

  • Geometry generation. The model uses a learned 3D prior — typically a triplane or volumetric representation distilled from a large dataset of paired image-to-3D examples — to predict the shape of the character behind what’s visible in the input. For a clean front-facing reference, this is reliable. For an oblique-angle source, the back of the character is less reliable because the model has less to work with.
  • Texture projection. The texture from the input image is projected onto the front of the mesh. For the back, the model either inpaints plausible texture (fast, sometimes blurry) or generates a new texture using the same model that made the geometry (slower, sharper). Quality varies by model — high-end image-to-3D models in 2026 produce textures sharp enough to ship without retouching.
  • UV mapping. Modern image-to-3D models output a clean UV layout — usually a single UV island for the body. Hand-editable in Blender if you need to optimize for a specific texel density target.

The practical takeaway: if your reference image is a clean, front-facing, full-body shot, the resulting 3D model is usually production-ready. If your reference is partial (just the upper body, oblique angle, occluded), expect to do some manual cleanup or regenerate from a stronger source.

Auto-rigging (the part everyone underestimates)

Rigging is what separates a 3D model from a 3D character. A model is geometry. A character is geometry plus a skeleton plus weight painting that says which vertices follow which bones. Manually rigging a humanoid in Blender is a non-trivial afternoon for an experienced artist; for a beginner, it’s a week.

3D Studio’s auto-rig identifies the character’s silhouette, places a humanoid skeleton (or a procedurally-generated one for non-humanoid shapes — quadrupeds, multi-armed creatures, fantasy bodies), and runs weight-painting using a learned model trained on hundreds of thousands of professionally-rigged characters. The output rig is compatible with any major 3D engine’s animation system.

Practical things to know:

  • Humanoid characters auto-rig the most reliably. The skeleton matches Mixamo / Unity humanoid conventions, so animations from external libraries work out of the box.
  • Non-humanoid creatures (spiders, dragons, fantasy beasts) get a procedurally-generated skeleton that fits the silhouette. Weight painting is solid for hero shots; for extreme poses you may want manual refinement.
  • Weight paint inspection lets you check how each bone affects the mesh. If a deformation looks wrong (e.g. shoulder breaks during arm rotation), you can repaint just that area.

Text-to-animation (game-ready motion from a prompt)

Once a character is rigged, text-to-animation produces a keyframe animation track on that rig from a plain-text description. “Walk forward at a relaxed pace, slight arm swing, looking ahead.” The model interprets the prompt as a sequence of skeletal poses over time and produces a clean animation curve.

Three things this is good for:

  1. Stock animations — idle, walk, run, jump, attack, death. The model knows these well; the output is comparable to a Mixamo clip.
  2. Custom one-off animations — celebration, taunt, transformation, character-specific moves. The model handles these adequately for indie-scale projects; AAA quality may need a manual cleanup pass.
  3. Variations on stock animations — “walk like an injured warrior”, “celebrate but with a small fist pump only”. The text prompt steers the style of the motion within the standard category.

What it’s not good at: complex multi-character interactions, synchronised choreography, or motion that needs to interact with environmental geometry (climbing a specific wall, sitting in a specific chair). For those, you still need motion-captured or hand-keyed animations.

Exporting to your engine (Unity, Unreal, Godot, Three.js)

Export pipeline diagram showing FBX, GLB, and GLTF formats flowing into Unity, Unreal, Godot, and Three.js
Three formats cover every game engine. FBX for legacy AAA pipelines; GLB for modern web and mobile; GLTF for asset-server workflows.

3D Studio exports to three formats. Pick by target engine:

  • FBX — universal compatibility. Works with Unity, Unreal Engine, Godot, Maya, 3ds Max, and Blender. The right export when you don’t know the destination yet.
  • GLB — modern binary glTF. Best for Three.js, A-Frame, Babylon.js, mobile games, and any web-rendered 3D. Smaller file size than FBX and faster to parse on devices.
  • GLTF — JSON-based glTF with separate texture files. Use when you want to inspect or modify the asset post-export, or when your asset server expects component files.

Unity: Drag the FBX into your Assets folder. Unity auto-imports and creates a humanoid Avatar if the rig is humanoid-shaped. Animation clips are imported as separate AnimationClip assets you can drop into an Animator Controller.

Unreal Engine: Import the FBX with Skeletal Mesh selected. UE auto-detects bones; if you’re using Mixamo-style skeletons, retargeting onto the standard UE5 mannequin is one click in the Animation Retargeter.

Godot 4: Drag the GLB or GLTF into the project. Godot imports it as a single .scn scene file containing the rigged character and animation tracks. Drop into your level and call play() on the AnimationPlayer.

Three.js: Use GLTFLoader to load the GLB. The loaded scene contains a SkinnedMesh and an AnimationMixer. mixer.clipAction(clip).play() and you’re rendering animated 3D in your browser.

When image-to-3D isn’t the right approach

Three cases where you’d skip the AI pipeline and use traditional tools instead:

  • Architectural-scale assets. Whole buildings, environments, terrains. Image-to-3D handles characters and props well; for environments, you want procedural generation tools (or hand-built blockouts).
  • Mechanical assets needing precise dimensions. A working firearm with accurate bolt-action geometry, a vehicle with measured wheelbase. Image-to-3D produces plausible-looking versions of these but not measured-accurate ones.
  • Stylized assets requiring a specific art-direction match. Shipping a game where every prop needs to match a hand-painted style guide. AI 3D tends to produce generic results; for tight art direction you’ll want a human modeler or a heavy art-direction reference workflow.

Frequently Asked Questions

Can I convert any image to a 3D model?

Most front-facing character images and many prop images convert reliably. Side-view-only or partial-body images convert but with reduced accuracy on the unseen side. Heavily stylized images sometimes confuse the model — a more naturalistic reference works better.

What format does the 3D model export in?

3D Studio exports to FBX, GLB, and GLTF. FBX for legacy / AAA engine pipelines, GLB for modern web and mobile, GLTF for component-file workflows. All three include the rig and animations if you've added them.

Is the output good enough for a real shipped game?

For indie and mid-scale games, yes. The geometry is clean, the textures are decent, and the rig is compatible with standard engine animation systems. AAA studios may use the output as a base mesh and refine in dedicated DCCs, but for a Steam-shipping indie game the result is shippable as-is.

How big are the exported 3D files?

A typical rigged humanoid character with one or two animation clips exports at 5–20 MB as a GLB. FBX is usually a bit larger because it stores texture data uncompressed. For mobile games, GLB with compressed textures is the right target.

Does this work for non-humanoid creatures?

Yes. The geometry pipeline handles arbitrary silhouettes — quadrupeds, dragons, multi-armed creatures, fantasy beasts. The auto-rig uses a procedurally generated skeleton fitted to the silhouette rather than a fixed humanoid template.

Sources

  1. glTF (Wikipedia)
  2. FBX (Wikipedia)
  3. Photogrammetry (Wikipedia)
  4. Three.js Documentation
  5. Skinning (computer graphics) (Wikipedia)
Written by Arron R.·1,836 words·8 min read

Related posts