AI Character Generator: Stay On-Model With Reference Images (2026)

By Arron R.9 min read
An AI character generator's job is to produce a consistent cast, not just one image. The on-model problem is solved with reference images, not better prompts. L

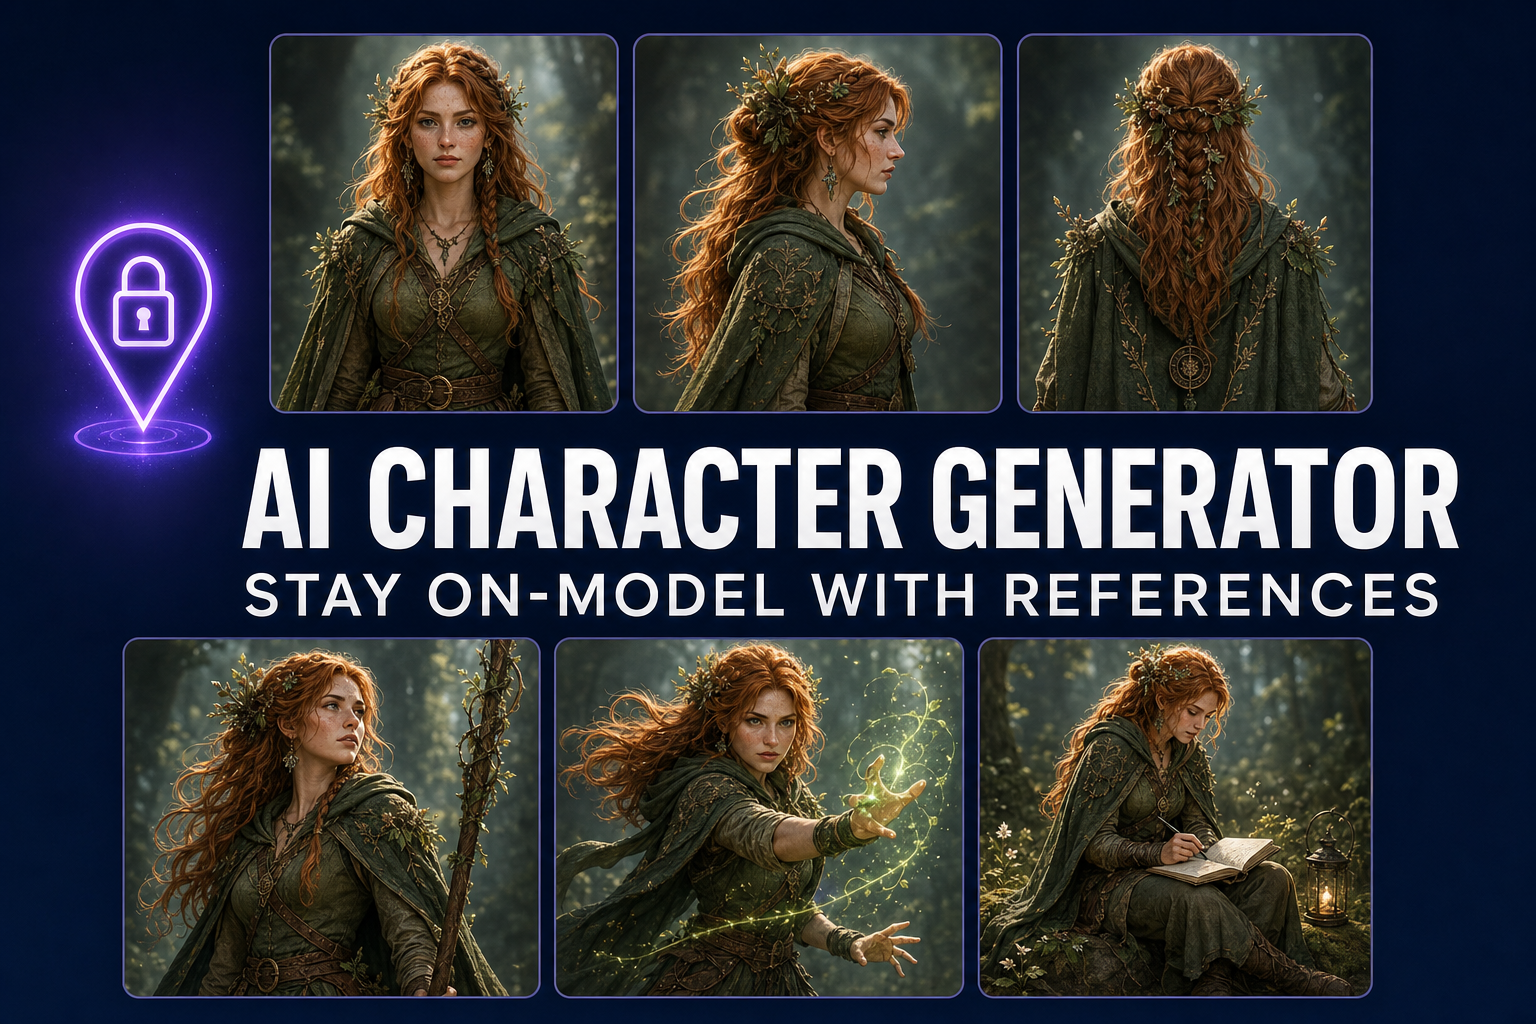
An AI character generator is the easiest way to design a hero, villain, NPC, or pet companion in 2026 — except for one annoying problem: the second render almost never looks like the first. Solving that — keeping the same character on-model across every angle, expression, and outfit — is the single biggest win you can make in your asset pipeline. This is the practical guide.

Diagram of an AI character generator workflow: prompt, generate, reference-lock, consistent model sheet
The four-step AI character generator workflow that actually produces consistent results: prompt, generate, reference-lock, model sheet.

What an AI character generator does well in 2026

  • The job of an AI character generator isn’t just to spit out one character — it’s to produce a consistent cast you can ship.
  • The “on-model” problem (every render looks like a different character) is solved with reference images, not better prompts. Every flagship model in 2026 supports them.
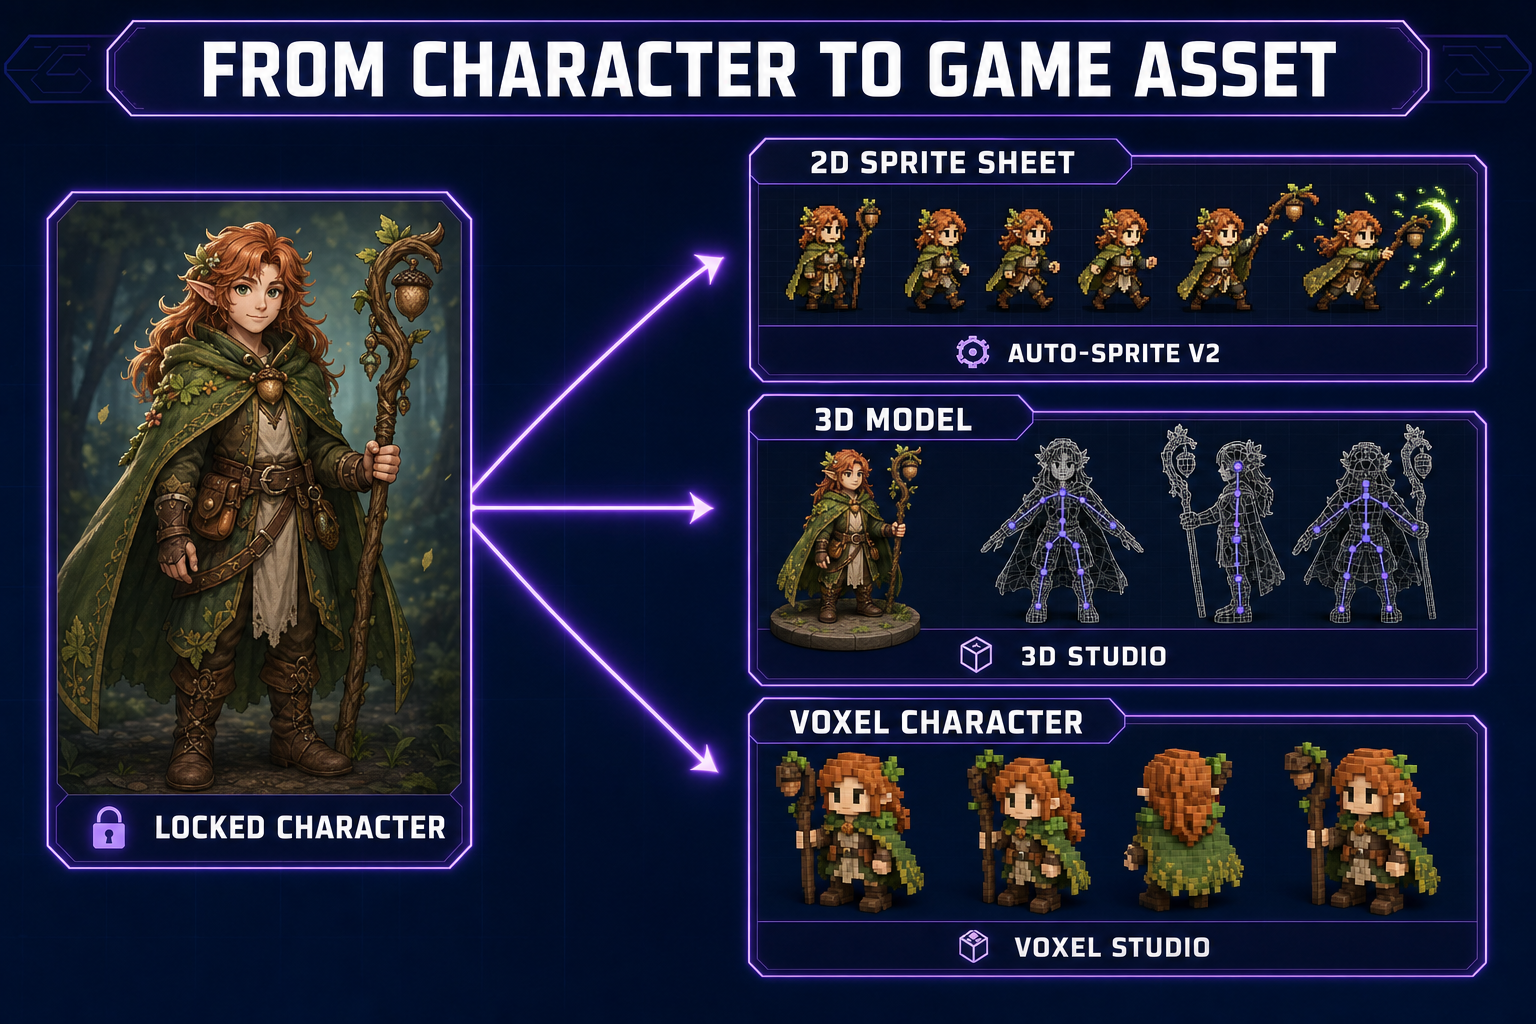
  • For game-dev specifically, the right pipeline is: prompt → reference-locked turnaround → 2D sprite or 3D model → animation. Each step keeps the same character across renders.
  • The model that wins for character work changes by use case. We rank all seven below.
  • The fastest path: open Sorceress AI Image Gen, prompt with a reference, and lock the character in under five minutes. Then push the model sheet straight into Auto-Sprite or 3D Studio.

The “on-model” problem (and why it kills most AI character generator projects)

Here’s the failure pattern that derails almost every first attempt at a character workflow. You write a great prompt — “a stoic elven ranger with silver hair, a dark green cloak, and a bow.” The model produces a render. You love it. You prompt again for the same character running, and the silver hair is now darker, the cloak is now teal, and the elf has subtly different cheekbones. Generate twenty times and you have twenty different characters who all loosely resemble your prompt.

This is not a prompting problem. Even the most carefully constructed prompts hit the same wall: the text is too low-bandwidth to fully specify a face. There are millions of plausible elven rangers with silver hair and a green cloak. The model picks one each time. You’ll never prompt your way out of this.

The fix is to give the model an actual image as a constraint, not just text. That’s reference-image conditioning, and every flagship model in 2026 supports it natively. Once you have one canonical render of your character, every subsequent render uses it as the source-of-truth for face, hair, outfit, and color palette.

The reference-image fix (how to lock a character so it stays on-model)

Side-by-side comparison of off-model AI character generator outputs versus on-model outputs locked with a reference image
Left: text-prompt-only outputs. Same prompt, four different characters. Right: same prompt with one locked reference image. Same character, four different poses.

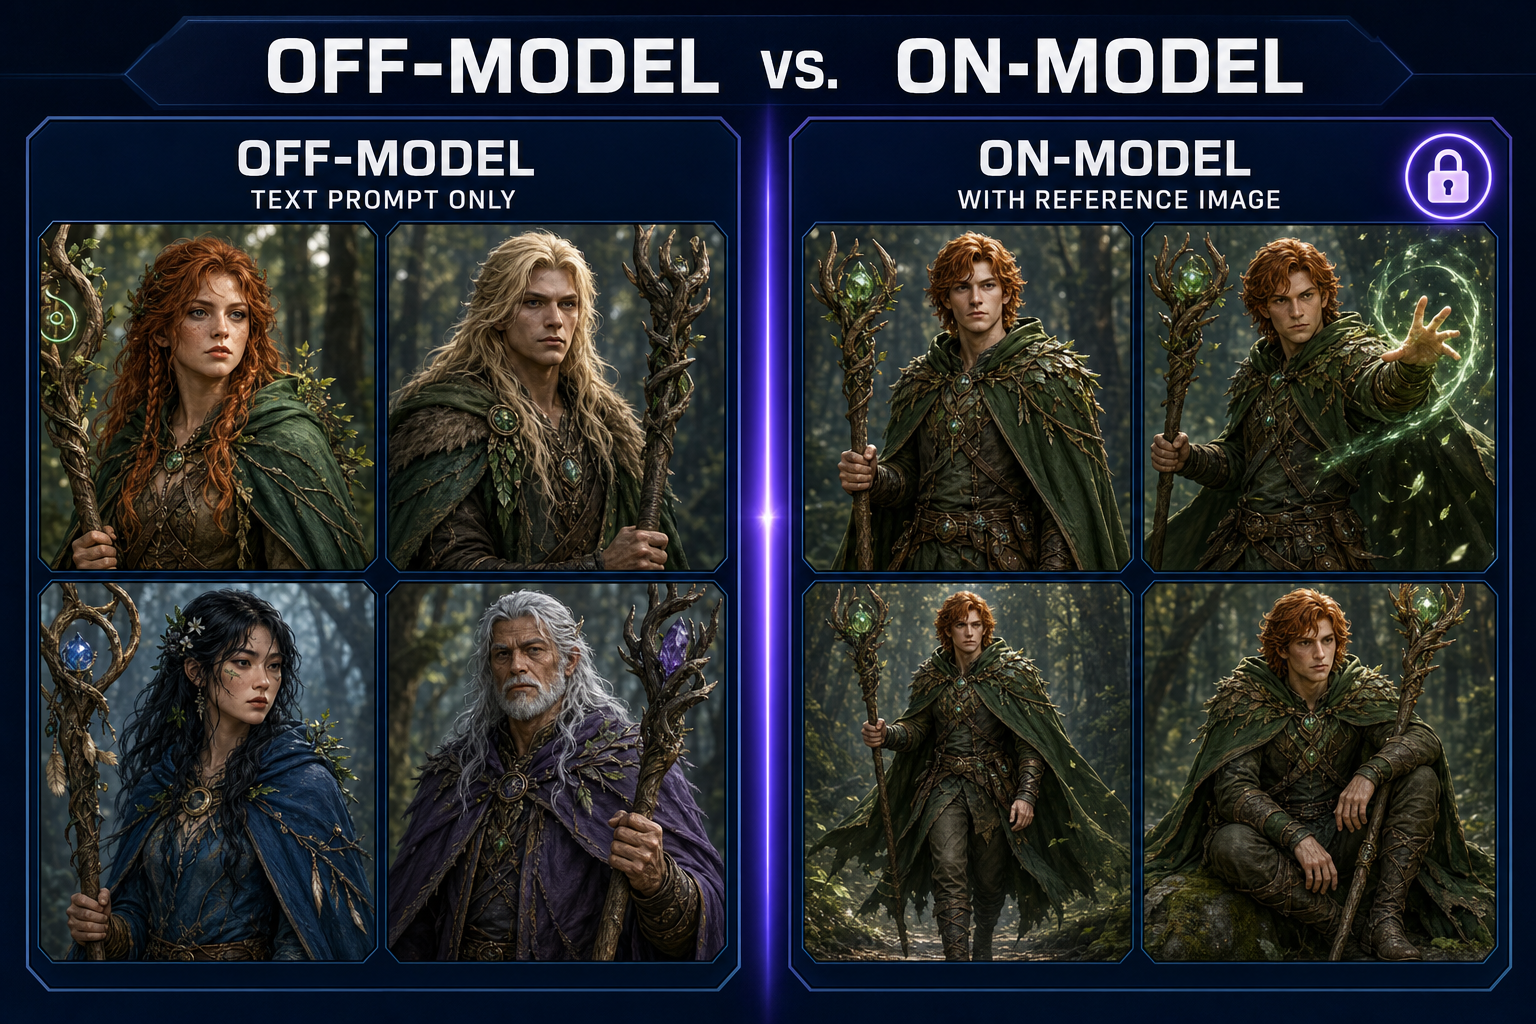
The mechanic is simple. You generate one canonical render — the “hero shot” — and then attach it as a reference image for every subsequent generation. The model uses the reference for identity (face, hair, body type, signature outfit details) and the prompt for what’s changing (pose, expression, lighting, environment).

Three things to know about reference-locking:

  1. The reference image quality compounds. A bad hero shot produces twenty bad downstream renders. Spend extra time on the hero shot specifically — generate ten variations and pick the one with the cleanest face and the most distinctive silhouette. That investment pays off across hundreds of subsequent generations.
  2. Some models reference better than others. Nano Banana Pro and GPT Image 2 are the strongest at character identity preservation. Flux 2 Pro is excellent at outfits and props but sometimes drifts on faces. Z-Image Turbo is fast but less reliable for tight identity matching.
  3. Multiple references stack. You can attach two or three images at once — for example, your hero shot plus an outfit reference plus a style reference. The model blends all three. This is how you build characters with specific costumes and consistent rendering treatments simultaneously.

Sorceress AI Image Gen treats reference images as first-class. You can drag in any image — including outputs from a previous generation — and pin them as references for the next batch. Multiple references, accent prompts per reference, and saved collections for grouping a character’s full reference set.

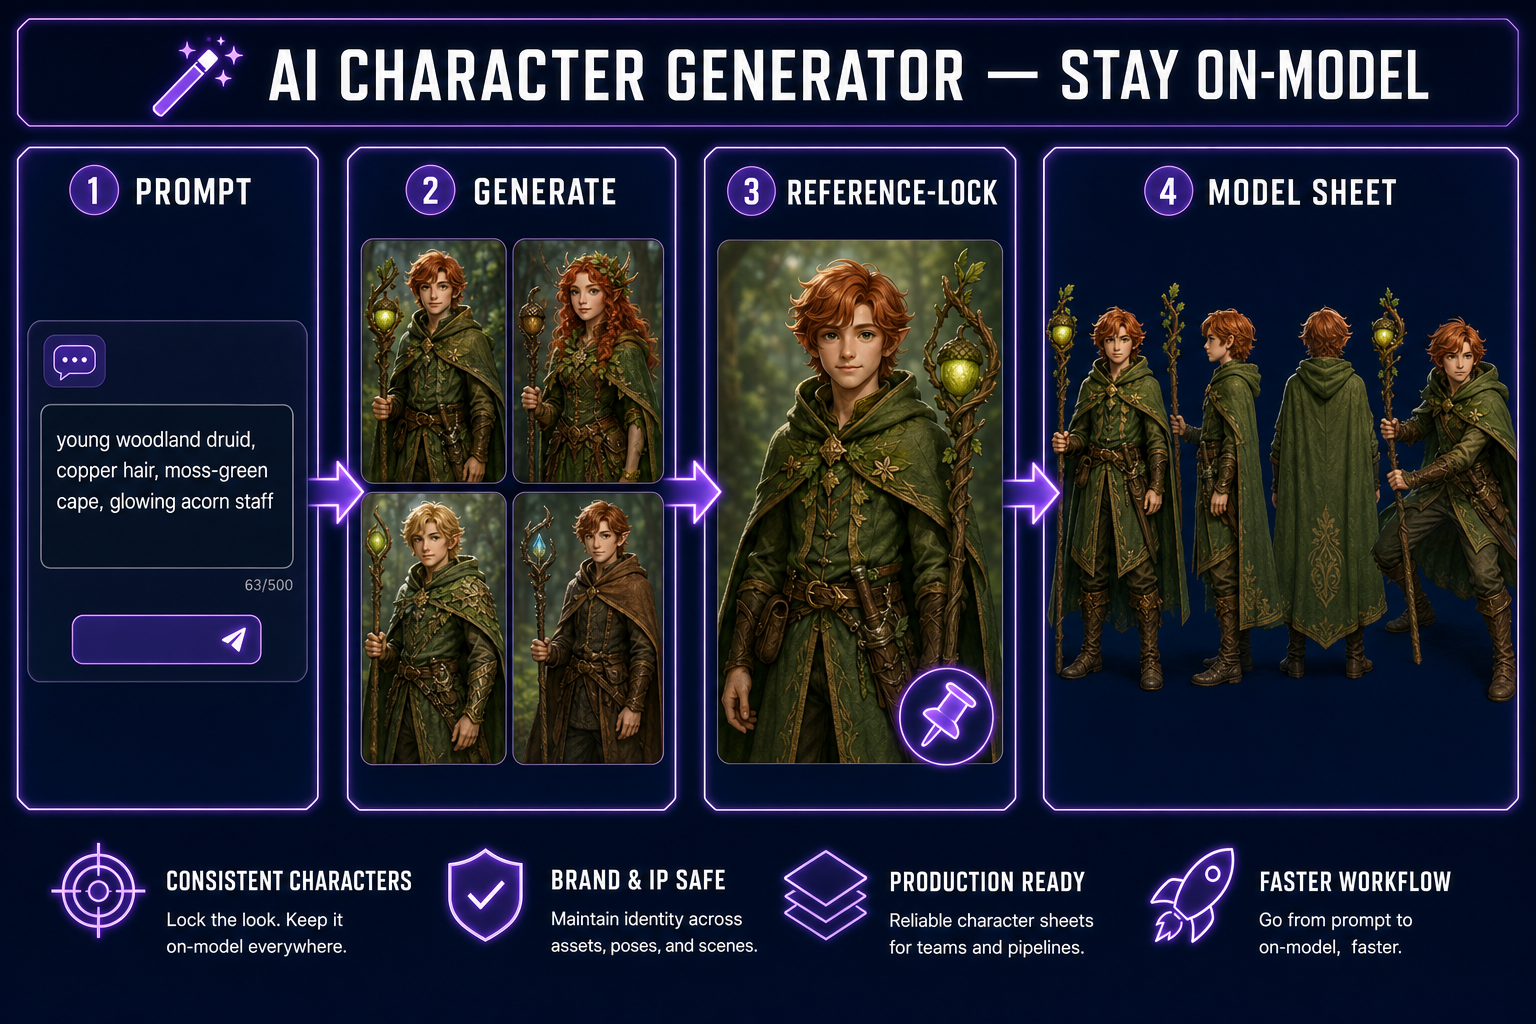
Step-by-step: build a hero character that stays on-model

Here’s the actual playbook we run. Total time: eight to twelve minutes for a complete locked-down character.

  1. Write the spec. Two or three sentences describing the character — species/type, distinctive features, costume, color palette, mood. Keep it narrow. “A young woodland druid with copper hair, freckles, a moss-green cape with a leaf-patterned hem, and a wooden staff topped with a glowing acorn.” Pin this as your spec — every prompt going forward references it.
  2. Generate the hero shot. Prompt: spec + “front-facing portrait, neutral pose, even studio lighting, full body visible, white background.” Pick a strong model — Nano Banana Pro or GPT Image 2 are both excellent. Generate eight variants. Pick the one with the cleanest face, sharpest silhouette, and most distinctive features. This is your reference.
  3. Build the model sheet. Attach the hero shot as a reference. Run four more generations with the same spec, varying only the pose: “side profile facing right”, “back view”, “three-quarter view”, “action pose mid-step”. You now have a five-view turnaround. This is what professional studios call a “model sheet” — the canonical reference document an artist would use to draw the same character in any context.
  4. Build expression and outfit variants. Same approach: keep the hero shot as reference, change one variable per prompt. “Smiling”, “angry”, “casting a spell”, “winter coat outfit”. Save these as a collection labeled with the character’s name. You’re building a character bible the AI can stay consistent against.
  5. Test stress poses. The acid test for on-model: prompt for something extreme. “Falling backwards mid-air, panicked expression, staff flying away.” If the character is still recognizable, you’ve successfully locked it. If not, the hero shot wasn’t strong enough — go back to step 2 and pick a different one.

The whole pipeline lives in one panel in AI Image Gen — references, collections, batch generation, and model switching are all on the same surface. There is no upload-export-reupload step.

Best AI image models for character work in 2026 (ranked)

Sorceress AI Image Gen ships seven models. They’re not interchangeable for character work specifically. Here’s how each one earns its slot in the picker:

  • Nano Banana Pro — best overall for character generators. Strongest at preserving facial identity from a reference. Use for hero shots, model sheets, and any time identity matters more than rendering speed.
  • GPT Image 2 — best for photorealistic characters and complex environments around them. Slightly slower than Nano Banana Pro but produces tighter detail in clothing and props. Use when the character needs to be in a specific scene, not on a white background.
  • Nano Banana 2 — fast and sharp. Use for batch-generating expression sheets after the character is locked. Half the cost of Nano Banana Pro at a small quality cost.
  • Flux 2 Pro — best for stylized character art (anime, Saturday-morning cartoon, hand-painted). Identity preservation is decent but not the strongest. Lock the character first on Nano Banana Pro, then re-render in Flux 2 Pro for stylized variants.
  • Seedream 5 Lite — uncensored. Useful for mature-rated game characters that other models refuse to generate. Same reference-image workflow as the others.
  • Z-Image Turbo — fastest in the picker. Use for rapid concept-stage exploration before committing to a hero shot. Don’t use for the final lock — identity preservation is weaker.
  • Grok Imagine — most “creative” interpretation of prompts. Often produces the most striking single image but is the least faithful to references. Use for inspiration, not consistency.

The rhythm we use: Z-Image Turbo for ten quick concept rolls, Nano Banana Pro to lock the hero shot, then Nano Banana 2 for the high-volume expression and pose sheet. Total cost on a full character is typically under a dollar in API tokens.

From character to game asset (animation, sprite, 3D)

Pipeline diagram showing AI character generator output flowing into 2D sprite, 3D model, and voxel
Once a character is locked, the same reference flows into every downstream asset path: sprite, 3D model, voxel, animation.

The model sheet you just built isn’t a deliverable — it’s the input to everything else. Three pipelines fan out from it:

  1. 2D sprite sheet. Push your hero shot into Auto-Sprite v2: it animates the still with AI video and converts the resulting clip into a clean game-ready sprite sheet. Same character, idle/walk/attack/jump frames. Vibe-coding a 2D platformer? This is your hero sprite.
  2. 3D model. Drop the hero shot into 3D Studio: it produces a textured 3D model, auto-rigs a humanoid skeleton, and lets you describe animations in plain text. Export to FBX, GLB, or GLTF. Same character, now a fully rigged 3D actor.
  3. Voxel character. Push the hero shot into Voxel Studio for a Minecraft-style or chunky-pixel-look version of the same character. Auto-rigged for humanoids, prompt-driven animation.

Each path keeps the character on-model because each path takes the same locked reference as input. The character bible you built in step 4 above is doing the heavy lifting at every downstream step.

What about pixel-art and stylized AI character generators?

The same workflow applies, with one extra layer. Pixel-art and other stylized treatments work best as a final pass on a locked character, not as the initial generation. Generate the character at full resolution in a clean style first, then use True Pixel to convert to pixel-art with palette control. The result is the same character now in pixel-art, with consistent palette and silhouette. Trying to generate pixel art directly tends to drift; converting from a locked source is far more reliable.

Common AI character generator mistakes

Five issues we see repeatedly, easy to avoid once you know to look for them:

  • Skipping the hero-shot step. Going straight from prompt to “ten poses” without locking a single canonical render. Every render drifts because there’s nothing to anchor against.
  • Over-detailed prompts. Writing a 200-word prompt with thirty descriptors. The model will pick five at random per generation. Keep prompts under thirty words and use the reference image to carry the rest.
  • Not using collections. Treating each generation as independent instead of part of a character set. The reference loop only works if you’re systematically building a library.
  • Wrong model for the wrong stage. Trying to lock identity on Z-Image Turbo because it’s fast. Speed doesn’t help if the output drifts. Use Z-Image Turbo for exploration only.
  • Treating outputs as final. The first locked character is rarely the best one. Generate, inspect, and re-pick the hero shot if anything looks weak. Sunk-cost fallacy is the biggest enemy of a good character bible.

Frequently Asked Questions

What's the best free AI character generator?

Most free AI character generators have either limited model selection, watermarks, or a tight token cap. Sorceress AI Image Gen runs every flagship model behind a single panel; you pay per generation but the per-image cost on Z-Image Turbo for concept work is fractions of a cent. For a one-off character bible the total cost is typically under a dollar.

Can I use AI-generated characters in a commercial game?

Yes — but verify the license terms of the specific model you used. Most major models in the Sorceress picker (GPT Image 2, Nano Banana, Flux) explicitly allow commercial use of generated outputs. Always read the current terms before shipping.

How do I make my AI character look the same in 2D and 3D?

Lock the character with a hero shot first, then feed that same image into both the 2D pipeline (Auto-Sprite) and the 3D pipeline (3D Studio). Both tools accept reference images. The character will preserve identity across both representations because both started from the same source.

Why does my AI character generator keep ignoring details from my prompt?

Prompt-only generation hits a complexity ceiling fast. Once you describe more than a few features in detail, the model starts dropping some at random. The fix is to encode those details in the reference image. Generate one image where the model nailed the descriptors you care about, then use it as a reference for everything else.

Do I need different reference images for different angles?

One strong front-facing reference is usually enough — the model can extrapolate side and back views from it. For especially complex outfits or non-humanoid characters, attaching two references (front and side) noticeably improves consistency on the back view.

Sources

  1. Model sheet (Wikipedia)
  2. Diffusion model (Wikipedia)
  3. Character design (Wikipedia)
  4. Image-to-Image Translation: Methods and Applications (Pang et al., 2021)
Written by Arron R.·2,078 words·9 min read

Related posts