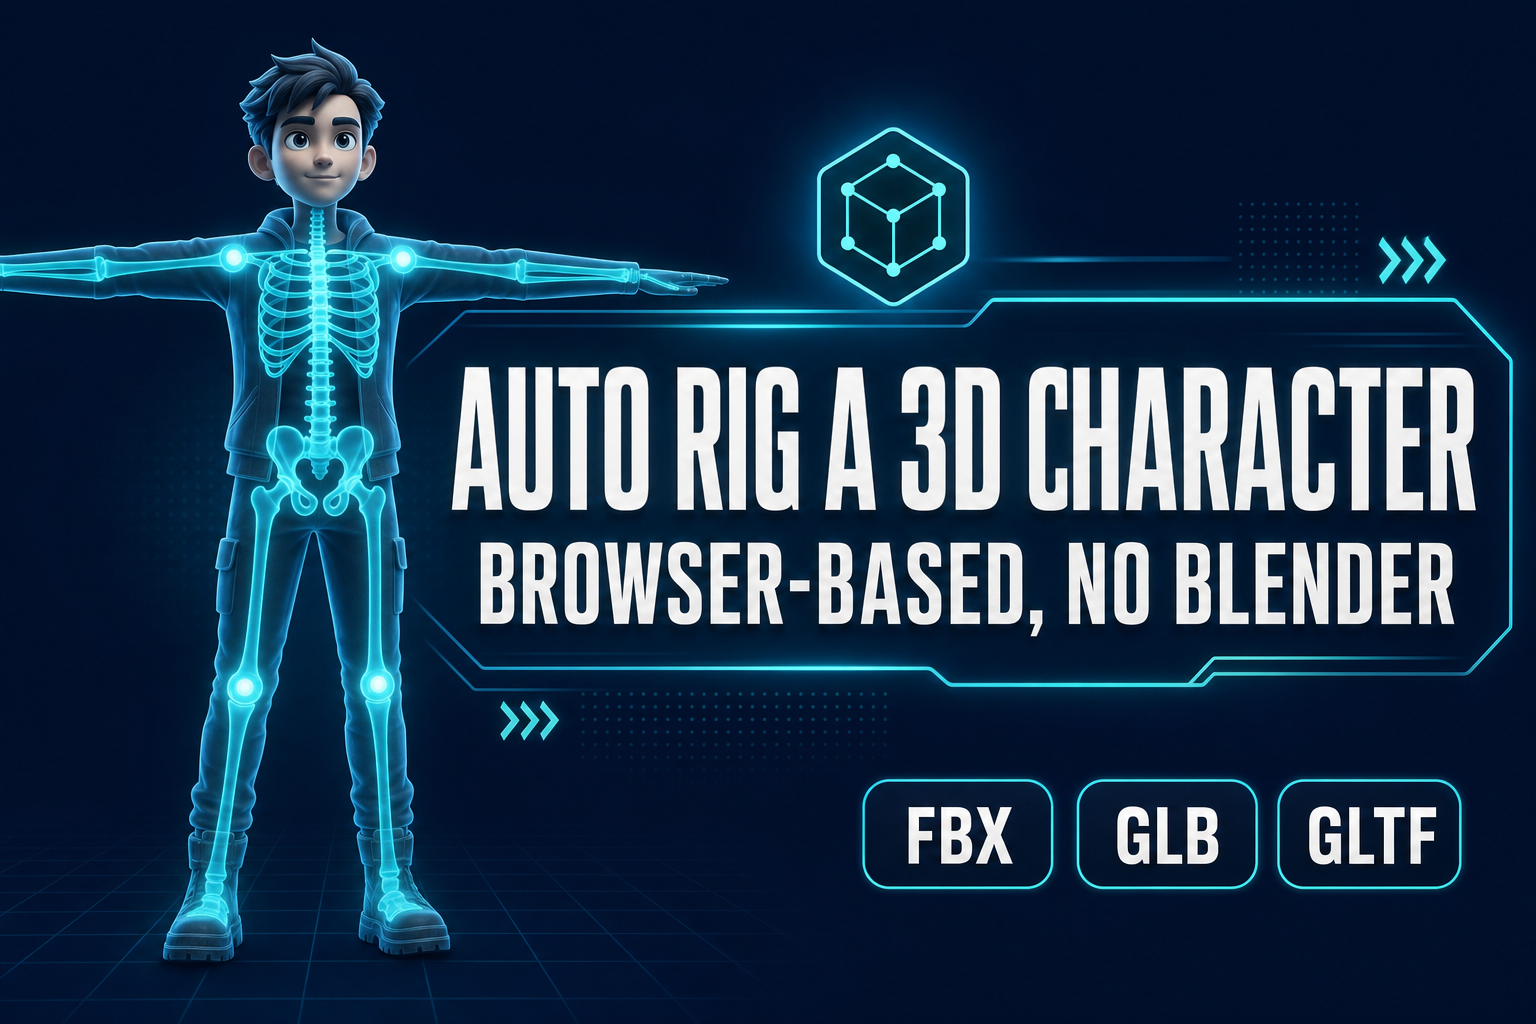
A static 3D character mesh is a sculpture, not a rig. The model has every triangle the engine needs to render the silhouette, but no skeleton inside it, no skin weights binding the geometry to that skeleton, and no way for the engine to play an animation clip. Drop the mesh into Phaser, Three.js, or any other 2D-or-3D engine and it shows up as a frozen statue. The fix is an auto rig — a one-click pipeline that infers a humanoid skeleton from anatomical landmarks, binds every vertex of the mesh to the right bones with the right weights, and produces a skeletal asset ready to drop into any animation system. This guide walks the full browser-based pipeline inside the Sorceress Auto-Rigging tool, the prompt-to-rig shortcut inside 3D Studio when you do not have a mesh yet, and the three failure modes that account for almost every bad rig.
The auto rig pipeline at a glance
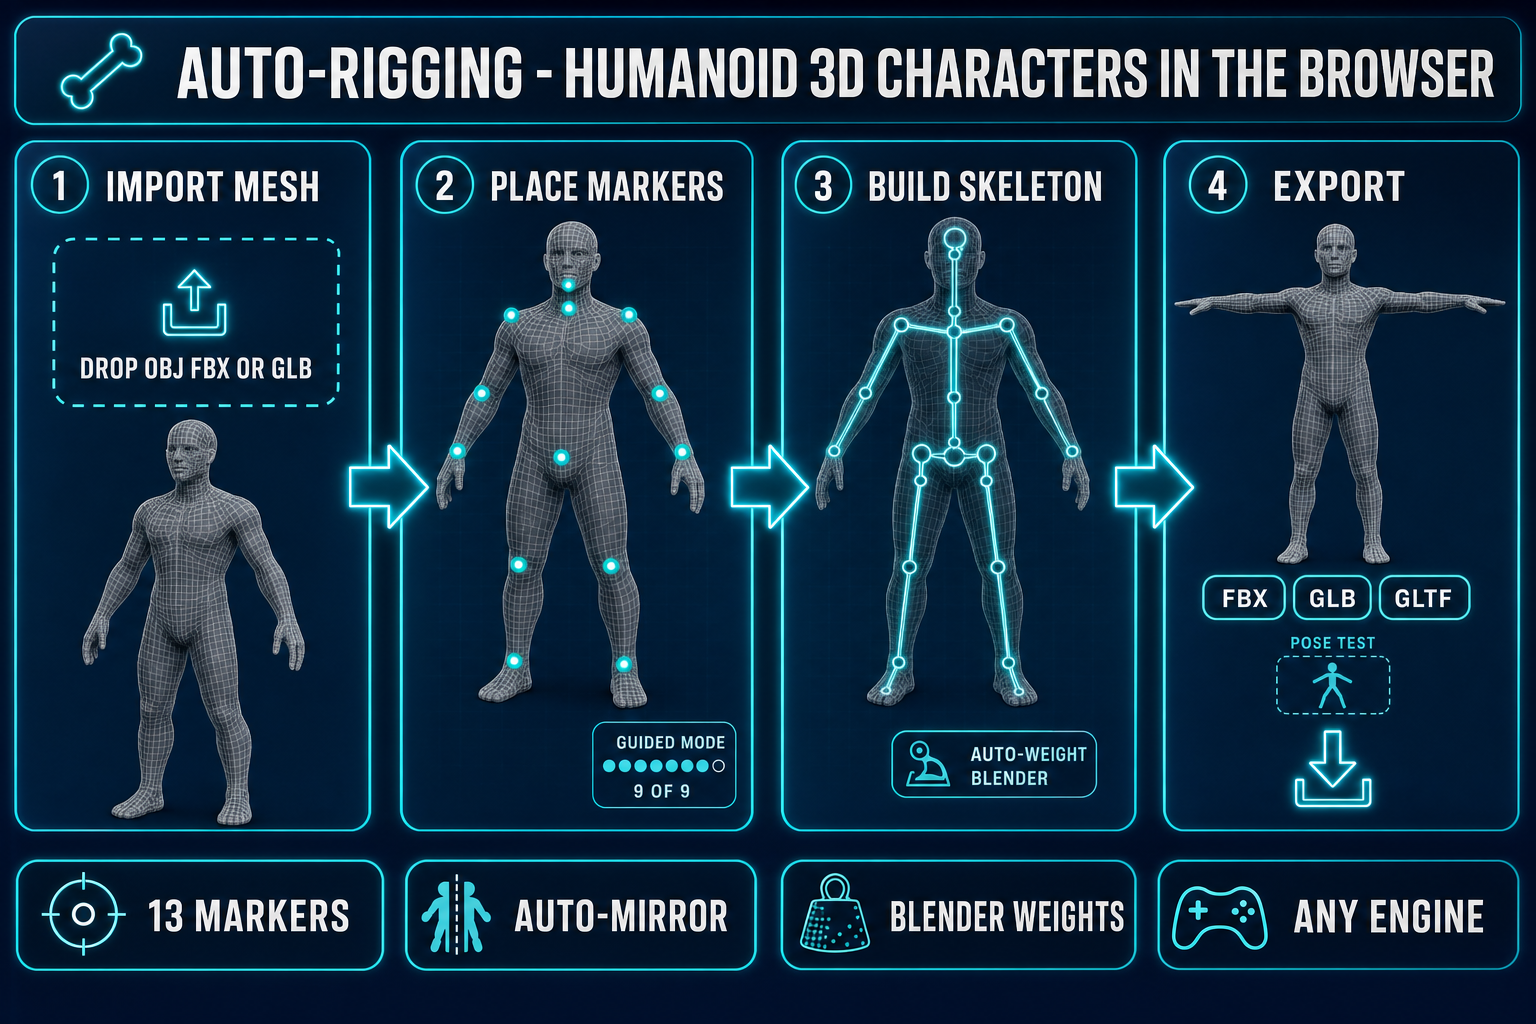
The whole pipeline collapses to five steps once the mesh is in the browser. Five steps, one tab, no Blender install:
- Import the mesh. Drop an OBJ, FBX, or GLB file into the upload zone. The tool parses geometry, normals, and UVs into a working buffer; any existing skeleton in an FBX is ignored, only the static surface is kept.
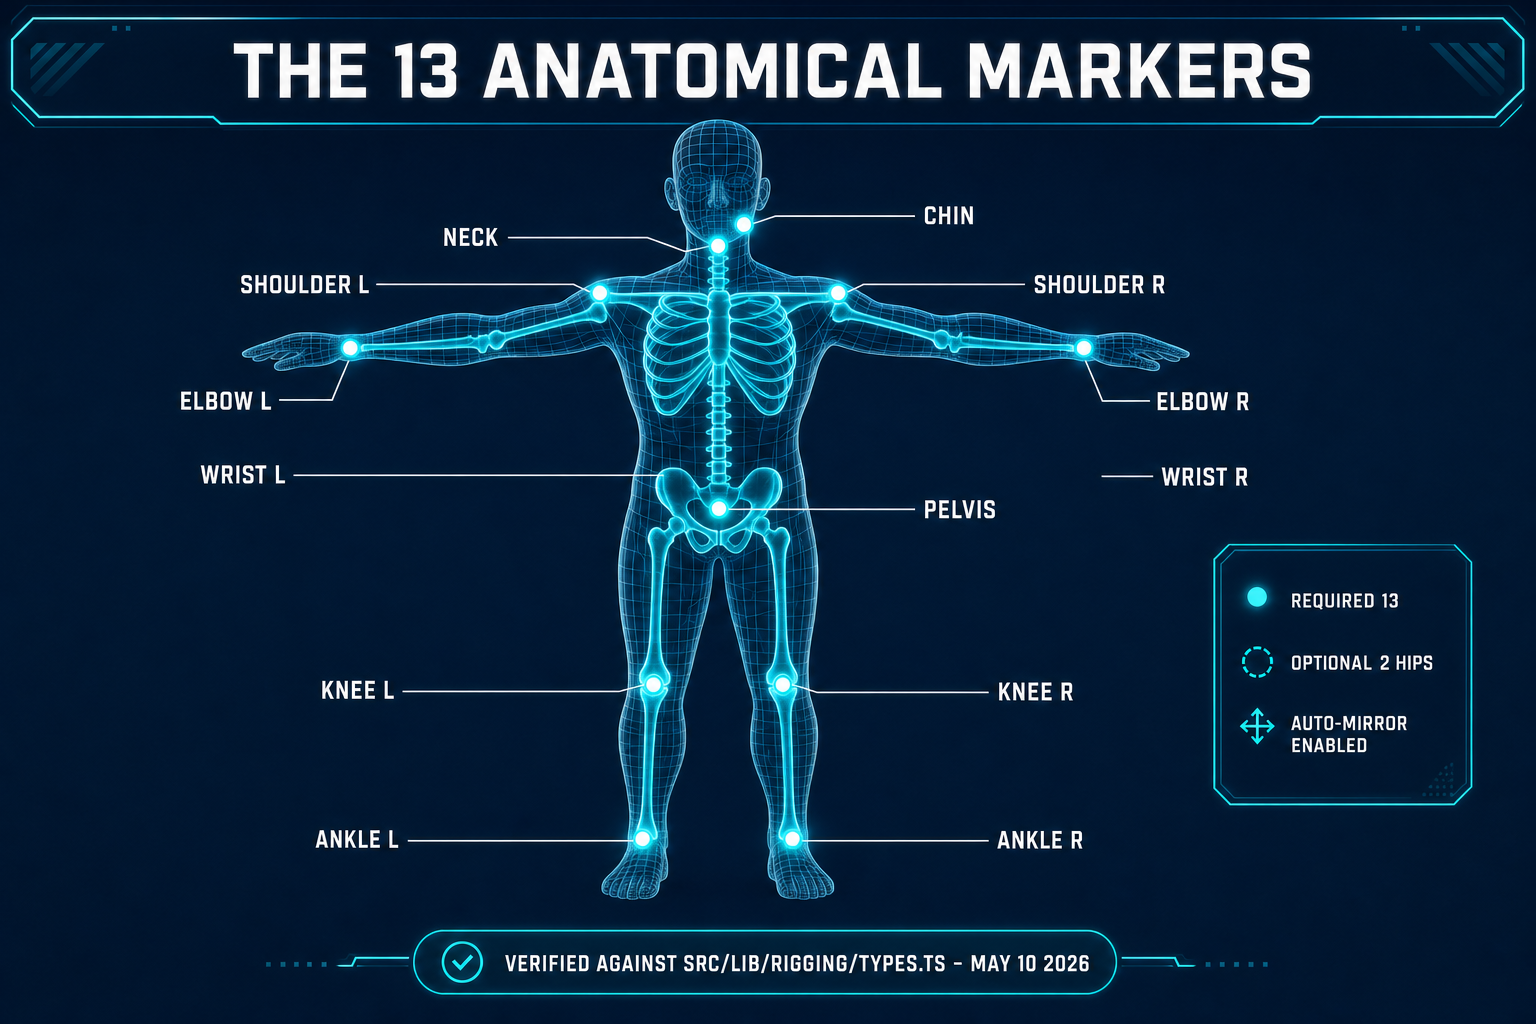
- Place 13 markers. Click 13 anatomical landmarks on the mesh: pelvis, neck, chin, the two shoulders, elbows, wrists, knees, and ankles. Guided mode walks the order and auto-mirror copies each left-side click to the right side, so a confident user is done in about a minute.
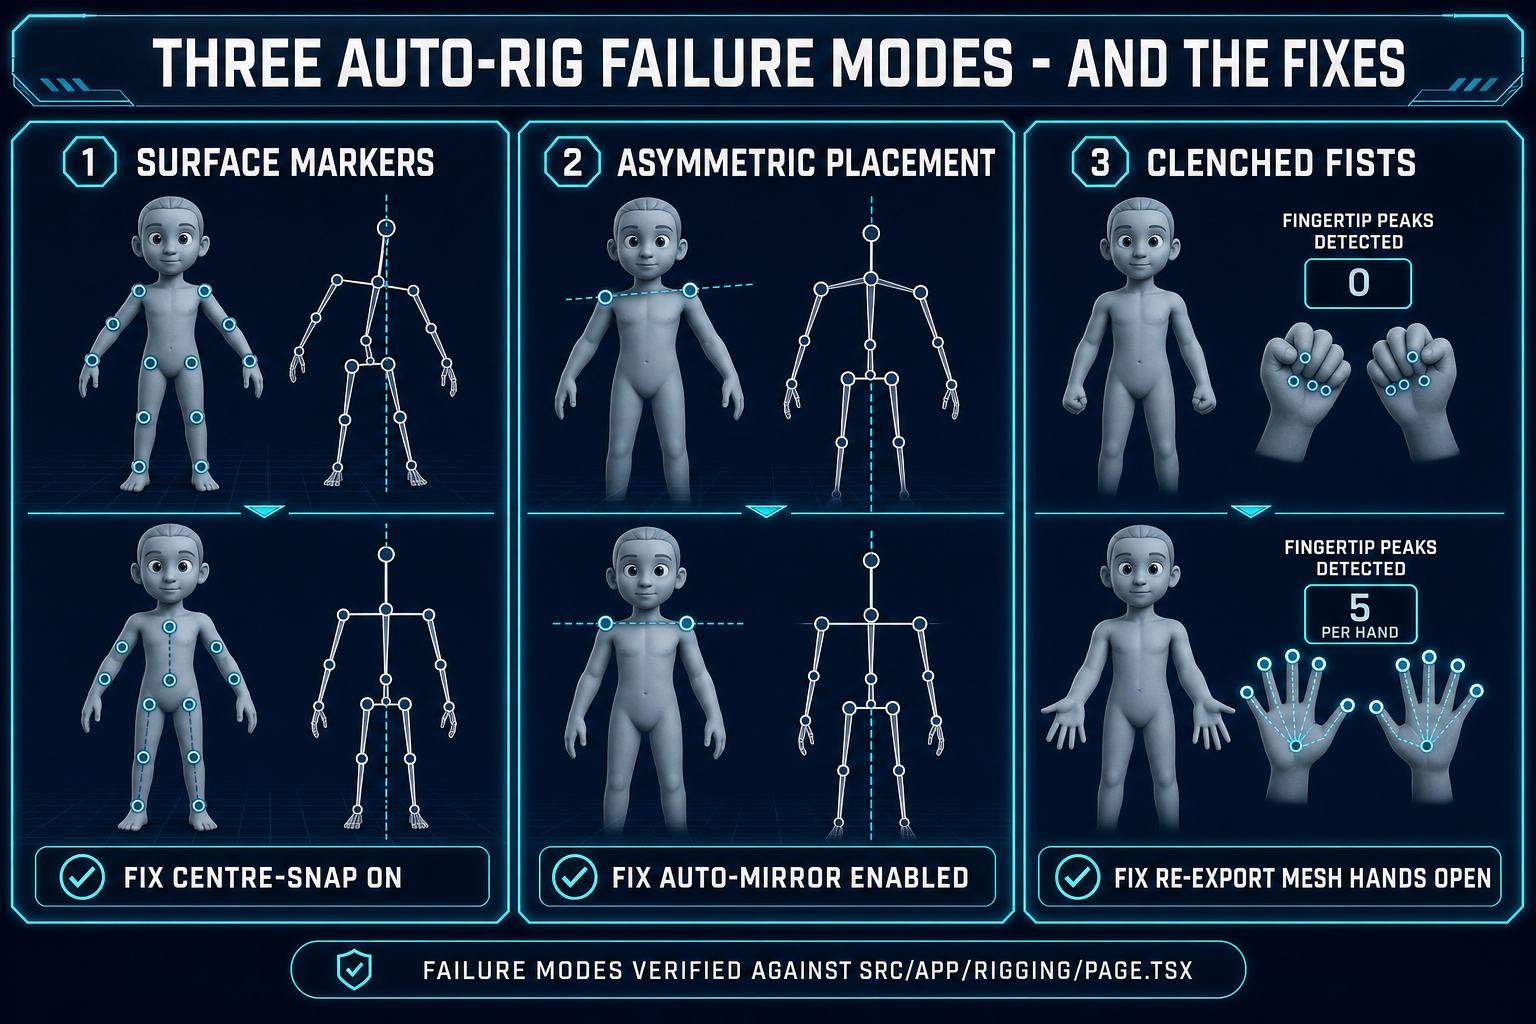
- Detect fingers (optional). Run the finger-peak detector on each open hand to find five fingertip locations per side. Skip this step for stylised characters where finger animation is not on the budget.
- Build skeleton + auto-weight. One click reads the markers, infers the bone hierarchy with the pelvis as root, and dispatches the heat-equilibrium weight solver on the Blender backend. The result is a skeletal mesh with smooth deformation at every joint.
- Pose-test and export. Open Pose Mode to drag any joint with full-body inverse kinematics, confirm the rig deforms cleanly, then export as FBX, GLB, or GLTF. The FBX export matches the SK_Mannequin reference skeleton so it imports cleanly into Unreal Engine.
Every step is interactive and undoable, and every step runs in your browser tab without you ever installing Blender, Maya, or any DCC tool. The only step that calls a remote service is the auto-weight step — that one runs against the Sorceress-hosted Blender server because the heat-equilibrium solver Blender ships still produces the cleanest open-source weights at the shoulder, hip, and knee.
What "auto rig" actually means in 2026
An auto rig collapses two hand-authored steps that traditionally take hours of expert time per character. The first step is building a skeleton: a hierarchy of bones with parent-child relationships that defines how the character moves at runtime. The pelvis is the root, the spine attaches above it, the neck attaches above the spine, the head attaches above the neck, and the limbs branch off as separate chains. Skeletal animation — the technique every modern engine uses for character motion — depends on this hierarchy because it is what lets a single bone rotation cascade through the chain.
The second step is skinning: binding every vertex of the mesh to one or more bones with a weight value that controls how the vertex moves when the bone moves. Linear blend skinning is the standard implementation — each vertex carries up to four bone indices and four weight values that sum to one, and at runtime the vertex position is computed as the weighted blend of where each driving bone would put it. Get the weights wrong and the mesh deforms like a stiff cardboard cutout at the joints; get them right and the character moves like a real body.
The auto rig automates both steps. The skeleton is inferred from a small set of anatomical markers placed on the mesh, and the bone hierarchy follows from anatomy. The skin weights are computed by a solver that reads the mesh geometry plus the skeleton and produces the four-bone, four-weight assignment for every vertex. The two solver families that actually work are heat-equilibrium (which simulates heat propagation from each bone through the mesh and reads the equilibrium temperature as the weight) and geodesic distance (which assigns weight by surface distance from each bone). Heat-equilibrium produces visibly better deformation at the shoulder and hip; the Sorceress auto rig uses it as the primary path through a hosted Blender backend, with geodesic as a local fallback.
src/lib/rigging/types.ts on May 10, 2026.Step 1 — Bring in your 3D mesh
Open Auto-Rigging. The page is a three-panel layout: a 3D viewport in the centre, a marker / detection / weights inspector on the left rail, and a log + export panel on the right. The first thing the page does is wait for a mesh.
Three formats are accepted directly:
- OBJ — the simplest and most portable. The tool parses vertices, faces, and UVs; per-face material assignments are ignored because the auto rig only needs geometry.
- FBX — the industry-standard skeletal-asset format and what most game engines export. The auto rig parses an FBX even if it already contains a skeleton (the existing rig is ignored, only the static surface is kept).
- GLB — the binary glTF 2.0 container. This is the export format every Sorceress image-to-3D model uses, which means the typical end-to-end Sorceress pipeline (prompt to image to mesh to rig to export) is GLB through the entire chain.
Drag a file onto the viewport or click the upload button. The mesh appears in wireframe by default with the surface mesh hidden so the markers are easier to place against the silhouette. Two pre-flight checks save time: rotate the camera to confirm the character is in T-pose (arms out horizontal, legs straight, hands open if you want finger detection), and check that the model is front-facing toward the camera. The auto rig defaults to the front-facing assumption for marker placement.
Step 2 — Place the 13 anatomical markers
The 13 markers are the data the auto rig actually needs. Every other parameter is inferred or chosen later. Get the markers right and the rest of the pipeline is essentially free.
The full list, in the order guided mode walks them: chin, neck, pelvis, optional left hip, left shoulder, left elbow, left wrist, left knee, left ankle. That is one side. The right-side markers come for free if the auto-mirror toggle is on, which it is by default. Auto-mirror reflects each left-side marker across the YZ plane of the mesh; for any character that is bilaterally symmetric — almost every humanoid — auto-mirror is correct, fast, and prevents the most common rigging error (asymmetric markers producing a tilted skeleton).
Two interaction details that matter:
- Centre-snap projects each click to the volumetric centre of the limb at that height rather than to the surface point you clicked. Without it, markers land on the skin and the inferred skeleton sits on the skin rather than down the bone axis. With it, markers land inside the volume where the joint actually is. Leave it on.
- Guided mode walks the placement order and shows a "9 of 9" progress label, so you do not need to remember the order. Free-placement mode is available for re-doing a specific marker after the initial pass; click the marker name in the inspector to make it the active marker, then click the new position on the mesh.
The interactive viewport supports orbit (right-mouse drag), pan (middle-mouse), and zoom (wheel). Three pre-set views — front, side, top — let you snap to an axis-aligned camera quickly. The pelvis, in particular, is much easier to place from a side view than from the front.