2D to 3D Image Conversion (Free, In Your Browser)

By Arron R.12 min read
2D to 3D image conversion turns a flat photo into a textured 3D mesh in minutes. Sorceress 3D Studio runs the conversion in your browser — drop the image, pick

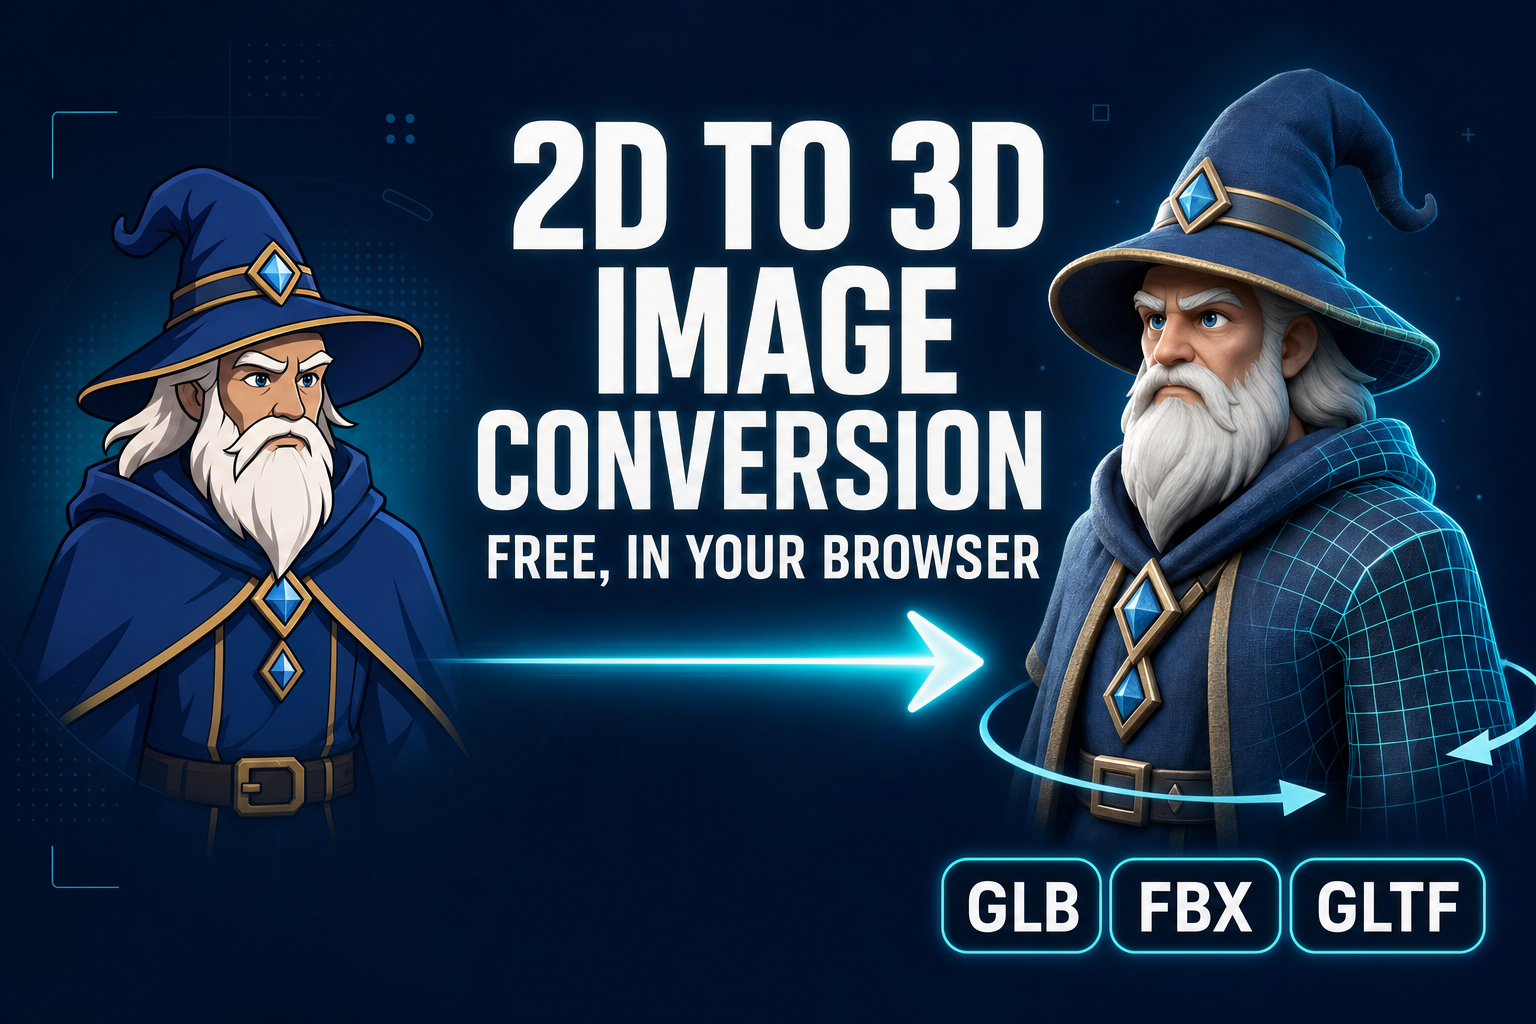
A 2D image is a flat grid of pixels: width, height, colour, nothing else. A 3D model is a mesh of vertices and triangles in three-dimensional space, with surface normals, UV coordinates, and a texture map you can rotate, light, and import into any game engine. The job of a 2D to 3D image conversion tool is to bridge that gap from a single flat input — one photo, one AI render, one concept sketch — and produce a textured, manifold mesh you can drop into a game in minutes. This guide walks the conversion primitive itself: the five image-to-3D models inside Sorceress 3D Studio, the model-picking trade-offs, the step-by-step browser workflow, what makes a good source image, and the failure modes that account for almost every bad output.

2D to 3D image conversion pipeline diagram: upload photo, pick model, lift to 3D mesh, preview with rotation, export GLB FBX or GLTF in the browser
The four-stage browser-based 2D to 3D image conversion workflow inside Sorceress 3D Studio. Upload a 2D image, pick a model, lift to a textured mesh, export to any engine.

The five-minute 2D to 3D image conversion pipeline

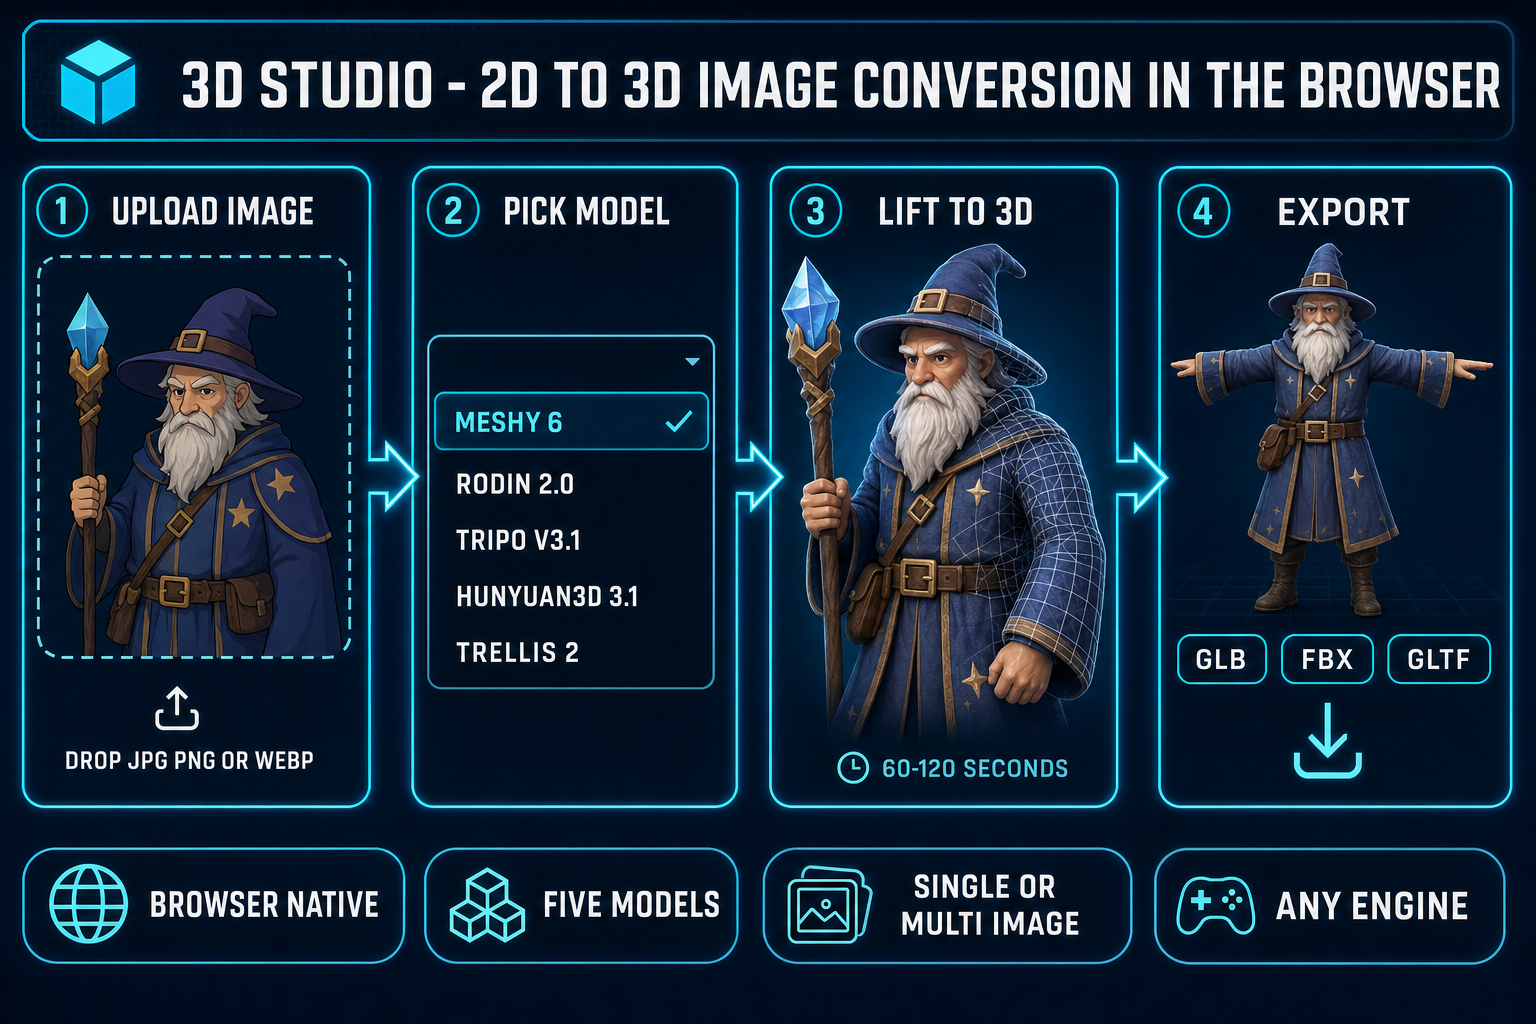
The whole conversion collapses to five steps once the image is on your machine. Five steps, one tab, no install:

  1. Open the Generate tab. Inside 3D Studio, the Generate tab is the entry point for both text-to-3D and image-to-3D. Drop the source image onto the upload zone, or paste a URL — the tool reads it client-side, normalises the orientation, and shows a thumbnail.
  2. Pick the model. Five image-to-3D models are exposed in the model selector: Meshy 6, Rodin 2.0, Tripo v3.1, Hunyuan3D 3.1, and TRELLIS 2. Each routes to its own backend; each has a distinct strength. The model-picker section below covers when to choose which.
  3. Run the conversion. Click Generate. The tool dispatches the job to the chosen provider, polls the queue, and streams the partial preview when the model exposes one. A typical Meshy 6 image-to-3D run takes 60 to 120 seconds end-to-end on a clear front-facing input.
  4. Preview the GLB. When the job completes, the textured mesh loads in the same tab inside an interactive viewer. Rotate, zoom, toggle wireframe, toggle the texture-only view. If the front looks right but the back is hallucinated badly, this is where you decide to keep, re-roll with a different model, or feed in a second reference image.
  5. Export. One click writes the model to GLB, FBX, or GLTF on the same page. Drop the file straight into Phaser, Three.js, or any other browser-first runtime. The same export feeds the auto-rig and animate tabs if you want to take the model further.

Every step except the model run executes in your browser tab. The image upload, the orientation normalisation, the GLB preview, and the export are all client-side. The only step that calls a remote service is the model run itself — and that is the entire point of the tool, because running Meshy or Rodin or Tripo on commodity laptop hardware is not something a 2026 GPU can do in real time.

What 2D to 3D image conversion actually means in 2026

A flat image is missing one of the three numbers a 3D mesh needs at every point. The image carries the X and Y of every pixel and the colour at that pixel; what it does not carry is depth — the Z that says how far each pixel sits from the camera. Monocular depth estimation is the long-standing computer-vision problem of inferring that missing Z from a single image. The classical approaches use shape-from-shading, perspective cues, focus blur, and known-object priors; the modern approaches train a neural network on millions of paired image-and-depth examples and let the network learn the prior end-to-end.

2D to 3D image conversion in 2026 goes one step further than depth estimation. Depth estimation gives you a depth map — one Z per pixel — which is enough to inflate the visible surface but produces a "ribbon" or "billboard" that has no thickness and no back side. A real 2D-to-3D model has to hallucinate the unseen geometry: the back of the head when the input is a front-facing portrait, the underside of the table when the input is a top-down photo, the inside of the silhouette when the input is a side-view of a fish. The technique that does this is 3D reconstruction from a single view, and as of 2026 every production-grade approach uses some form of diffusion model trained on 3D priors plus a mesh-extraction step like marching cubes on a learned signed-distance or occupancy field.

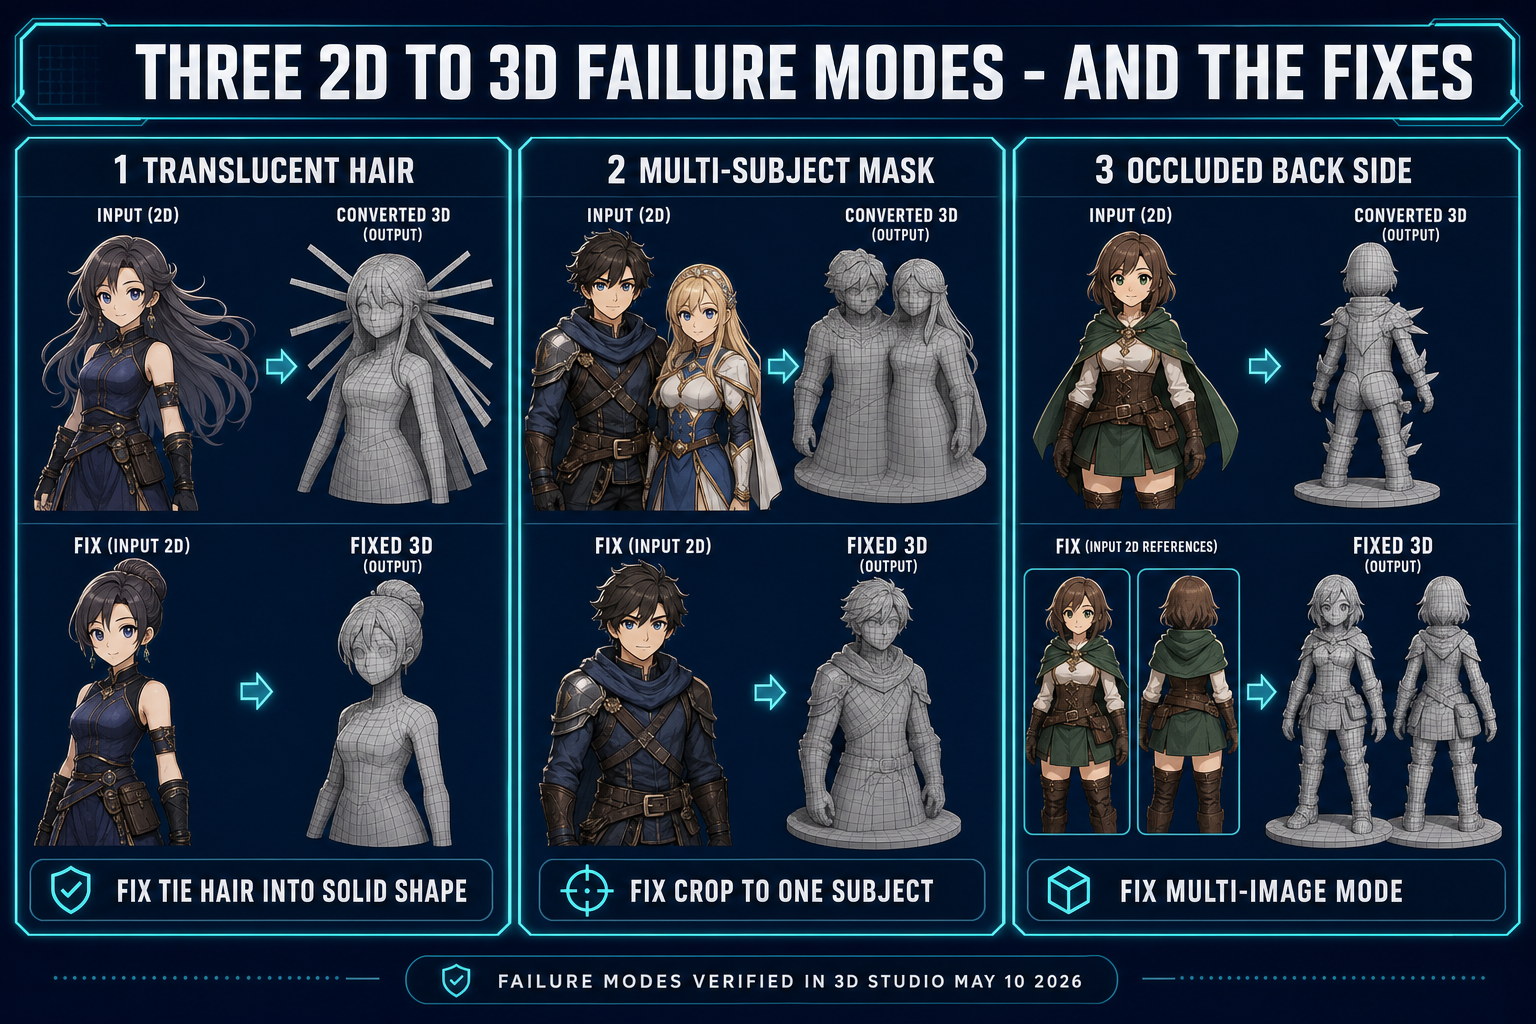
The reason the problem is hard, and the reason the back-of-the-head still looks wrong on most outputs, is that monocular reconstruction is fundamentally under-constrained — there are infinitely many 3D shapes whose front projection matches the input image, and the model is choosing one of them based on a learned prior over what real-world objects look like. When the input subject sits inside the prior's training distribution (a human in T-pose, a cartoon character with clean silhouette, a single rigid object on a plain background) the output is plausible. When the input is unusual (a translucent jellyfish, a cluster of three overlapping characters, a top-down map view) the prior runs out of guidance and the back side hallucinates badly. The good-source-image section below is mostly about staying inside that training distribution.

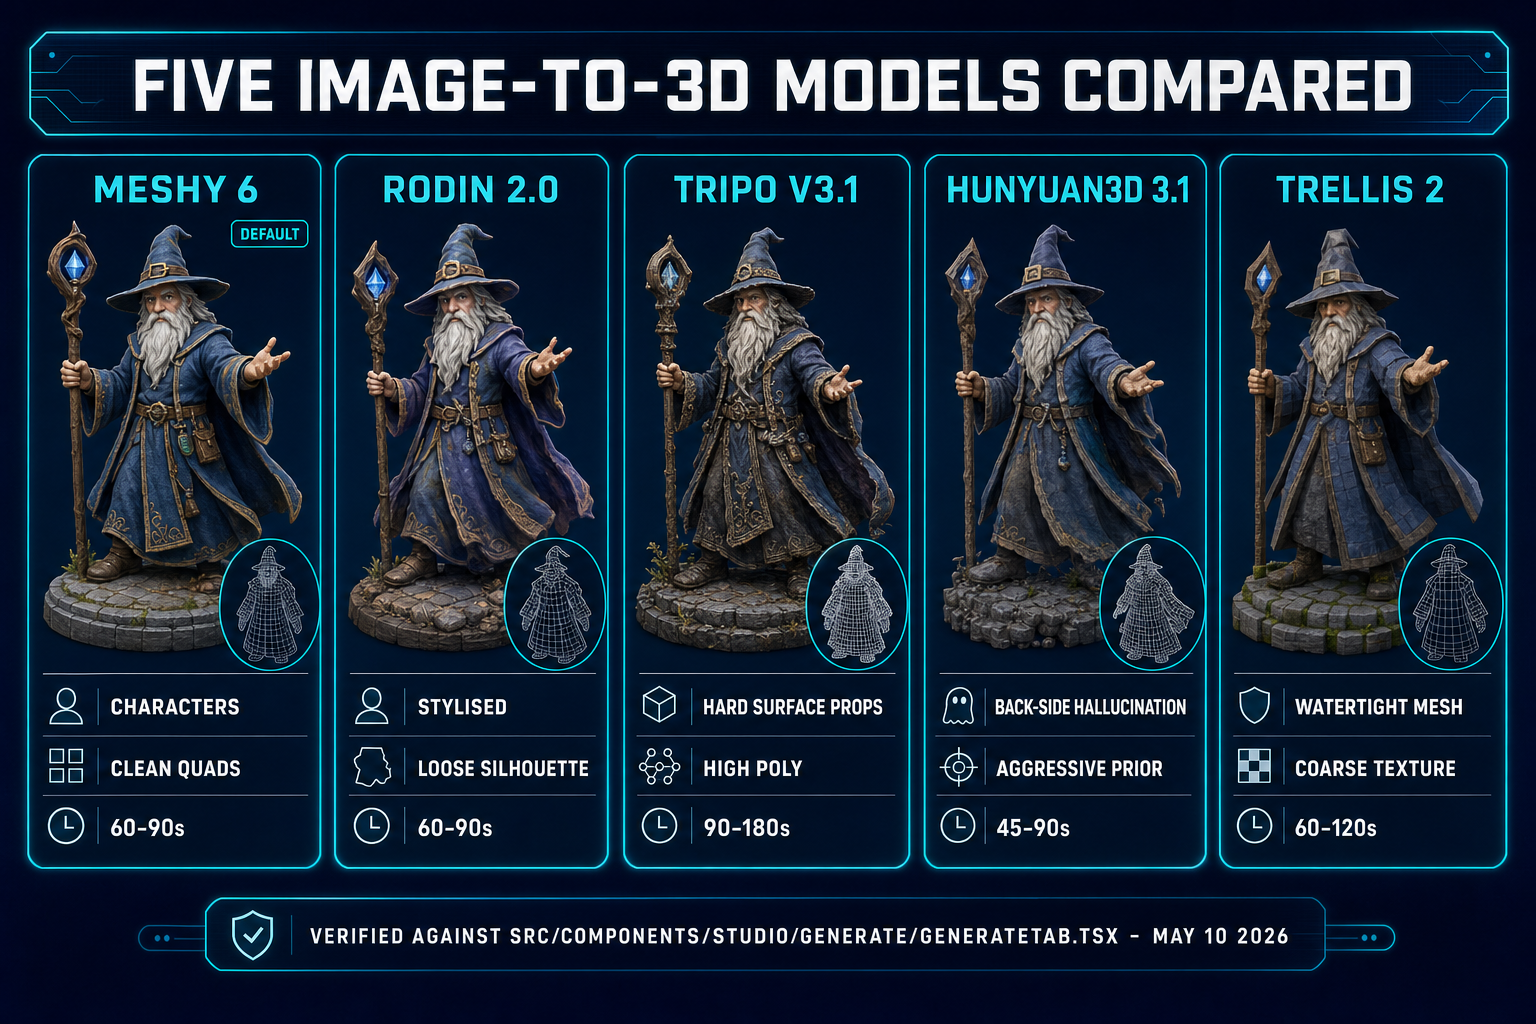
The five image-to-3D models in 3D Studio

3D Studio exposes five distinct image-to-3D backends inside one model picker, all reachable from the same Generate tab. Each maps to a separate API on a separate provider, and each is verified live in src/components/studio/generate/GenerateTab.tsx as of May 10, 2026. The five models share the input contract (single image in, textured mesh out) but produce noticeably different geometry, topology, and texture quality.

  • Meshy 6. The default. Meshy 6 is the strongest all-rounder for game-character and game-prop conversion: clean topology, watertight meshes, faithful texture transfer, and the highest poly-budget option of the five. Use Meshy 6 when the source is a front-facing character, a rigid prop, or anything you plan to auto-rig later — the topology lands close to what an auto-rigger expects. The Meshy preview/refine split (text-to-3D only) is a separate flow; image-to-3D goes straight to the textured mesh.
  • Meshy 5. The previous-generation Meshy model, kept in the picker for cost-conscious runs. Lower credit cost than Meshy 6 (10 vs 40 mesh credits, per src/components/studio/generate/types.ts). The geometry is rougher at sharp edges and the texture has visible seam artefacts on highly textured inputs. Use Meshy 5 for first-pass exploration when you do not yet know which input image you want to lift.
  • Rodin 2.0. Hyper3D's Rodin 2.0, routed through Replicate. Rodin's texture quality is the cleanest of the five on stylised inputs (anime characters, painted concept art, cel-shaded renders) — its 3D prior is trained heavier on stylised data than Meshy's. Rodin's geometry is slightly looser at the silhouette than Meshy, so the auto-rig step on a Rodin output can need a manual marker pass. Use Rodin when stylisation matters more than rig-readiness.
  • Tripo v3.1. Tripo's third-generation model, accessible through the Tripo API. Tripo's strength is high-poly output on prop-style inputs: vehicles, weapons, environment objects. The face cap on v3.1 is 500,000 (versus the 100,000 cap on the older Tripo v2) and that headroom shows up as crisper geometry on hard-surface props. Use Tripo for environment props where the silhouette has lots of small detail.
  • Hunyuan3D 3.1. Tencent's image-to-3D model, the most aggressive of the five at hallucinating the unseen back side from a single front view. Hunyuan tends to over-commit on the back hallucination, which is good when you need a fully textured 360-degree view of a character and bad when you want a faithful conversion of only the visible front. Use Hunyuan when "the back has to look like something" matters more than absolute fidelity.
  • TRELLIS 2. Microsoft Research's TRELLIS, second generation, single-image-only on the fal.ai backend. TRELLIS produces the cleanest watertight meshes of the five at the expense of texture detail — it bakes the image into a coarser texture map than Meshy or Rodin. Use TRELLIS 2 when you need a manifold mesh for 3D printing or a clean-topology base for sculpting more than you need a perfect texture transfer.

The picker remembers your last choice across sessions, so once you have settled on a default for your project (Meshy 6 for characters, Tripo for props, Rodin for stylised concept art) the model selection drops out of the per-run workflow.

Five image-to-3D models compared: Meshy 6, Rodin 2.0, Tripo v3.1, Hunyuan3D 3.1, TRELLIS 2 with strengths and weaknesses for 2D to 3D image conversion
The five image-to-3D models exposed in 3D Studio's model picker. Each has a distinct geometry, topology, and texture profile — picking the right one for the input is half the job.

Step-by-step: a real 2D to 3D image conversion in 3D Studio

The walkthrough below uses a single concrete example: a front-facing portrait of a stylised wizard character, lifted to a textured mesh ready for the auto-rig step. Open 3D Studio in a browser tab, sign in if needed, and follow the same five clicks on your own input.

  1. Open the Generate tab and pick image-to-3D. Generate has three input modes — text, image, multi-image — surfaced as a top-of-panel toggle. Click Image. The upload zone replaces the prompt box.
  2. Drop the image. JPG, PNG, and WebP are all accepted. The tool resizes the image client-side to the model's expected input resolution and shows a thumbnail; if the orientation is wrong (sideways phone photo), the rotate buttons fix it before upload.
  3. Pick the model. Open the model picker and select Meshy 6 (the default for characters). The credit cost shows next to each model — Meshy 6 charges 40 credits for the mesh and 20 for the texture pass, totalling 60 credits per image-to-3D run.
  4. Click Generate. The job moves into the queue. A progress bar tracks the model's reported progress; the typical Meshy 6 run completes in 60 to 120 seconds. The tool polls the upstream API and streams progress back into the UI without you refreshing.
  5. Preview, decide, export. When the job completes, the textured GLB loads inside the in-tab MeshyViewer component. Drag to rotate, scroll to zoom, toggle wireframe to inspect the topology. If the front matches the input but the back has visible seam artefacts, re-run on Hunyuan3D 3.1 (better back hallucination) or feed a back-view reference using the multi-image mode. When you are happy, click Export and pick GLB, FBX, or GLTF.

The five-click run is the floor. The ceiling is multi-image input — feed two or three views of the same subject (front, side, back) and the model produces a noticeably more faithful 360-degree mesh. Multi-image mode is on the Generate panel toggle, in the same picker as text and image. The pricing is per-mesh, not per-image, so a multi-image run is the same 60 credits as a single-image run.

What makes a good 2D source image

The quality of the converted mesh is bounded above by the quality of the source image. The same Meshy 6 model that produces a clean stylised wizard from a clean reference produces a melted mess from a low-quality reference. Five rules cover most of the input-quality decisions:

  • Single subject, clean background. The conversion model masks the foreground from the background as a first step. A busy background that overlaps the subject's silhouette confuses the mask, and the resulting mesh either includes a chunk of background or loses detail along the silhouette. A plain colour or simple gradient background is best; you can also pre-pass the image through Sorceress BG Remover to produce a clean alpha-cut input.
  • Front-facing or three-quarter view. A pure side or pure back view forces the model to hallucinate the front face, which is the most-trained-on view and the one users will inspect first. Front or three-quarter input gives the model the strongest signal.
  • Even, soft lighting. Hard shadows bake into the texture map permanently — a mesh lit from one side at upload time stays half-shaded after export. Even ambient or soft global lighting in the source image gives a texture you can re-light freely in the engine.
  • Resolution between 512 and 2048 pixels on the long axis. Below 512, the model has too few pixels to extract texture detail. Above 2048, most providers downsample anyway. The sweet spot for cost and quality is 1024 to 1536 on the long axis.
  • The subject in T-pose or A-pose if it is a character. A character with arms tight against the body produces a mesh where the arms are fused into the torso, and the auto-rig step then has to separate them by hand. A T-pose or A-pose source produces clean arm silhouettes ready for rigging.
Three 2D to 3D image conversion failure modes: translucent hair fan-out, multi-subject mask confusion, occluded back side hallucination — and the input fix for each
The three most common 2D to 3D image conversion failure modes — translucent hair, multi-subject masks, and occluded backsides — and the input-side fix for each.

Common 2D-to-3D failure modes (and the fixes)

Three failure modes account for almost every bad conversion. Each has a clean fix at the input side; none requires a different model or a paid upgrade.

  1. Translucent hair, smoke, or particles fan out into spider-leg geometry. Cause: the diffusion-based mesh extractor cannot represent transparency, so it places solid geometry wherever the input has any non-zero alpha. Long flowing hair, smoke trails, and motion-blurred particle effects all become forests of thin triangles attached to the head. Fix: pre-pass the input through a hair-tied or solid-colour reference; or accept the output and clean the resulting mesh in 3D Studio's Refine tab, which has a one-click "remove islands smaller than X" filter. For game characters, retie the hair into a solid silhouette before lifting.
  2. Multi-subject scenes mask incorrectly. Cause: the foreground mask collapses two distinct subjects into one blob, and the model produces a single mesh joining them at the closest pixels. Fix: crop the source image to one subject. If you genuinely need both, lift each one separately and compose them in the engine. The conversion is fundamentally a single-object operation.
  3. Occluded back side hallucinates wrong. Cause: a single front-view input does not constrain the back side, so the model invents geometry from its prior. The hallucination is plausible-but-wrong on stylised characters and visibly wrong on anything with sharp asymmetric details (a backpack, a cape, a logo on the chest). Fix: switch to multi-image input and feed a second back-view or three-quarter-view reference. A second image cuts back-side error roughly in half on every model in the picker, with the largest effect on Hunyuan3D 3.1 (the most prior-driven of the five).

The verification path for any conversion that looks wrong is the in-tab GLB preview. Toggle wireframe, walk around the model, look for islands, look for backside misalignment, look for "fans" of triangles. If any of those show up, decide on the fix above and re-run; the cost of a re-run on Meshy 5 is 30 credits, on Meshy 6 is 60 credits, and the failure modes are usually visible from the first preview frame so re-runs are quick. Verified May 10, 2026 against src/components/studio/generate/GenerateTab.tsx, src/components/studio/generate/types.ts, and the deployed model picker — the five providers, the Meshy 5/6 mesh and texture credit costs, the multi-image mode, and the GLB/FBX/GLTF export options all match the live tool today.

Where to go from here: rig, animate, ship

2D to 3D image conversion is one step in a larger pipeline. Once you have the textured GLB, three obvious next moves open up:

  • Auto-rig the humanoid. If the converted mesh is a humanoid character, the next step is a skeleton and skin weights. Sorceress Auto-Rigging takes the GLB straight from the export step, places 13 anatomical markers, builds the skeleton, and runs the auto-weight solver in the browser. The full workflow is in the browser-based auto rig guide.
  • Animate by text prompt. The Animate tab inside 3D Studio drives a Hunyuan-class text-to-motion model on the rigged mesh — describe the action ("walk forward, then jump"), get a baked clip back as a GLB animation. The full workflow is in the prompt-to-rigged-mesh guide.
  • Take the full character pipeline. If you want the prompt-to-image-to-3D-to-rig-to-animate path as one read rather than four, the full image-to-3D-model pipeline guide covers the whole arc end to end.

For non-humanoid creatures (quadrupeds, spiders, multi-leg drones), the rigging step lives in Procedural Walk rather than the humanoid auto-rigger. The Mixamo alternative guide covers the trade-off honestly.

The conversion itself is the cheap step: 60 credits and 60 to 120 seconds per run on Meshy 6. The expensive step is the source image. Spending an extra five minutes inside AI Image Gen on a clean front-facing reference saves an hour of mesh cleanup downstream.

Frequently Asked Questions

What is 2D to 3D image conversion in 2026?

2D to 3D image conversion is the process of turning a single flat image — a photograph, an AI-generated render, a hand-drawn concept — into a textured 3D mesh you can rotate, light, and import into a game engine. The flat image carries colour information at every X-Y pixel; the 3D mesh adds the missing Z (depth) and the unseen geometry on the back side of the subject. Modern conversion tools combine two machine-learning techniques: monocular depth estimation, which infers a depth value for every visible pixel; and 3D reconstruction from a single view, which uses a diffusion-based prior trained on millions of 3D shapes to hallucinate the parts of the geometry the input image cannot see. The output is a watertight or near-watertight polygon mesh with a texture map baked from the source image. As of 2026, browser-based tools like Sorceress 3D Studio expose five separate image-to-3D backends (Meshy 6, Rodin 2.0, Tripo v3.1, Hunyuan3D 3.1, TRELLIS 2) inside a single picker, and the typical conversion completes in 60 to 120 seconds end-to-end.

How long does a 2D to 3D image conversion actually take?

On a clean front-facing input image, the typical conversion run takes 60 to 120 seconds of wall-clock time on Meshy 6, the default model in Sorceress 3D Studio. The time breaks down roughly as follows: image upload and client-side normalisation runs in under one second; the queue-and-dispatch step depends on current server load and is usually a few seconds; the model run itself is the bulk of the time and depends heavily on which provider you picked. Meshy 6 typically returns in 60 to 90 seconds; Rodin 2.0 is similar; Tripo v3.1 with the high face-cap option runs longer, around 90 to 180 seconds; Hunyuan3D 3.1 is the fastest of the five at 45 to 90 seconds; TRELLIS 2 falls in the middle. Multi-image mode (feeding two or three reference views) does not double the time — the model still runs once on the combined input. The GLB preview load and the export to FBX/GLB/GLTF are interactive and effectively instant, so the total time-to-engine on a typical run is under three minutes from drop to download.

Can I do 2D to 3D image conversion free in the browser?

Sorceress 3D Studio runs the entire 2D to 3D image conversion workflow in your browser tab — image upload, model selection, GLB preview, and export all happen client-side without any install. The model run itself is dispatched to a remote backend (Meshy, Rodin, Tripo, Hunyuan3D, or TRELLIS) because running a production-grade image-to-3D diffusion model on commodity laptop hardware is not yet feasible in real time. New accounts get free trial credits when they sign up, which cover several runs across Meshy 5, Hunyuan3D 3.1, and TRELLIS 2 — the three lower-cost models in the picker. Once the trial credits run out, you can either top up with credits or supply your own provider API keys (BYO key) for unlimited runs at the provider's billed rate. Other free options exist outside Sorceress, named in plain text (Meshy free tier, Tripo free tier, makerworld) — each comes with separate sign-up flow, watermarks, or daily run caps; the trade-off between sign-up friction and run cap is the main differentiator between them.

Which 2D to 3D image conversion model is best for game characters?

For game characters specifically, Meshy 6 is the strongest of the five models exposed in 3D Studio's picker. The reason is topology: Meshy 6 produces clean quad-dominant or near-quad topology with even edge flow around the limbs and the head, which is exactly what an auto-rigger expects to find when it places a humanoid skeleton inside the mesh. Meshy 6's silhouette adherence is also the highest of the five — the converted model's outline closely matches the input image's outline, which means an auto-rig step does not have to compensate for limbs that drifted out of place during conversion. Rodin 2.0 is a close second on stylised input (anime, cel-shaded, painted) and produces cleaner texture maps on those inputs, but its topology is slightly looser at the silhouette. Hunyuan3D 3.1 hallucinates the back side aggressively, which is good for characters meant to be seen from all angles but can produce unrealistic back-of-head geometry on faithful conversions. Tripo v3.1 is best for hard-surface props (vehicles, weapons), not characters. TRELLIS 2 is best when you need a watertight mesh for 3D printing, not for in-engine characters. The default for characters is Meshy 6.

What file formats does the 2D to 3D image conversion produce?

The conversion produces a textured 3D mesh that 3D Studio exports in three formats — FBX, GLB, and GLTF. GLB is the binary glTF 2.0 container and is the default for browser-first runtimes like Three.js, Babylon.js, and PlayCanvas; the texture is embedded in the same file, so it is one self-contained download. GLTF is the JSON-text variant of glTF 2.0 — the same data with the texture in a separate file — and is preferred when you want to inspect or edit the model's materials by hand before importing into the engine. FBX is the industry-standard skeletal-asset format and is what most game engines export and import; if you plan to take the model further into the auto-rig and animate steps, FBX is the most engine-portable choice for the eventual rigged character. Every export option lives next to the GLB preview in the same Generate tab, so picking a different format does not require re-running the conversion. The conversion writes the mesh once and the export step transcodes it into the chosen container.

Why does the back of my 2D to 3D model look wrong?

Single-view 2D to 3D image conversion is fundamentally under-constrained: the input image only shows one side of the subject, and the model has to invent the unseen geometry from a learned prior over what real-world objects look like. When the subject has unusual back-side details — a backpack, a cape, a logo on the chest, asymmetric hair — the prior cannot know about them and produces a plausible-but-wrong hallucination. The model picks the closest match to its training distribution, and on stylised characters that match is usually a generic back rather than the actual back of your character. The fix is to feed the model more information by switching from single-image to multi-image input mode. Multi-image mode accepts two or three reference views — front, side, back, or any combination — and feeds them all into the same conversion pass. With a back-view reference image, the model has direct visual evidence for the back side and the hallucination drops out. Multi-image runs cost the same credits as single-image runs (the cost is per-mesh, not per-image), so the only friction is generating the additional reference views. For AI-generated characters, AI Image Gen with the same character reference on a different angle is the cleanest workflow.

Does 2D to 3D image conversion work on photos with multiple people in them?

Single-subject conversion is the design assumption for every model in the picker — Meshy 6, Rodin 2.0, Tripo v3.1, Hunyuan3D 3.1, and TRELLIS 2 all expect one subject in the foreground and a background to mask away. When the input image contains two or more people, the foreground mask collapses them into a single connected blob and the conversion produces a single mesh that joins the subjects at whatever pixels are closest in the image. The result is rarely usable: you get something that looks like a fused statue rather than two separate characters. The fix is to crop the source image to a single subject before uploading. If the image has two people standing apart, crop to one person, run the conversion, then crop again to the other person and run a second conversion; you will end up with two separate GLB files you can pose independently in the engine. If the people are overlapping in the original frame, the cleanest fix is to regenerate or repaint the source image so each subject has its own clean cut-out. The conversion is fundamentally a single-object operation; do not try to cheat it with a group photo.

Sources

  1. Monocular depth estimation (Wikipedia)
  2. 3D reconstruction (Wikipedia)
  3. Marching cubes (Wikipedia)
  4. Polygon mesh (Wikipedia)
  5. glTF 2.0 specification (Khronos Group)
  6. Neural radiance field (Wikipedia)
Written by Arron R.·2,758 words·12 min read

Related posts