Try a Mixamo Alternative (Browser Rig Workflow)

By Arron R.10 min read
A useful Mixamo alternative must do more than attach bones. Sorceress lets you fit a humanoid skeleton, compute and inspect skin weights, test text-generated mo

A character is not game-ready because an animation preview plays. The mesh, skeleton, skin weights, motion, and export contract all have to agree. This browser workflow uses Sorceress Auto-Rigging to fit and skin a humanoid, then moves the result into Sorceress 3D Studio for motion testing and export. The Sorceress controls, supported model paths, weight workflow, and animation handoff described below were verified against the live source on July 18, 2026.
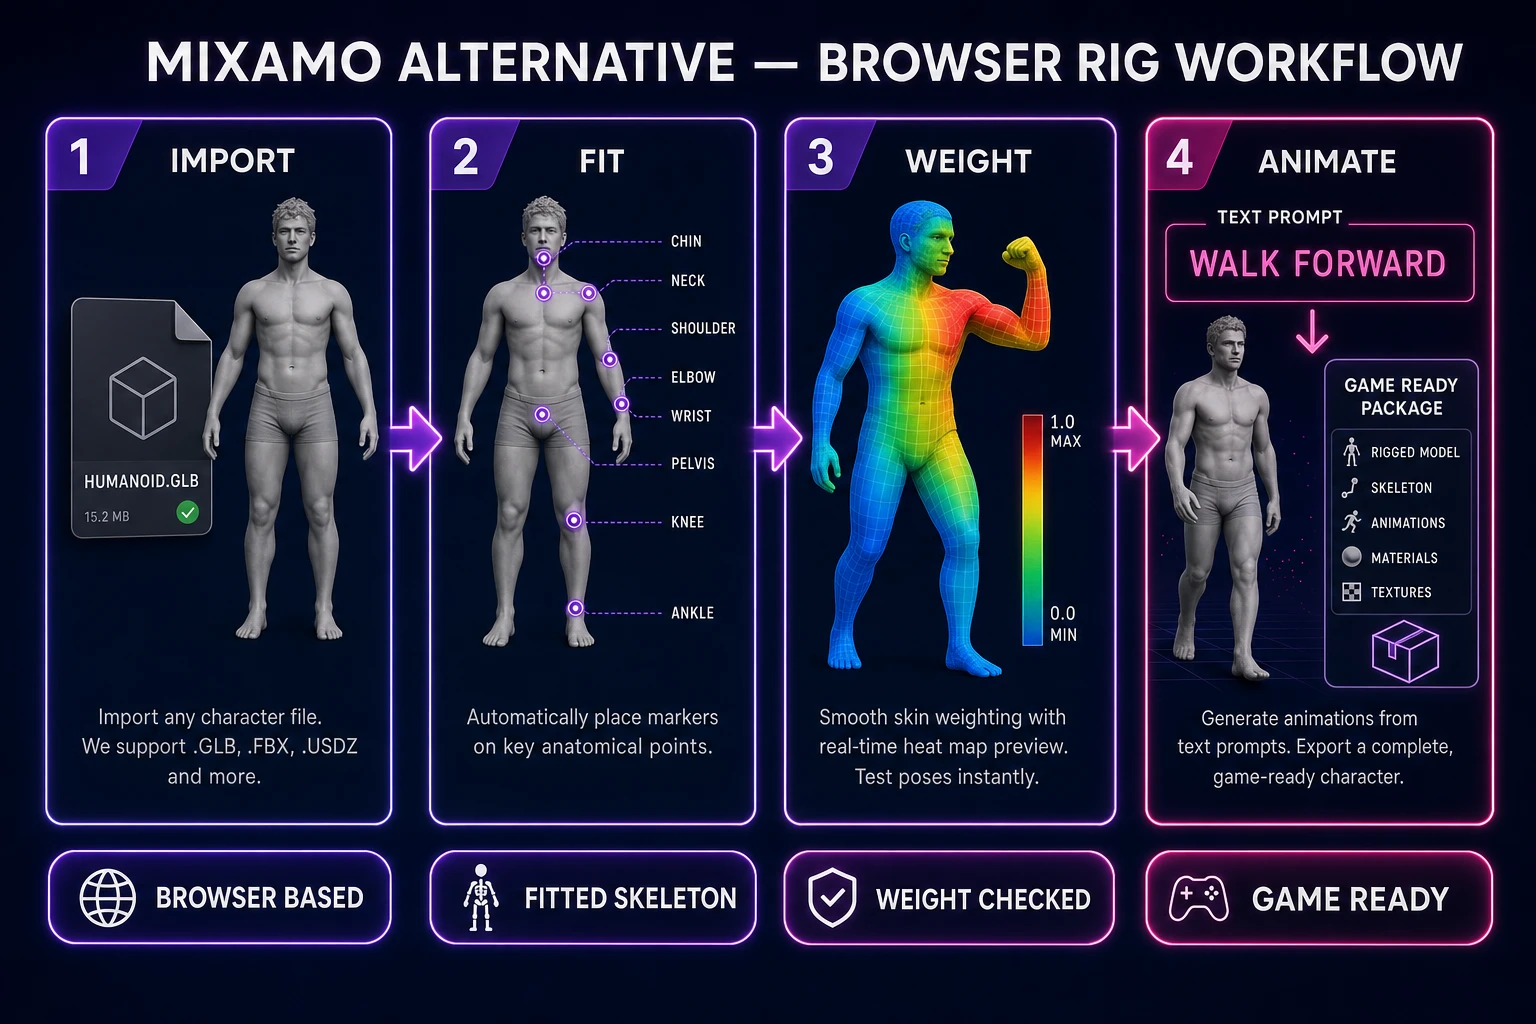
Mixamo alternative browser rig workflow from humanoid mesh through marker fitting, skin weights, motion test, and game-ready export
A complete rigging path treats import, skeleton fit, skin deformation, animation, and export as separate checks rather than one automatic result.

What a Mixamo alternative needs to replace

The primary keyword mixamo alternative has 210 monthly searches and KD 7 in DataForSEO research generated July 18, 2026. The search sounds like a request for another animation library, but game production usually exposes a deeper need: a dependable route from an unrigged character mesh to a tested asset that can survive gameplay poses.

A useful alternative should cover five jobs. It must accept the source model without quietly changing its scale or orientation. It must build or preserve a skeleton that matches the character’s anatomy. It must bind vertices to bones with weights that deform cleanly. It must let you test representative motion before export. Finally, it must produce files and metadata that the game runtime can load without guessing.

Those jobs are connected, but they are not interchangeable. A perfect walk clip cannot repair a shoulder joint placed outside the arm. A clean skeleton cannot compensate for torso vertices weighted to the wrist. An attractive viewport preview does not prove that the exported GLB carries the same skin and bone relationships. The fastest workflow is the one that reveals each failure at the stage where it can actually be corrected.

This is why “one click” is the wrong evaluation criterion. Automation should remove repetitive setup while leaving the important evidence visible. You need to see the anatomical markers, inspect the built skeleton, review the weight result, bend the difficult joints, and verify the final package. If a tool hides those checkpoints, every problem is deferred until integration, where it costs more to diagnose.

Keep the mesh, skeleton, weights, and motion separate

A skinned character is a relationship between several data sets. The mesh supplies vertices and triangles. The skeleton supplies a bone hierarchy and transforms. Skin weights assign each vertex to one or more bones. Animation clips change bone transforms over time. The glTF 2.0 skin specification formalizes this through joints, inverse bind matrices, and mesh skin references.

That separation gives you a practical debugging order:

  1. Mesh: confirm the model is upright, centered, complete, and suitable for deformation.
  2. Skeleton: place joint centers where the anatomy should rotate, not merely where the surface looks convenient.
  3. Weights: verify which vertices follow each bone and how influence blends across joints.
  4. Motion: test the rig with poses that expose shoulders, hips, knees, wrists, and root travel.
  5. Export: reload the delivered asset and compare it with the accepted viewport result.

Do not change all five layers after one bad pose. If an elbow bends around the right point but the forearm caves in, the joint placement may already be correct and the weights need attention. If the entire arm rotates from the chest, inspect the hierarchy and shoulder placement before repainting vertices. If the rig looks correct in a static crouch but drifts across the floor during a looping walk, inspect root-motion handling rather than rebuilding the skeleton.

Three.js exposes the same distinction. A SkinnedMesh combines geometry with skin indices and weights, while a Skeleton owns the ordered bones and inverse matrices. Keeping those responsibilities clear makes browser testing representative of the data a WebGL game will actually consume.

Test the Sorceress Mixamo alternative workflow

The Sorceress path uses a visible sequence instead of treating auto-rigging as a black box:

  1. Load or select a humanoid character and open the Rig workspace.
  2. Correct the model orientation before placing anatomical markers.
  3. Place the required body landmarks, using guided placement and mirroring where appropriate.
  4. Build the skeleton and inspect it inside the mesh from more than one view.
  5. Run Compute Weights, inspect the deformation, and recompute after meaningful joint changes.
  6. Use Send to Animate → to test generated or saved motion on that exact rig.
  7. Export only after representative clips pass the deformation and root-motion checks.

The standalone Auto-Rigging tool is marked Pro in the current Sorceress product source. The integrated 3D Studio also carries the character through generation or upload, rigging, weight refinement, animation, and export. Start at Auto-Rigging when you already have a humanoid mesh and want to focus on the rig. Start in 3D Studio when the character is part of a larger concept-to-animation pipeline.

Browser import is possible because the File API exposes user-selected files to client code without handing a page unrestricted filesystem access; the W3C File API specification defines that model. Sorceress can parse the chosen character, keep the viewport interactive, and pass the accepted in-memory rig between its Rig and Animate workspaces. You still control when the model is selected and when the result is saved or downloaded.
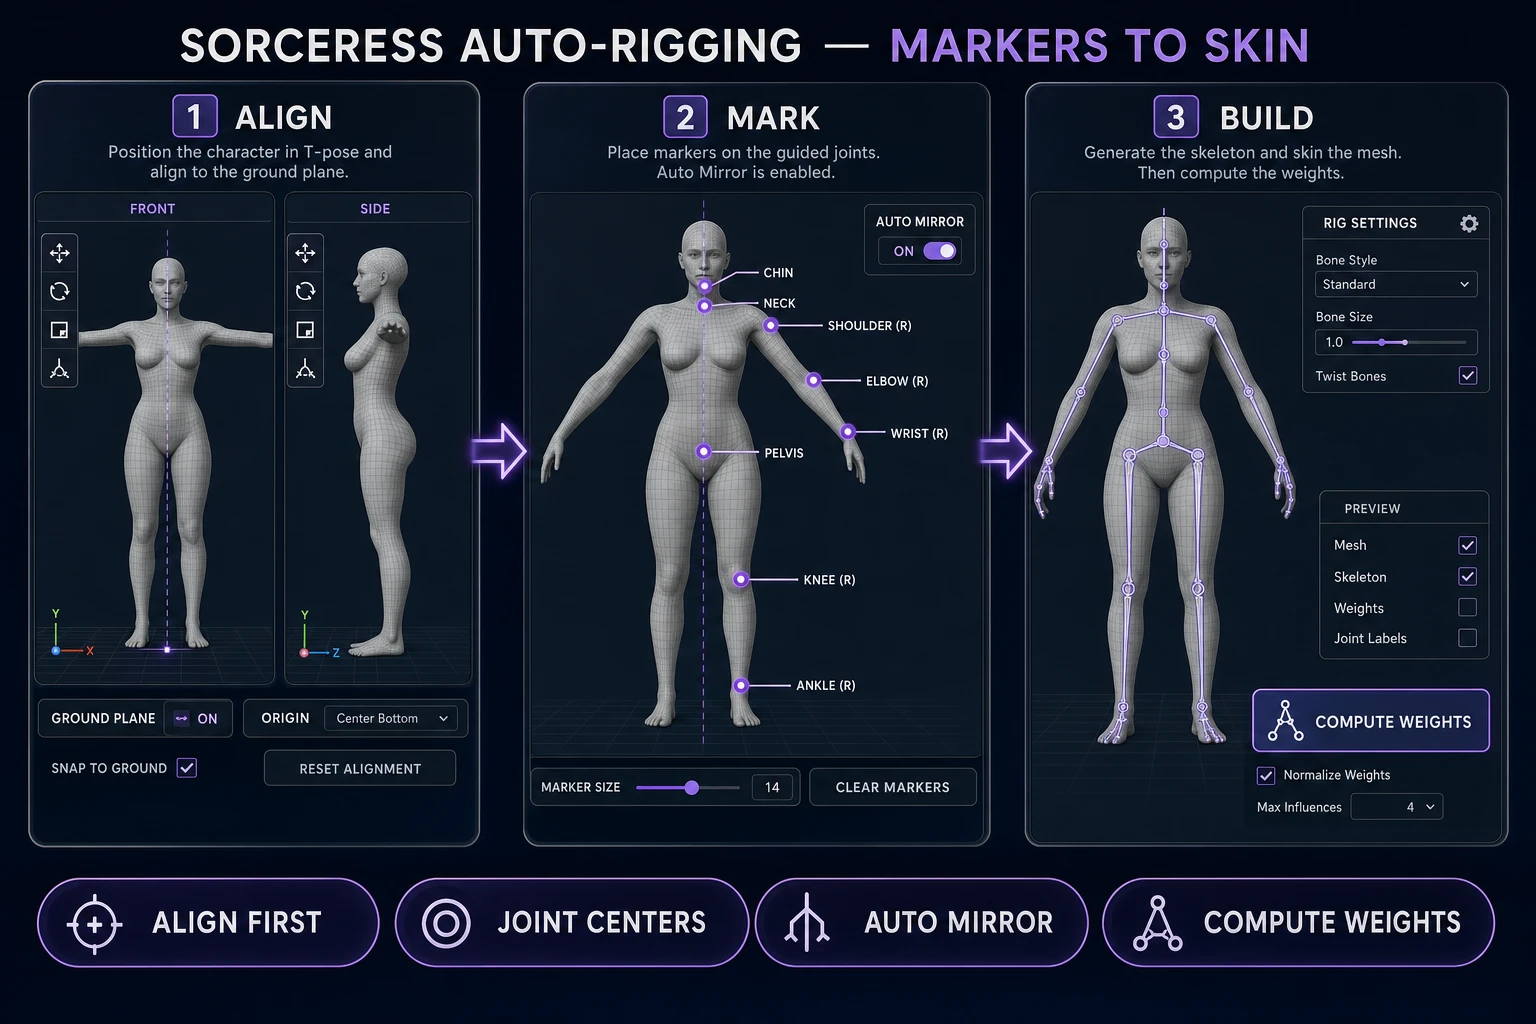
Sorceress Mixamo alternative auto-rigging interface with model alignment, guided humanoid markers, skeleton build, and Compute Weights control
Guided placement is useful because it turns an abstract skeleton fit into a sequence of anatomical decisions that can be inspected before skinning.

Import and place the humanoid markers

Begin with a neutral character pose. Arms need enough separation from the torso for the shoulder, elbow, and wrist to be located clearly. Legs need visible separation around the hips, knees, and ankles. Large coats, capes, weapons, and crossed limbs can obscure the body shape the fitter needs. If an accessory is not part of the deforming body, consider handling it as a separate part later instead of letting it distort the initial fit.

Load the model, then use the orientation controls before placing anything. Check front and side views. The head should be above the pelvis, feet should share a sensible ground level, and the character should face the expected direction. A rig can be mathematically valid while pointing sideways or lying on its back; fixing orientation first prevents every later marker from being correct only in the wrong coordinate frame.

The core marker set covers the pelvis, neck, chin, shoulders, elbows, wrists, knees, and ankles, with left and right hip markers available as additional anatomical guidance. Guided placement walks through the landmarks, and Auto Mirror can place the matching point across the character’s center. Mirroring saves clicks, but it is not proof of symmetry. Inspect both sides afterward, especially when the source pose, clothing, or body proportions are uneven.

Place a marker at the joint’s rotation center, not on the most visible patch of skin. The elbow belongs inside the arm where upper arm and forearm rotate. The knee belongs within the leg volume, not on the kneecap surface. The shoulder must connect the arm to the torso without sitting so far inward that raising the arm collapses the chest. Use wireframe or a translucent view when the surface hides that interior relationship.

After the required markers are placed, build the skeleton. Orbit around it. Look down the arms and legs from the front, side, and three-quarter views. Bone chains should pass through the body volume, and paired limbs should have comparable lengths unless the design is intentionally asymmetrical. If a joint is wrong, move the marker or joint now. Weight computation should not be used to conceal a structural placement error.

Refine skin weights before animation

Click Compute Weights only after the skeleton fit passes inspection. Skinning assigns influence values to vertices so the surface follows nearby bones. Most vertices need a dominant bone and a controlled blend near joints. Broad, soft transitions usually belong around shoulders and hips; narrow hinges need more disciplined transitions around elbows and knees.

Test the areas that commonly expose weight problems:

  • Shoulders: raise the arm and check whether the chest caves in or the upper arm detaches visually.
  • Elbows: bend beyond a mild preview angle and look for pinching, volume loss, or a sharp seam.
  • Hips: lift one thigh and crouch to reveal cross-leg influence and pelvis collapse.
  • Knees: bend the leg while watching the back of the knee and the kneecap silhouette.
  • Wrists and hands: rotate the hand and confirm that forearm vertices do not follow the fingers or opposite limb.

Use the weight visualization to trace a visible defect back to an influence. A vertex that flies toward the opposite hand is not an animation problem. A strip of torso that follows the upper arm usually indicates influence crossing a body-part boundary. A rigid elbow may need a better blend between upper-arm and forearm bones. Make one targeted correction, rerun the same pose, and compare the silhouette.

If you change joint positions after weights are computed, Sorceress keeps the existing weights available but surfaces that they may be stale. That is useful for small inspection adjustments, but meaningful anatomical changes deserve a recompute. The weights were calculated against the previous bone geometry. A new shoulder center or altered limb length changes the relationship the solver was asked to model.

Do not overbuild details the camera cannot resolve. Finger rigs matter for close interaction, weapon handling, and expressive hands. They matter much less for a distant top-down unit. The body still needs stable wrist deformation, but production value comes from matching rig complexity to screen size rather than maximizing bone count.

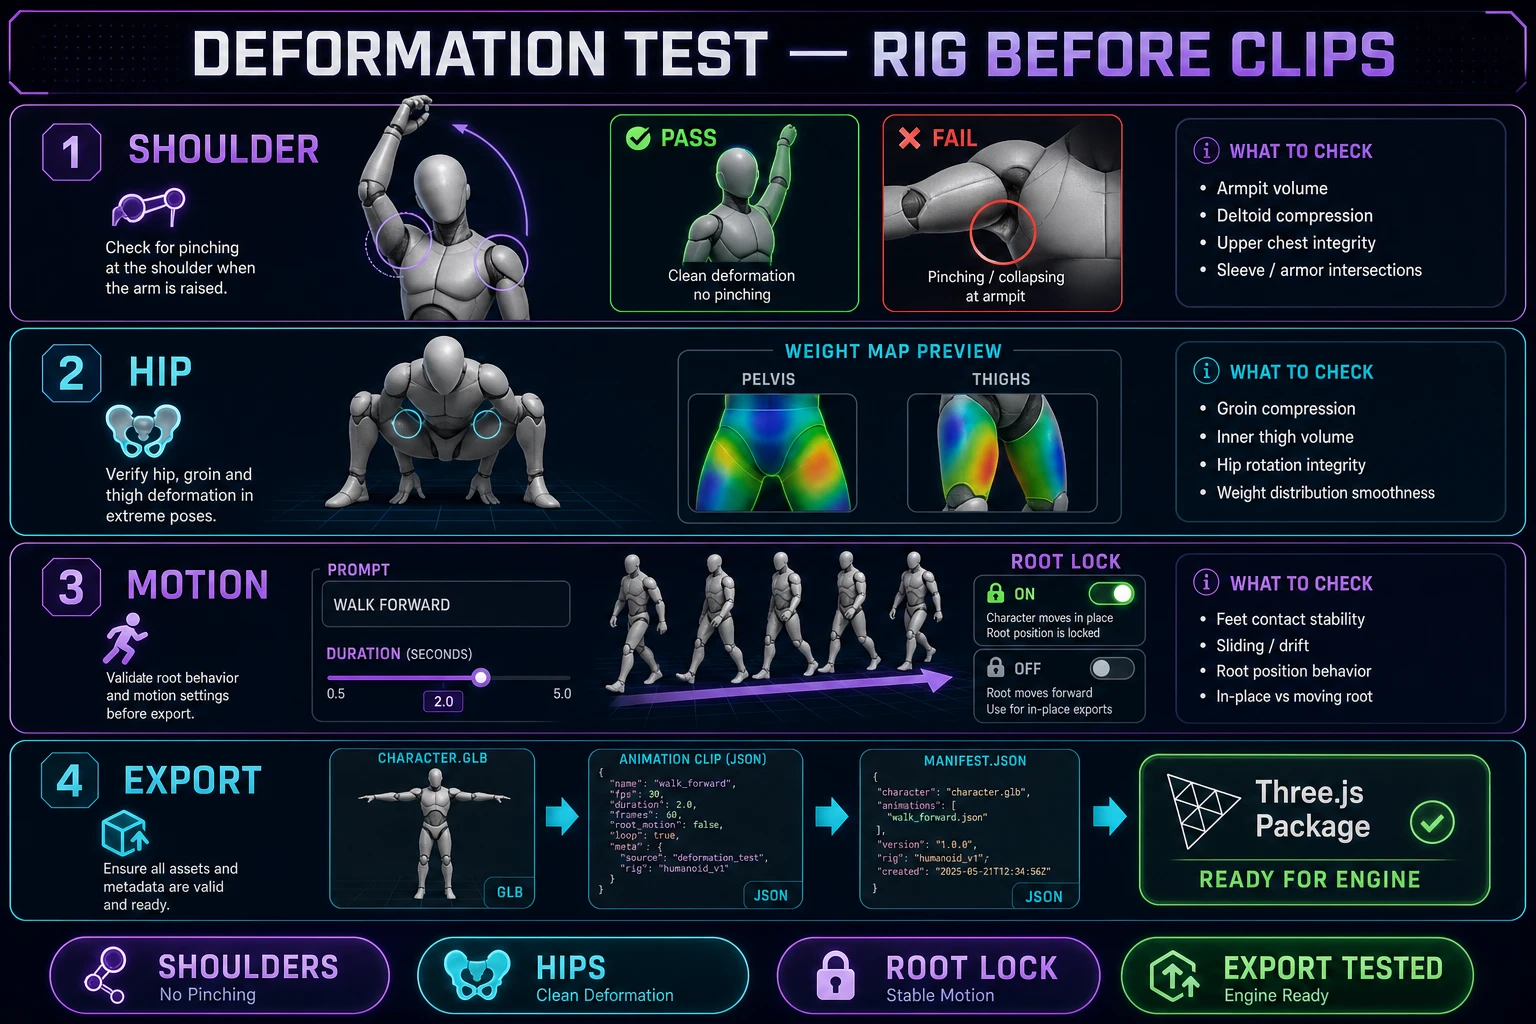
Mixamo alternative deformation test showing shoulder and hip skin weights, text-to-animation prompt, Root Lock, and exported character package
A rig passes when difficult joints preserve a readable silhouette and the exported motion follows the same root-motion contract used by the game controller.

Generate text motion and inspect deformation

When the rig and weights are ready, use Send to Animate →. This handoff builds a skinned GLB for animation and keeps the fitted skeleton and computed weights attached to the current character. In Animate, start with short diagnostic prompts before generating a large library. “Walk forward,” “deep crouch and stand,” “raise both arms overhead,” and “turn left, then return to neutral” each test a different part of the rig.

Watch the motion slowly as well as at normal playback speed. Pause near maximum shoulder elevation, deepest hip flexion, full knee bend, and foot contact. A fast clip can hide one bad frame; a paused extreme pose cannot. Rotate the camera while paused because a silhouette that looks acceptable from the front may reveal severe volume loss from the side.

Separate animation quality from rig quality. If both feet slide but the legs deform cleanly, inspect the clip timing, ground contact, and root settings. If the right shoulder collapses across unrelated clips, return to the skeleton or weights. If one generated action contains an implausible pose while other actions pass, the clip may be the outlier. Reusing a small test set gives you evidence instead of a new theory after every generation.

Choose root handling deliberately. Enable Root Lock for locomotion when the game controller moves the character and the clip should play in place. Keep authored travel when the clip is a cinematic action or the runtime intentionally consumes root motion. Never move the character with both systems at once. The result will drift because the controller and pelvis track each apply displacement.

Save only clips that pass. A compact set of tested idle, walk, run, jump, hit, and interaction motions is more useful than a folder of animations that reproduce the same shoulder defect. The neighboring guide to AI character rigging goes deeper on the marker-driven fit, while the Sorceress tools guide maps the rest of the asset pipeline.

When a Mixamo alternative fits your export pipeline

This Mixamo alternative fits best when you want control over the rigging evidence, not just access to a motion catalog. It is a strong match for a custom humanoid mesh that needs anatomical fitting, a character whose shoulders or hips require weight inspection, a browser-first workflow, or a project that wants text-generated motion tested on the final skinned character before export.

It is a weaker match when the source is not humanoid, when the model already carries a production skeleton that must remain untouched, or when the target project requires a specific proprietary skeleton contract you have not validated. Sorceress has separate paths for procedural multi-legged rigs and for imported pre-rigged character profiles. Choose the path that preserves the source asset’s real requirement instead of forcing every model through one humanoid template.

Before delivery, run a simple export acceptance check:

  1. Export the selected character package or GLB with the intended animation clips.
  2. Load the exported asset in a clean test scene rather than trusting the authoring viewport.
  3. Confirm scale, up axis, materials, skeleton presence, skin deformation, and clip names.
  4. Verify whether each locomotion clip is in place or carries root travel.
  5. Run one gameplay-speed movement test and one paused extreme-pose inspection.

Keep a small manifest beside the asset: character name, source version, skeleton profile, export format, clip list, in-place flags, and any known camera-distance limits. That note turns a visual result into a reproducible game asset. It also gives a coding agent enough context to integrate the character without inventing bone names or movement assumptions.

The practical decision is straightforward. Use a motion-only service when its stock rig and stock clips already satisfy the project. Use Sorceress when the character itself needs to be fitted, skinned, inspected, animated, and exported as one traceable browser workflow. Open Auto-Rigging for the focused mesh-to-rig path, or enter 3D Studio when you also need character creation, animation management, and a packaged runtime handoff.

Frequently Asked Questions

What should a Mixamo alternative include for game characters?

It should import the mesh format you actually use, let you fit or verify the skeleton, calculate skin weights, expose deformation problems before export, and produce an asset your runtime can load. Animation quantity alone is not enough. A character with shoulder collapse, loose elbows, or foot sliding still needs rig work before it belongs in a game.

Can Sorceress auto-rig a humanoid model in the browser?

Yes. The Sorceress rigging workflow accepts humanoid model files, provides guided anatomical marker placement, builds a humanoid skeleton, computes skin weights, and hands the skinned character to the Animate workspace. Auto-Rigging is marked as a Pro tool in the current product source.

Why should I inspect skin weights before animation?

Bones only define transforms; skin weights decide how strongly each vertex follows each bone. Poor weights appear as collapsing shoulders, pinched hips, detached-looking wrists, or vertices pulled by the wrong limb. Inspecting the weight map and testing representative poses catches those defects before they are repeated across every animation clip.

Do I need to rig fingers for every game character?

No. Finger detail should match the camera and gameplay. A close third-person character may need readable hand deformation, while a distant strategy unit may only need stable wrists and a convincing hand silhouette. Spend rig complexity where the player can see it, but do not let unnecessary detail delay the core body-deformation test.

Should locomotion clips keep root motion?

Use in-place motion when the game controller moves the character and the clip only poses the body. Keep authored root travel for a cinematic or a runtime that deliberately consumes root motion. Mixing both methods makes the mesh drift away from its controller, so record the choice per clip and test it inside the target movement loop.

Sources

  1. glTF 2.0 Specification — Skins
  2. THREE.SkinnedMesh — Three.js Documentation
  3. THREE.Skeleton — Three.js Documentation
  4. File API — W3C
Written by Arron R.·2,238 words·10 min read

Related posts