A free AI animation generator from image is the single most useful piece of the 2026 game-dev pipeline that, until last year, required a Maya seat, a Mocap suit, and an animator. The browser landscape changed that. The honest 2026 question for a free AI animation generator from image is no longer "can I animate a character from one image for free" — the answer is yes. The honest 2026 question is which kind of animation you want: a 3-second video clip of the source image moving in place, a 2D sprite sheet you can drop into a Phaser scene, or a rigged 3D character with a text-prompted motion clip you can re-animate forever. This guide walks the third path — the rigged 3D animation pipeline — because it is the only path that produces a reusable game-ready asset, and because Sorceress runs the whole thing in a browser tab with a single metered step that costs 2 credits. Every other step is free for any signed-in user. Verified May 20, 2026 against the live tool source and the official skeletal-animation primer.
What a free AI animation generator from image actually does in 2026
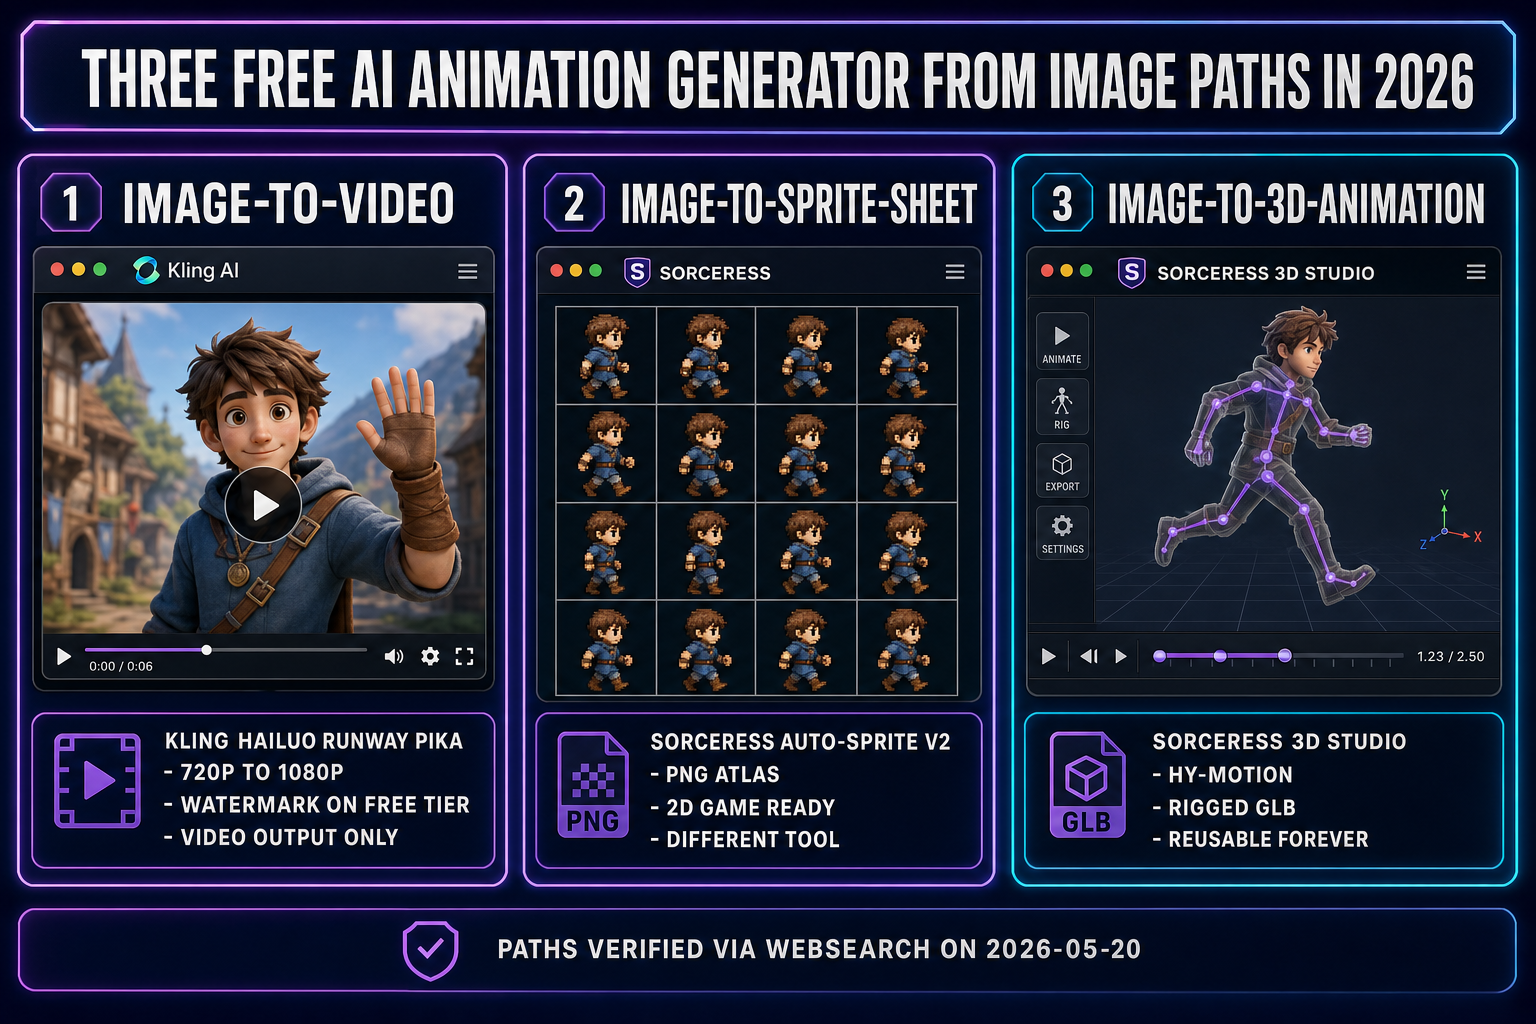
The phrase "free AI animation generator from image" hides three fundamentally different outputs that all market themselves under the same headline. The first is a 2D video clip: feed in a still, get a 3-to-10-second 720p or 1080p video where the source image appears to move in place. Kling AI, Hailuo AI, Luma Dream Machine, Runway Gen-3, and Pika 2.0 all sit in this category — verified May 20, 2026, each ships a daily-allowance free tier with a watermark or a one-time-credit-pack free tier without one. The second is a 2D sprite sheet: feed in a still, get a packed grid of pixel-art frames you can load into a 2D game engine. The third — the one this guide is about — is a rigged 3D character with a text-prompted motion clip you can re-animate, retarget, and blend into a game-engine animation graph forever. Only the third produces an asset that survives the move from "marketing clip" to "playable game character".
The difference matters for budgeting. A 2D video clip is locked: whatever motion the model chose is the motion you get. You cannot reuse it, cannot extend it, cannot drive it from a state machine. A 2D sprite sheet is the bridge between the video output and a 2D game scene (the AI sprite generator pipeline walks that bridge). A rigged 3D animation is the reusable asset — one GLB file containing the mesh, the skeleton, and the baked motion track, ready to drop into any 2026 engine. The honest cost framing: a free AI animation generator from image at the 2D-video tier costs nothing per attempt but produces a one-shot artefact; the rigged 3D tier costs a few credits per attempt but produces a forever-asset. For a game character you will animate twenty times before shipping, the rigged 3D path is cheaper per frame of usable content even when the per-call cost is non-zero.
The third category is also the one almost nobody covers honestly. The big 2D image-to-video tools are well-documented because their marketing pushes them. The 3D rigged path is younger — HY-Motion 1.0 only shipped on December 30, 2025, the open-source models that lift an image to a textured 3D mesh only stabilised in mid-2025, and the browser auto-rig pipelines only landed at production quality in early 2026. The honest version of "free AI animation generator from image" in May 2026 is: yes, you can run the rigged 3D pipeline end-to-end in a browser tab for the cost of a 2-credit HY-Motion call, but the public guides have not caught up. This is that guide.
The three paths in 2026 and how to pick
The decision tree is mercifully short. Three signals decide which path the user wants:
- If the output is a marketing render or a short social clip: pick a 2D image-to-video tool. Kling AI for the best motion quality on the free tier (six 1080p clips per day, small watermark). Hailuo AI for watermark-free output on the free tier (ten 720p clips per day). Luma Dream Machine for the stylised look. Runway and Pika for the one-time credit-pack free runs. None of these output a reusable game asset; they output a video file.
- If the output is a 2D game character sprite sheet: pick the AutoSprite path. Generate the source image, run it through an AI video model to add the motion, then run the video frames through Sorceress AutoSprite v2 to extract a packed PNG sprite sheet. Game-ready for any 2D engine. The detailed walkthrough is in the AI animation generator from image guide.
- If the output is a rigged 3D character with a reusable motion clip: pick the 3D Studio path covered below. This is the only path that produces a GLB file with a skeleton, a mesh, and a baked animation track. It is the right pick for any character you will animate more than once.
The rest of this guide is the third path: the rigged 3D free AI animation generator from image pipeline inside 3D Studio. Five sub-steps, every one in a browser tab, one metered call at the end.
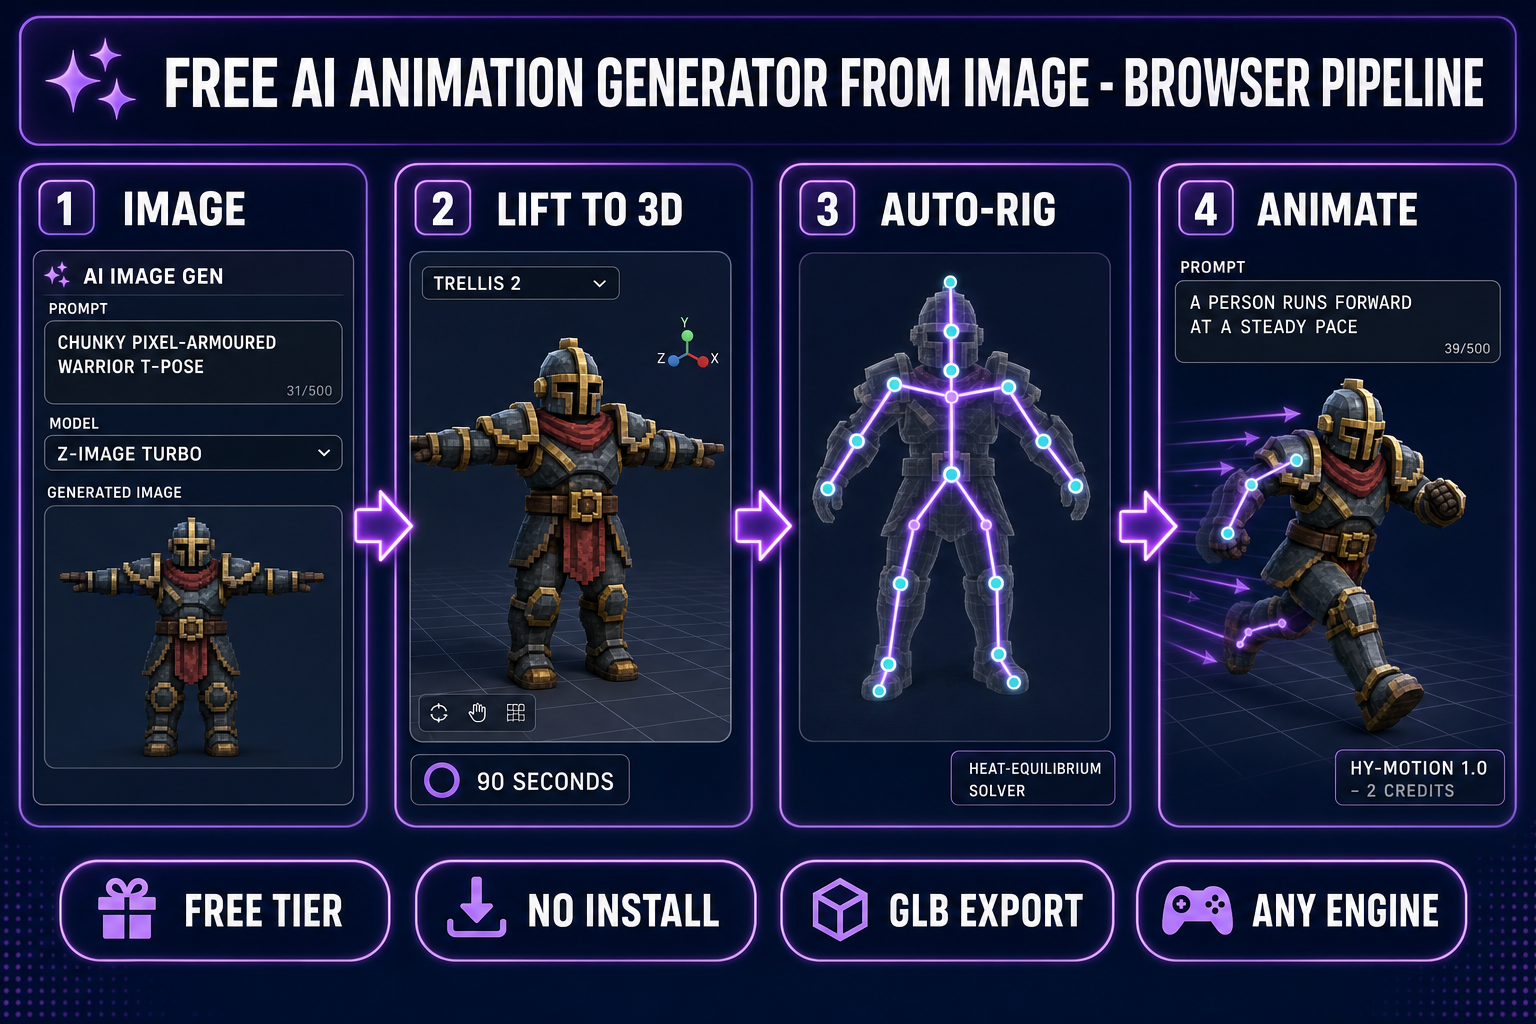
How to stand up the free AI animation generator from image pipeline in five steps
The end-to-end pipeline lives in a single 3D Studio tab. Five conceptual steps, every step interactive, every step undoable, every step except the last one free for any signed-in user.
Step 1 — Generate the source still with AI Image Gen
Open AI Image Gen and write a prompt that gives the rigging step a fighting chance. Three rules: T-pose or A-pose, front-on framing, limbs separated from the body. The literal prompt that works reliably is "a chunky humanoid warrior in clean T-pose, arms slightly away from body, fingers spread, facing camera, plain neutral background, full body visible, 3:2 aspect". Pick the model on the right rail. For the cheapest path, Z-Image Turbo (the Tongyi-Mai ultra-fast model) ships at low credits per generation and renders a clean T-pose in roughly 10 seconds. For the highest character quality, Nano Banana 2 (the Google flagship at low-tier cost) gives crisp anatomy. For text-on-character requirements (a name tag, a logo), GPT Image 2 is the right pick — it is the only model in the 2026 lineup that renders dense legible text reliably. All three are part of the seven-model rail in AI Image Gen, verified against src/app/_home-v2/_data/tools.ts on 2026-05-20.
One generation. Send the result to the 3D Studio Generate tab via the "Use in 3D Studio" action, or download as PNG and re-upload. Time elapsed: roughly 10 to 45 seconds depending on the chosen model.
Step 2 — Lift the still to a textured 3D mesh
Inside 3D Studio, the Generate tab takes the source image and lifts it to a textured 3D mesh. Six models ship in the picker — Hunyuan 3D 3.1, Meshy 6, TRELLIS 2, TRELLIS, Rodin 2.0, Tripo v3.1 — verified against src/lib/threed-models.ts on 2026-05-20. For a free-tier-budget run, TRELLIS is the cheapest at low double-digit credits per generation and produces a clean mesh in about 60 seconds. For the highest mesh quality on the same run, Meshy 6 takes about 150 seconds and produces sharper topology. For animated characters specifically (where mesh deformation cleanliness matters more than texture detail), Hunyuan 3D 3.1 and TRELLIS 2 produce the most rig-friendly geometry. The output is a GLB containing the mesh and the diffuse texture map, ready for the auto-rig step.
One click. Wait 60 to 180 seconds. The Generate tab shows the mesh in a preview viewport. Time elapsed cumulatively: roughly 70 seconds to 4 minutes depending on the image and 3D model picks.
Step 3 — Auto-rig the humanoid skeleton
Switch to the Rig tab — the auto-rig step is the third stage of the free AI animation generator from image pipeline. The mesh loads automatically from the previous step. Place 13 anatomical markers on the mesh — pelvis, neck, chin, the two shoulders, the two elbows, the two wrists, the two knees, the two ankles (plus two optional hip markers for fine-tuning) — verified against src/lib/rigging/types.ts on 2026-05-20. Auto-mirror is on by default, so for a symmetric humanoid you click nine markers and the tool builds the other six. Centre-snap is on by default and projects each click to the volumetric centre of the limb rather than its surface point.
One click on the "Build skeleton + auto-weight" button. The mesh and the skeleton go to a hosted Blender backend that runs the heat-equilibrium weight solver — the same solver Blender itself ships, run as a service so the browser user never installs Blender. The full marker-placement-to-weighted-rig path is covered in detail in the browser auto-rig guide. Wait 60 to 120 seconds. The output is a rigged GLB with the skeleton bound to the mesh.
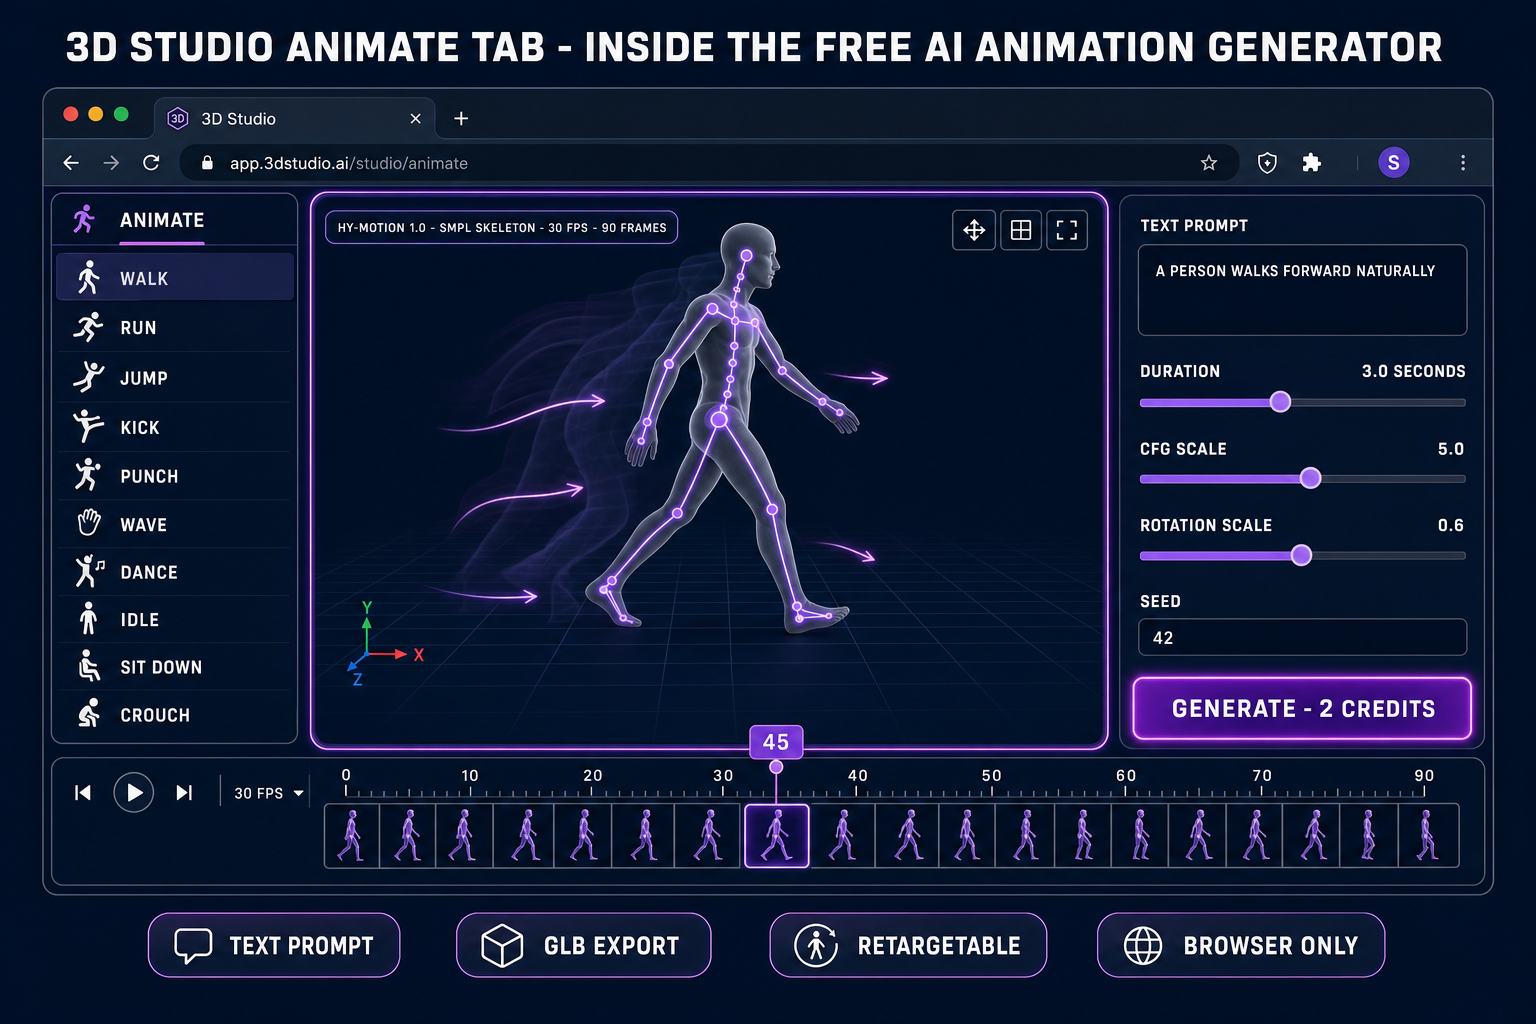
Step 4 — Animate by text prompt with HY-Motion
Switch to the Animate tab — the metered call in the free AI animation generator from image pipeline. The rigged mesh loads from the Rig step. The right-hand panel exposes the HY-Motion text-to-motion controls. Type a motion description in the prompt field, pick a duration (the slider runs 0.5 to 10 seconds; 3 seconds is the default and matches a typical walk-cycle loop length), leave CFG scale at 5.0 and rotation scale at 0.6 (the defaults verified against src/app/api/animation/generate/route.ts on 2026-05-20), and click "Generate — 2 credits".
The ten built-in presets cover the common cases — Walk ("A person walks forward naturally"), Run ("A person runs forward at a steady pace"), Jump, Kick, Punch, Wave, Dance, Idle, Sit down, Crouch — and every one of them is a working prompt you can run as-is, verified against the PRESETS array in src/components/studio/animate/AnimateTab.tsx on 2026-05-20. For a custom motion, write the prompt in present-tense plain English describing what the character does: "A person throws a left-hand jab and a right-hand cross", "A person spins their sword above their head", "A person draws a bow and releases an arrow", "A person casts a spell with both hands raised". HY-Motion covers 200+ motion categories across six classes (locomotion, daily activities, fitness, game-character actions, social interactions, sports) — verified against the official Hugging Face model card on 2026-05-20. The model is Tencent HY-Motion 1.0, released December 30, 2025, the first text-to-motion model successfully scaled to the billion-parameter level (1.0B standard, 0.46B Lite). Sorceress runs it on a hosted RunPod endpoint so the browser user never needs the 26 GB of VRAM the standard model requires locally.
Wait 30 to 90 seconds for the generation to complete. The Animate tab plays the result on the rigged character in the centre viewport with a timeline scrubber and a frame-by-frame stepper.
Step 5 — Export the GLB and load it in your engine
Click the Export panel and pick "Animation (.glb)" — the final step of the free AI animation generator from image pipeline. The file contains the mesh, the skeleton, and the baked HY-Motion animation clip in glTF 2.0 binary format — the Khronos Group standard every modern engine consumes natively. Verified May 20, 2026 against the GLTFExporter integration in src/components/studio/animate/AnimateTab.tsx on lines 5301, 5355, 5457, and 5507. The export is instant — there is no remote round-trip, just a Three.js GLTFExporter pass on the rigged scene.
For Three.js (and Phaser 4 scenes using this.add.threejs), load with the GLTFLoader and drive the clip with the AnimationMixer — both shipped in Three.js r184 (April 16, 2026) verified against the official GitHub release notes on 2026-05-20:
const loader = new GLTFLoader();
const gltf = await loader.loadAsync('/assets/warrior.glb');
const mixer = new THREE.AnimationMixer(gltf.scene);
const action = mixer.clipAction(gltf.animations[0]);
action.play();
// In render loop:
mixer.update(delta);
For Godot 4, drop the GLB into the FileSystem panel; the importer reads the animation into a fresh AnimationPlayer node automatically. For Unity, the glTFast package converts the rig into a humanoid AnimationController. For Unreal, the built-in glTF importer reads the skeleton and the animation track, with SK_Mannequin retargeting as the cleaner final-mile step for projects built on the Unreal mannequin.