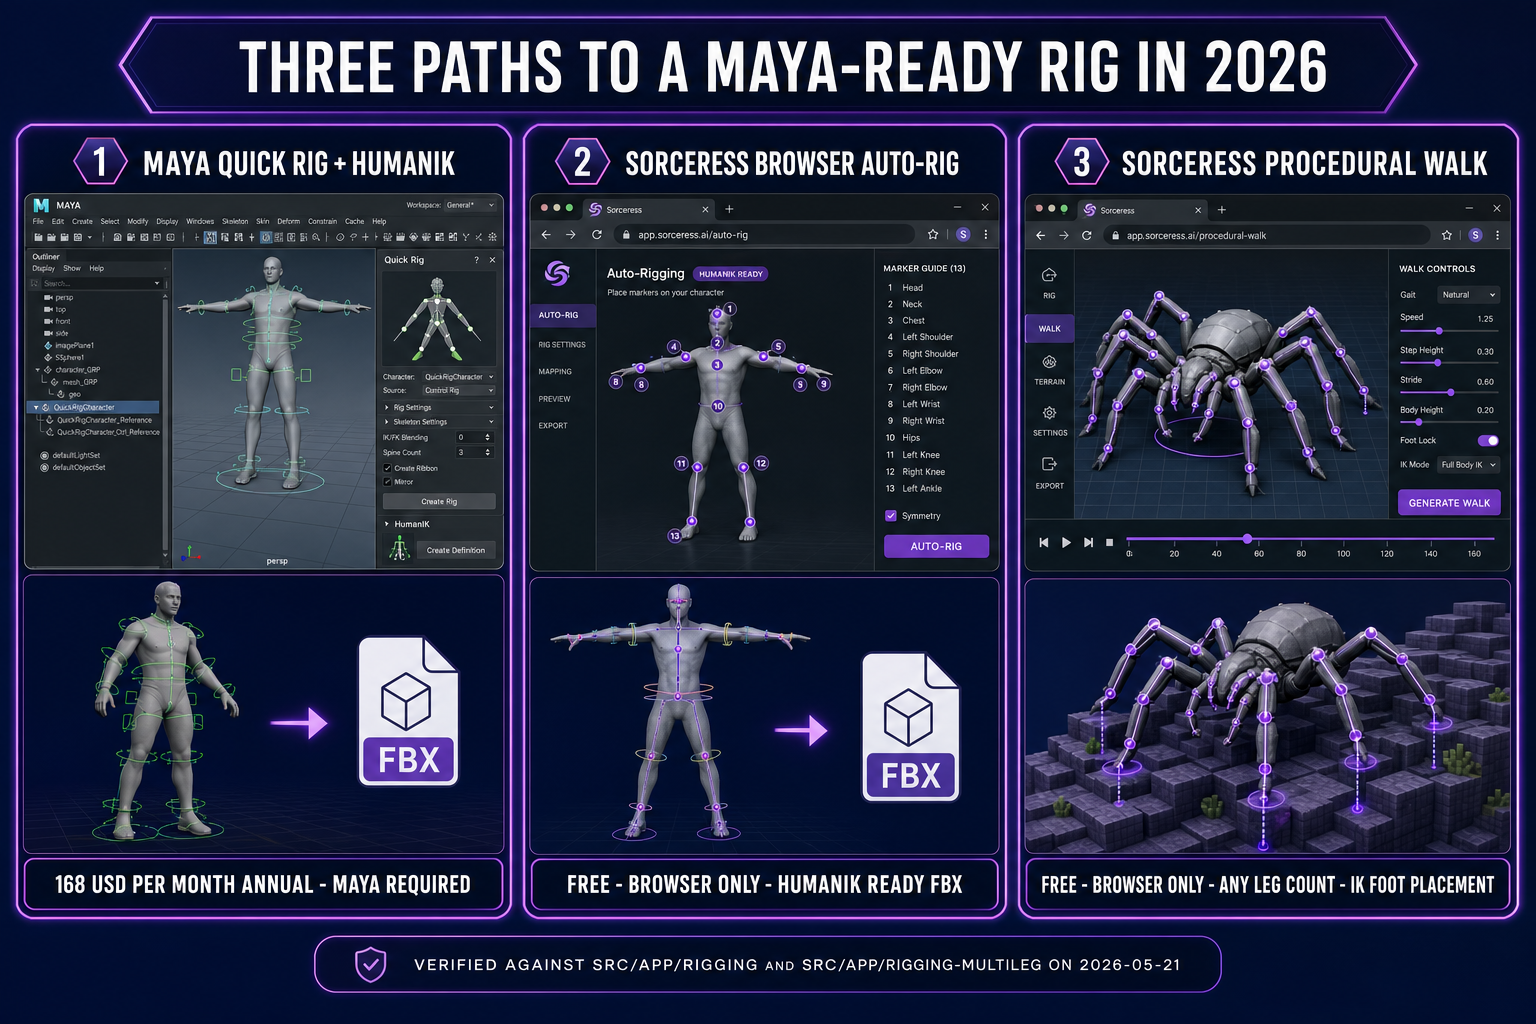
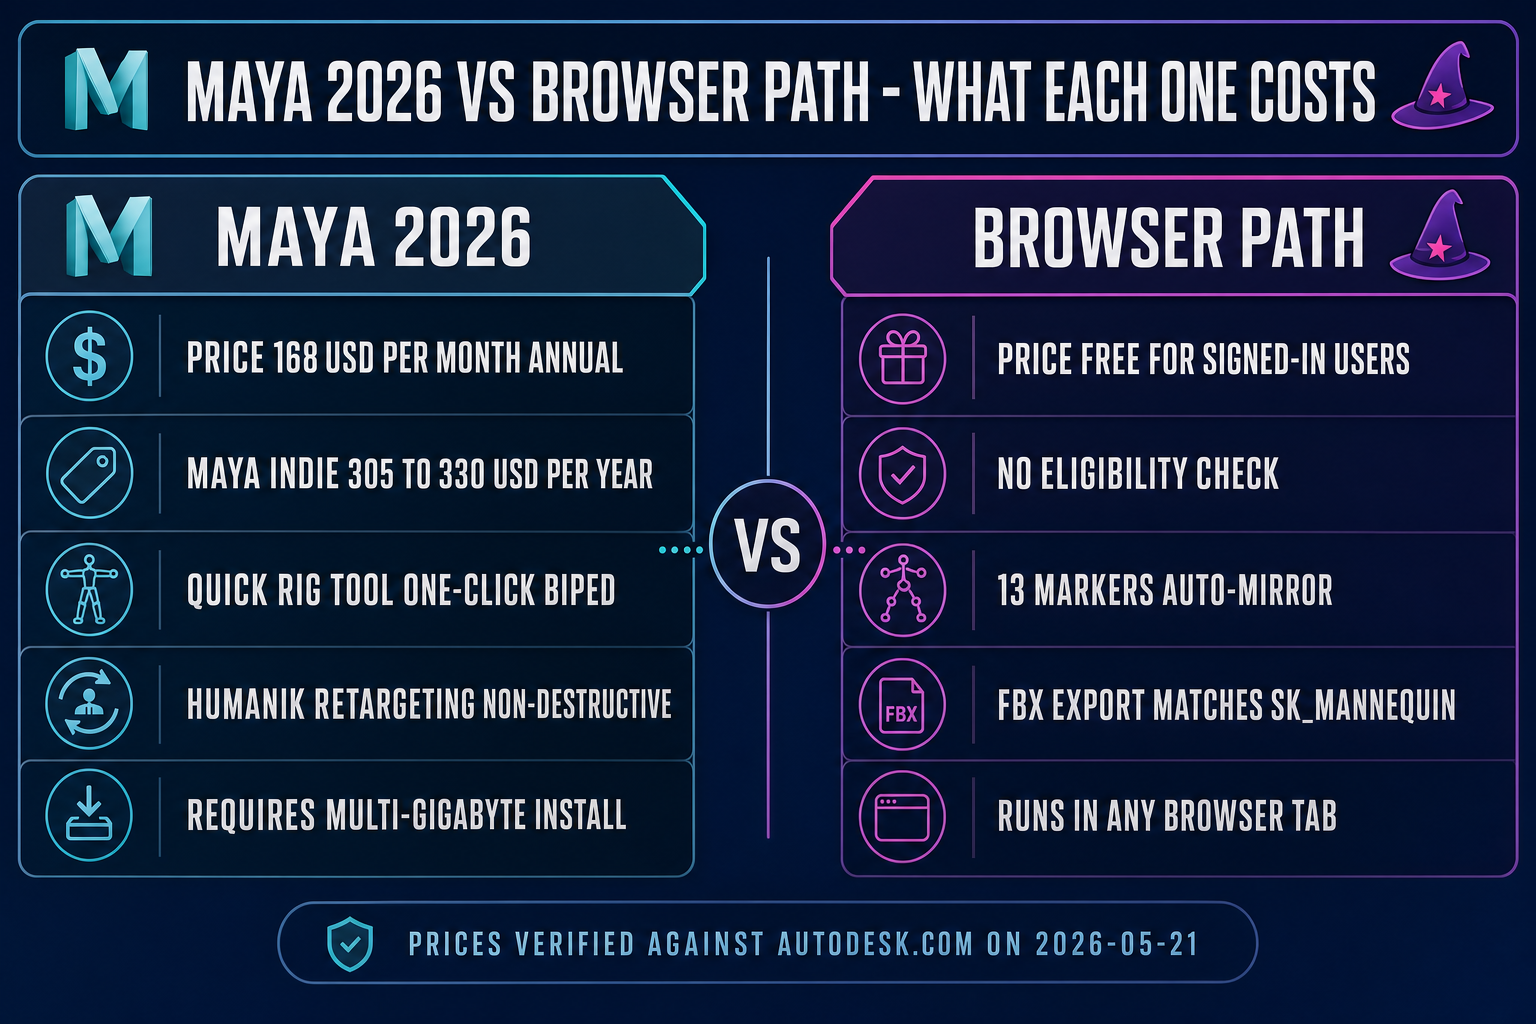
Maya is the Hollywood-grade DCC tool that owns enterprise character animation. Its built-in Quick Rig tool produces a clean HumanIK-driven biped skeleton in one click, and the HumanIK system retargets motion-capture libraries between characters non-destructively. The catch is the seat price: Autodesk Maya 2026 lists at $168/month on annual billing (about $2,010/year) and the Maya Indie tier (for solo developers under $100,000 in annual gross revenue at companies of five or fewer) lands at $305 to $330/year, both verified against autodesk.com on 2026-05-21. For a game developer who needs a rigged character and the FBX it exports — but does not want to pay for the rest of Maya — there is a browser path that produces a Maya-compatible skeleton without a Maya seat, without a HumanIK characterization session, and without an install. This guide walks the honest comparison: what the Quick Rig actually ships, where the browser auto rig for Maya alternative matches it, and where you should still keep Maya around.
What “auto rig for Maya” actually means in 2026
When a developer searches for an auto rig for Maya, two specific Maya features sit behind the query: the Quick Rig tool and the HumanIK animation system. The Quick Rig is the one-click side; HumanIK is the retargeting and animation-mapping side. They are both shipped with Maya at no extra cost — the $168/month annual subscription, the $255/month month-to-month price, the $300-for-100-tokens Flex licence at 6 tokens/day, and the Maya Indie tier at $305 to $330/year all include the rigging menu set in full. Verified against the autodesk.com Maya 2026 product pages on 2026-05-21.
The Quick Rig tool lives in the Rigging menu set under Skeleton > Quick Rig, in the Rigging shelf, or under Windows > Animation Editors > Quick Rig. It offers two workflows: One-Click and Step-By-Step. The One-Click mode produces an automatic rig “that works best for standard biped character meshes” — Autodesk’s own phrasing in the help docs — when the character mesh is a biped, the mesh is Y-up, and the character faces the positive Z axis. The tool selects the mesh, runs an internal geometric analysis to place the joints, and binds the result to a skeletal-animation hierarchy. Step-By-Step mode exposes the guide markers for manual adjustment before the skeleton is generated; it is the option Autodesk’s own documentation recommends “for greater control and accuracy” because the One-Click placement may not align elbows or knees with the model’s actual joints. The output of either mode is a HumanIK skeleton bound to the mesh with default weights.
HumanIK is the system that makes the skeleton useful beyond a single character. To use HumanIK retargeting — non-destructively transferring a walk cycle from a source character onto a target character — both characters need a HumanIK characterization, a mapping of at least 15 required nodes (ankles, knees, hips, spine base, shoulders, elbows, wrists, and head) onto the skeleton’s joints. Optional bones improve pose quality. Once characterized, animations move freely between characters on layers, with bake-down or live preview both available. This is the feature that makes Maya genuinely valuable for animation-library work, and the feature with no direct browser-tool equivalent.
Maya’s auto rig versus the browser path: the real cost
The honest comparison is not a feature table; it is a workflow plus the cost of admission. Maya’s auto rig costs the Maya seat. The browser auto rig for Maya alternative costs zero for any signed-in user. The break-even depends on what else you do with the seat.
If your daily work is character animation across multiple projects, you need a Maya seat anyway, and the Quick Rig is one click on a tool you already own. The cost of the rig itself is rounding error. If your daily work is a browser-first game-jam pipeline, a vibe-coded indie project, or a hobby roster of two or three characters, the Maya seat is the entire cost — there is no other use case absorbing it. The browser path covers your roster without buying into the rest of the DCC.
The other dimension is the install. Maya Indie at $305 to $330/year is the cheapest Autodesk-licenced path, but it still ships as a multi-gigabyte desktop install with the standard Autodesk eligibility check (under $100,000 USD gross creative revenue in the last twelve months, fewer than five employees, not a subsidiary of a larger company, verified May 21, 2026 against autodesk.com’s Indie campaign page). The Indie tier does not include priority support, SLA guarantees, or account management. For a browser-first developer those omissions are fine. The install footprint and learning curve are the bigger drag — Maya’s UI is a deeper investment than a single rig is worth if you only need rigs.
The browser-based auto rig for Maya alternative
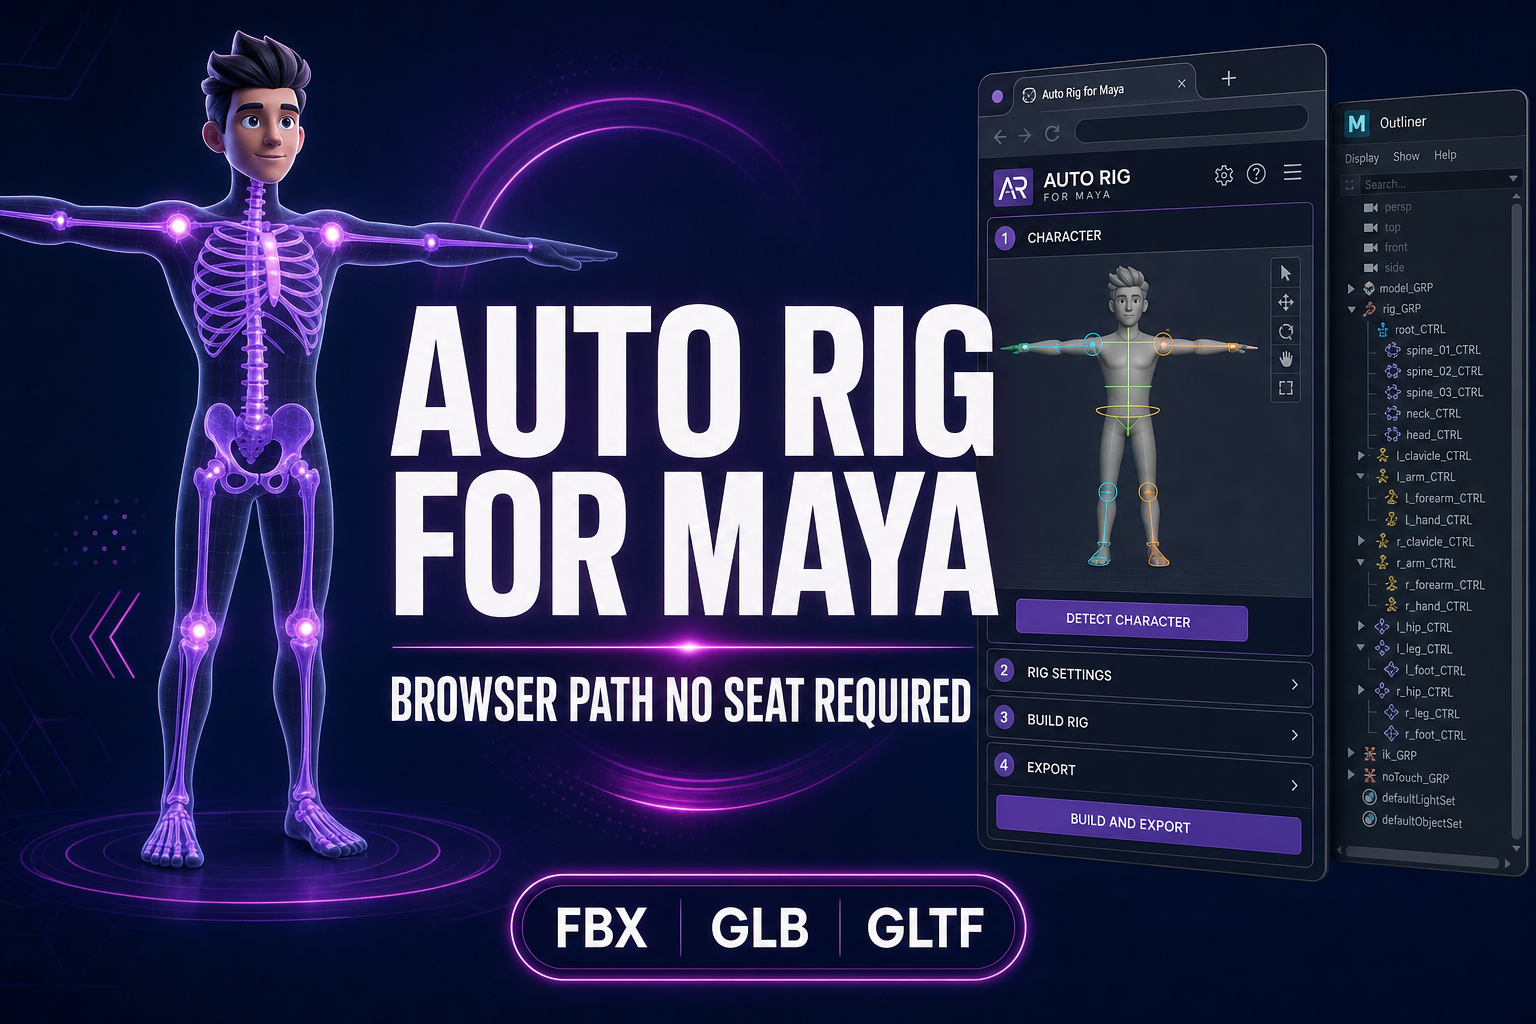
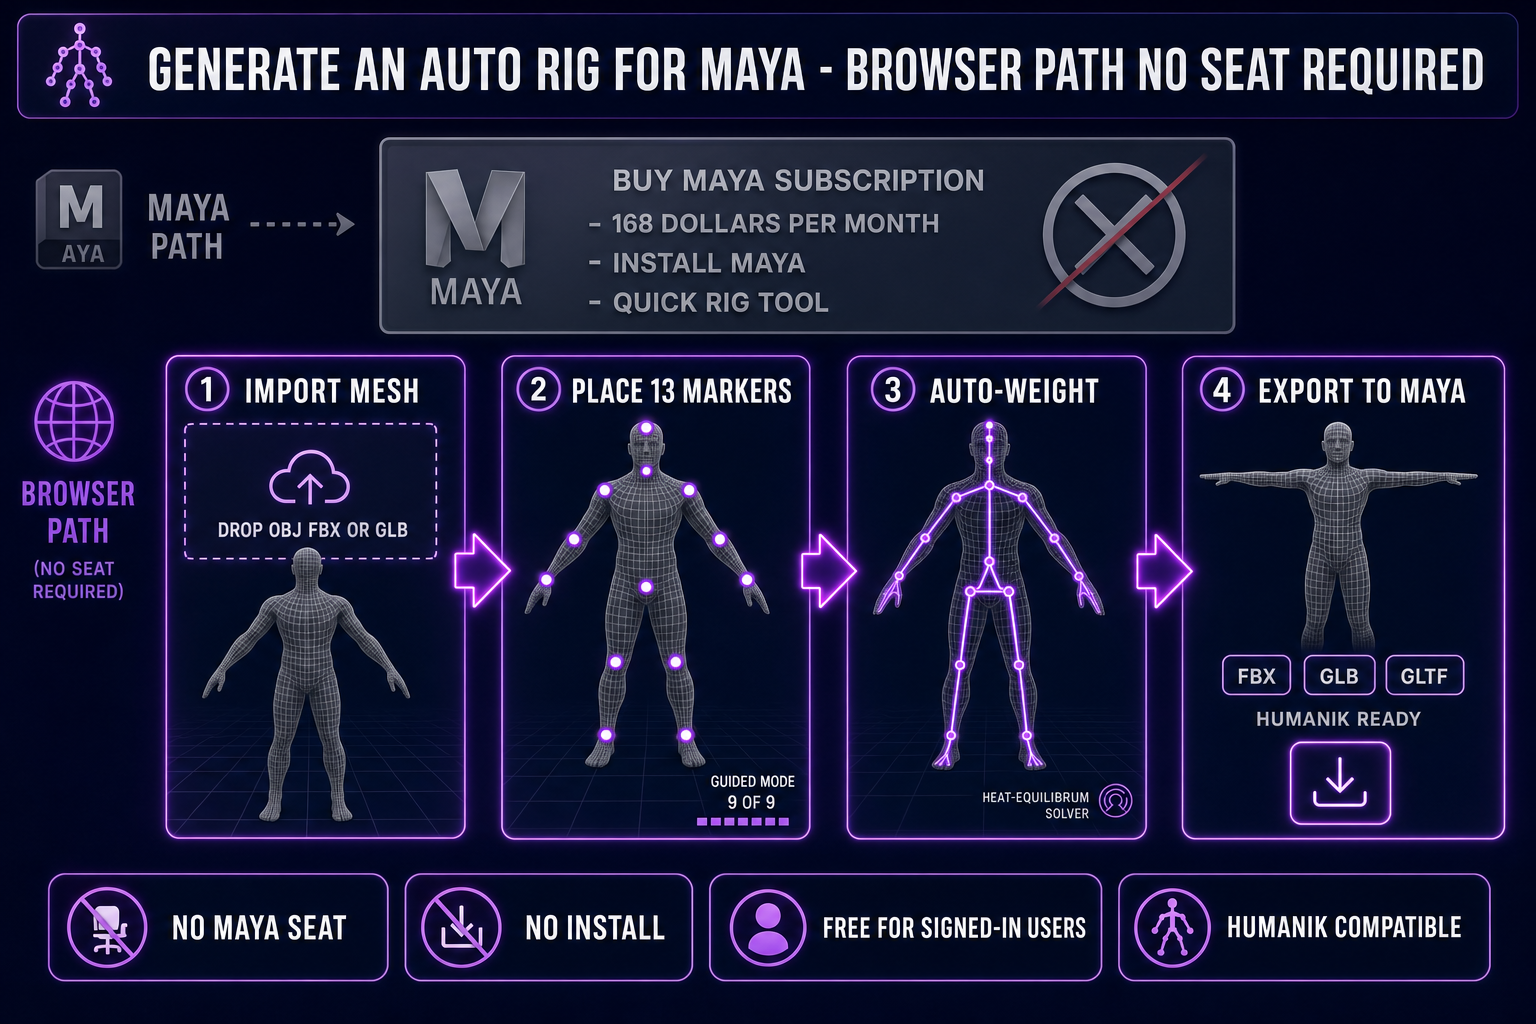
The browser path that delivers a Maya-compatible rig without a Maya seat is Sorceress Auto-Rigging at /rigging. It runs entirely in a browser tab on the same WebGL stack any modern device already has — no install, no plugin, no Autodesk login. The page accepts the same three input mesh formats Maya’s Quick Rig consumes (OBJ, FBX, GLB), parses them client-side in JavaScript and Three.js, and lays out the same three-pane interface every rigging tool uses: a 3D viewport in the centre, a marker and detection inspector on the left, and a log and export panel on the right.
The skeleton anatomy follows the Maya HumanIK biped shape closely on purpose. Verified against src/lib/rigging/types.ts on 2026-05-21, the marker set is thirteen required anatomical landmarks (pelvis, neck, chin, left and right shoulder, left and right elbow, left and right wrist, left and right knee, left and right ankle) plus two optional hip markers. Auto-mirror reflects every left-side placement to the right; centre-snap projects each click to the volumetric centre of the limb rather than its surface, which keeps the inferred bone axis down the middle of the muscle mass. For a symmetric humanoid you place nine markers and the tool builds the other six. The required-marker count is comparable to HumanIK’s “at least 15 required nodes” mapping, but the placement is faster because the user clicks anatomical points instead of mapping joints onto an existing skeleton.
The bind step calls a Sorceress-hosted Blender backend that runs the heat-equilibrium weight solver — the same solver Blender ships, and the one Maya’s bind-skin defaults reach for when “Heat Map” mode is selected. The browser never opens Blender, the user never sees a Python error, and the output is an FBX, GLB, or GLTF the consuming engine accepts directly. Verified against src/lib/rigging/blender-client.ts on 2026-05-21, the FBX bind pose matches the SK_Mannequin reference skeleton at the bone-position and orientation level, which is what makes the exported file drop cleanly into Unreal’s content browser and into Maya for HumanIK characterization.
The five-step workflow: generate an auto rig for Maya in the browser
The full pipeline collapses to five steps, each one running inside a single browser tab:
- Import the mesh. Drop an OBJ, FBX, or GLB into the viewport. Any existing skeleton in the source FBX is ignored — the tool keeps the static surface only and builds a new rig from scratch. GLB is the format every Sorceress image-to-3D model exports, so a prompt-to-rig pipeline runs GLB through the entire chain.
- Place thirteen anatomical markers. Guided mode walks the canonical order (chin, neck, pelvis, hip, shoulder, elbow, wrist, knee, ankle) and auto-mirror handles the right side. Centre-snap stays on by default. For a chibi or a stylised silhouette where the proportions confuse a fixed-marker rigger, the marker positions can be nudged individually before the build step.
- Run finger detection (optional). A separate peak-detection pass finds five fingertip locations per hand on any character whose hands are sculpted open. Skip this step for chibis, mascots, and stylised characters whose hands are paddles or fists; the rig still works without finger bones.
- Build the skeleton and auto-weight the skin. One click reads the markers, constructs the bone hierarchy with the pelvis as root, and dispatches the mesh and skeleton to the hosted Blender backend for heat-equilibrium weight solving. The wait is typically 60 to 180 seconds depending on vertex count; progress is reported in the log panel.
- Pose-test and export. Toggle pose mode, drag any joint with full-body inverse kinematics, confirm the rig deforms cleanly across the shoulders, hips, and spine, and export. The FBX export is what you import into Maya for HumanIK characterization; the GLB export is what loads into Three.js r184 directly. The April 16, 2026 Three.js release upgraded
SkinnedMesh.applyBoneTransformto optionally accept a Vector4, supporting both direction (w = 0) and position (w = 1) transforms in homogenous coordinates, verified against the r184 release notes on github.com.
Every step is interactive and undoable, every step happens in a browser tab, and the only remote call is the auto-weight pass against the hosted Blender server. The tool is free for any signed-in user; uploading custom 3D models requires a Pro subscription, but generation, downloads, rigging, and animation are free for everyone. Compared with Maya Indie at $305 to $330/year for the rigging step alone, the cost difference is the entire Maya seat.