Carve an Image to 3D Printer Workflow (AI Pipeline)

By Arron R.19 min read
The honest image to 3D printer workflow in 2026: pick a clean photo, lift to a watertight mesh in Sorceress 3D Studio (Rodin 2.0 writes STL natively), import in

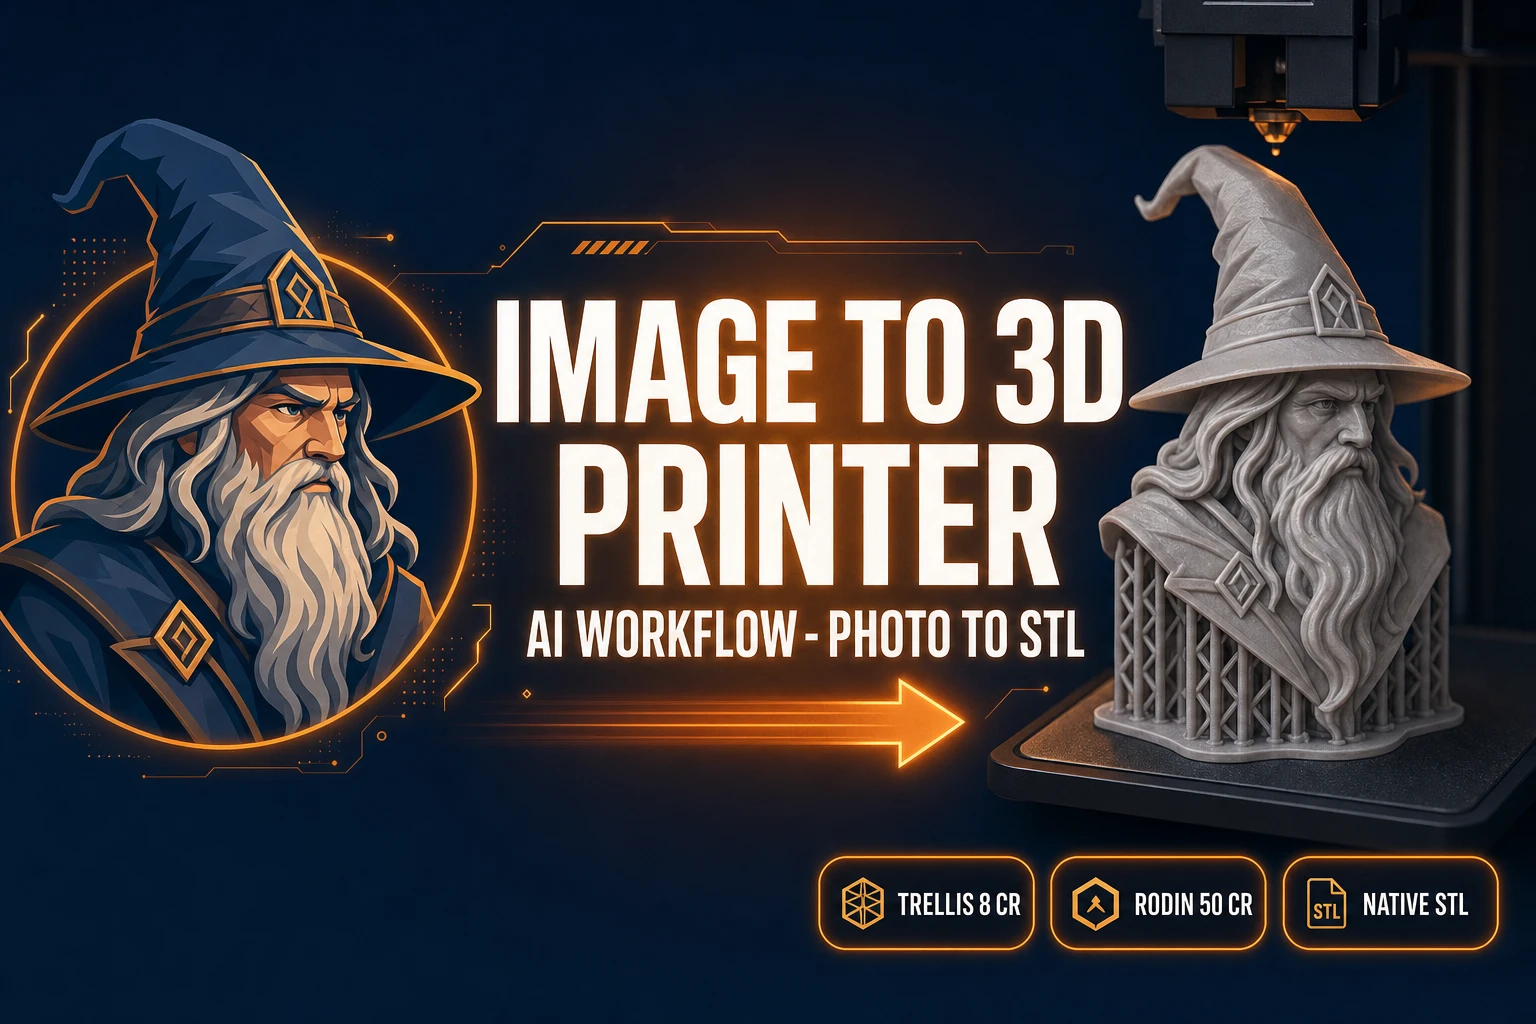
The image to 3D printer pipeline used to involve Blender, three plug-ins, two formats nobody liked, and a coin-flip on whether the slicer would accept the result. In 2026 it does not. The honest browser-first path goes from a single photo to a watertight STL inside Sorceress 3D Studio, then into Bambu Studio or PrusaSlicer or OrcaSlicer, then onto whatever FDM or resin rig sits on your desk. This guide carves the whole image to 3D printer workflow into the five steps that actually work, the model picks that produce printable geometry, and the five quiet failure modes that wreck a print three hours into the bed.

Image to 3D printer workflow diagram: photo upload, AI mesh lift in 3D Studio, native STL export from Rodin 2.0, slice in Bambu Studio or PrusaSlicer, print on any FDM or resin printer
The four-stage browser-first image to 3D printer workflow inside Sorceress 3D Studio: photo in, AI mesh lift, native STL export, slice and print.

The image to 3D printer workflow at a glance

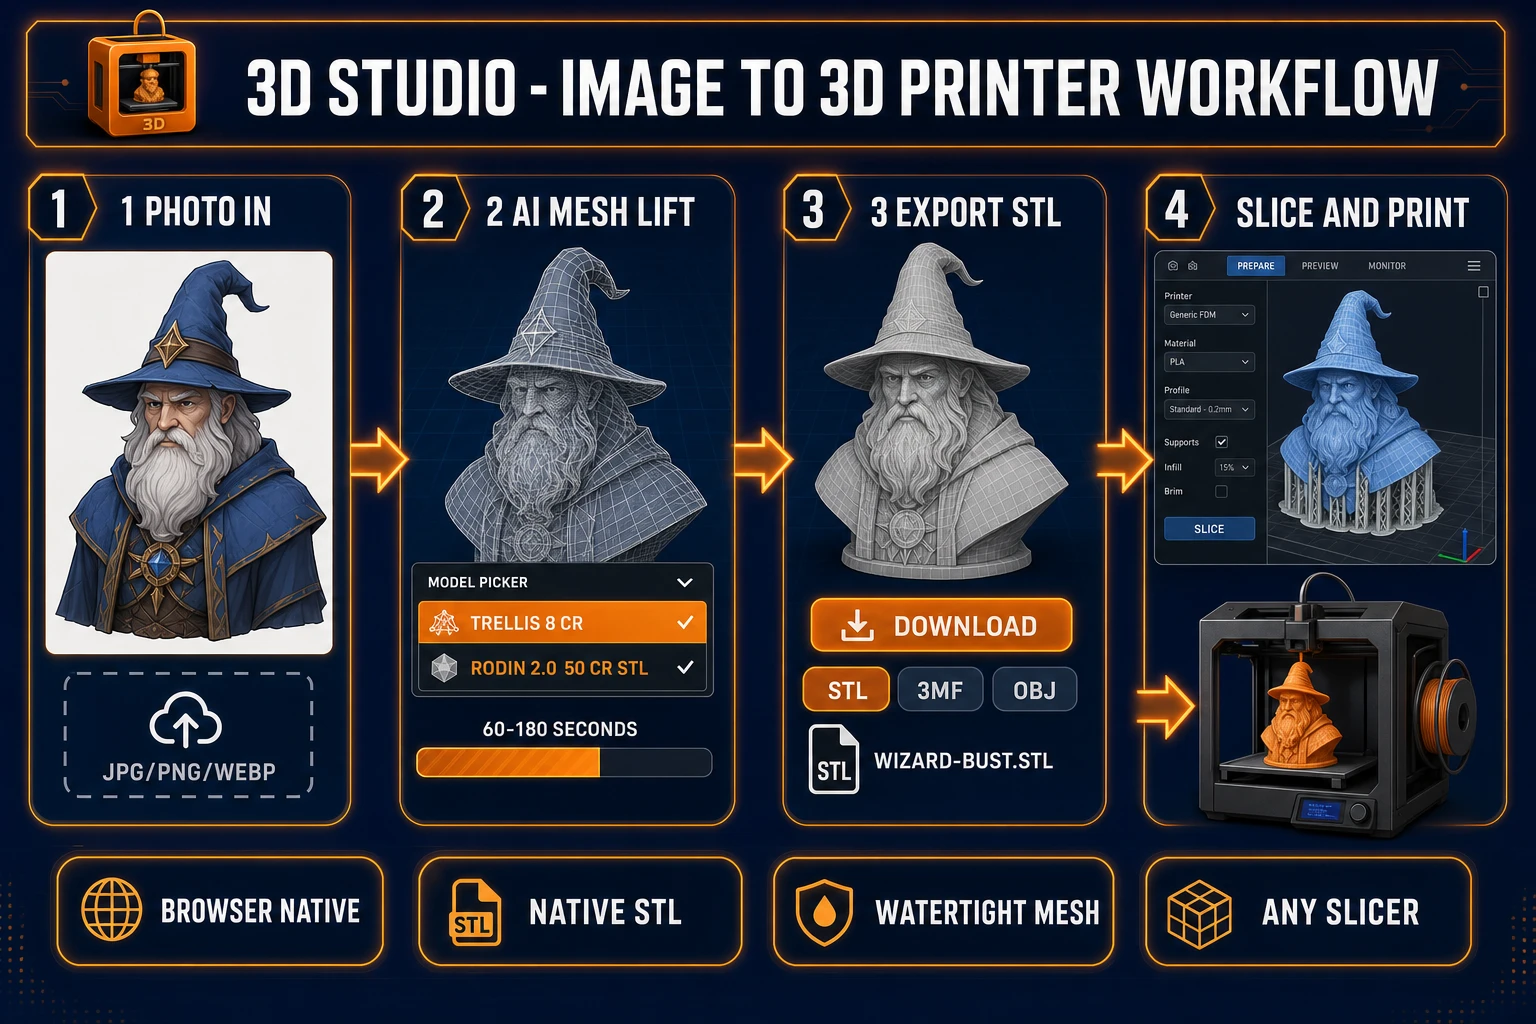
The whole image to 3D printer pipeline collapses to five steps once the source photo lives on your machine. Five steps, one browser tab for the AI lift, one slicer for the print prep, and no Blender or CAD seat in between:

  1. Get a clean source photo. A front-facing or three-quarter view of one subject on a clean background. Use any smartphone photo, a public-domain reference, or generate one in Sorceress AI Image Gen.
  2. Lift the photo to a 3D mesh. Open 3D Studio, set the input mode to image-to-3D, drop the photo, pick a model that produces watertight meshes (Rodin 2.0 or TRELLIS are the safest picks for printing), and click Generate.
  3. Export to STL. Rodin 2.0 writes STL directly from the model picker; the other six models output GLB, which any modern slicer or free converter turns into STL in seconds.
  4. Slice. Open Bambu Studio, PrusaSlicer, OrcaSlicer, or Cura. Set scale, orientation, supports, and layer height. Save the G-code.
  5. Print. Send the G-code to your FDM or resin 3D printer. Wait. Cure or sand. Done.

Steps 1 and 2 happen entirely in your browser and take roughly five minutes plus the model-run time. Steps 3 and 4 take another five minutes. Step 5 is whatever your printer needs — one to fifteen hours depending on the print size and the layer height. The whole image to 3D printer pipeline is honestly browser-first up to the moment the printer takes over.

What “image to 3D printer” actually means in 2026

A 2D image is a flat grid of pixels. A 3D-printable file is a triangulated mesh of vertices in three dimensions, with every triangle’s outward normal explicitly defined, the surface fully closed, and the geometry watertight enough that a slicer can decide what is “inside” the mesh and what is “outside”. The job of an image to 3D printer pipeline is to bridge that gap from a single flat input — one photo, one AI render, one concept sketch — and produce the mesh that the slicer turns into G-code your printer can extrude line by line.

Two technical ideas do the lifting. First, monocular depth estimation: the long-running computer-vision problem of inferring depth from a single 2D image. A neural network trained on millions of paired image-and-depth examples learns the prior over what real-world objects look like and assigns a Z value to every pixel of the input photo. Second, 3D reconstruction: the step that hallucinates the unseen back side, fills in occluded geometry, and produces a closed mesh. As of June 2026 every production-grade approach uses some flavour of diffusion model trained on 3D priors, paired with a mesh-extraction step like marching cubes over a learned signed-distance field. The output is a closed manifold mesh you can rotate, light, slice, and print.

That mesh then has to be saved in a format the slicer accepts. The standard for 3D printing is STL — deliberately simple, every triangle encoded as three vertices plus one outward-facing normal, with no colour, no texture, no scale unit, and no material data. The slicer reads only the geometry and infers everything else from your slicer settings. That is exactly what the image to 3D printer workflow needs, because the colour and texture of the source photo are irrelevant the moment the print head extrudes plastic. The geometry is the asset. 3MF is the modern alternative when colour matters — it preserves textures and per-object material assignments for multicolor systems like the Bambu Lab AMS — but STL is the single-extruder default and what the slicer expects 95 percent of the time.

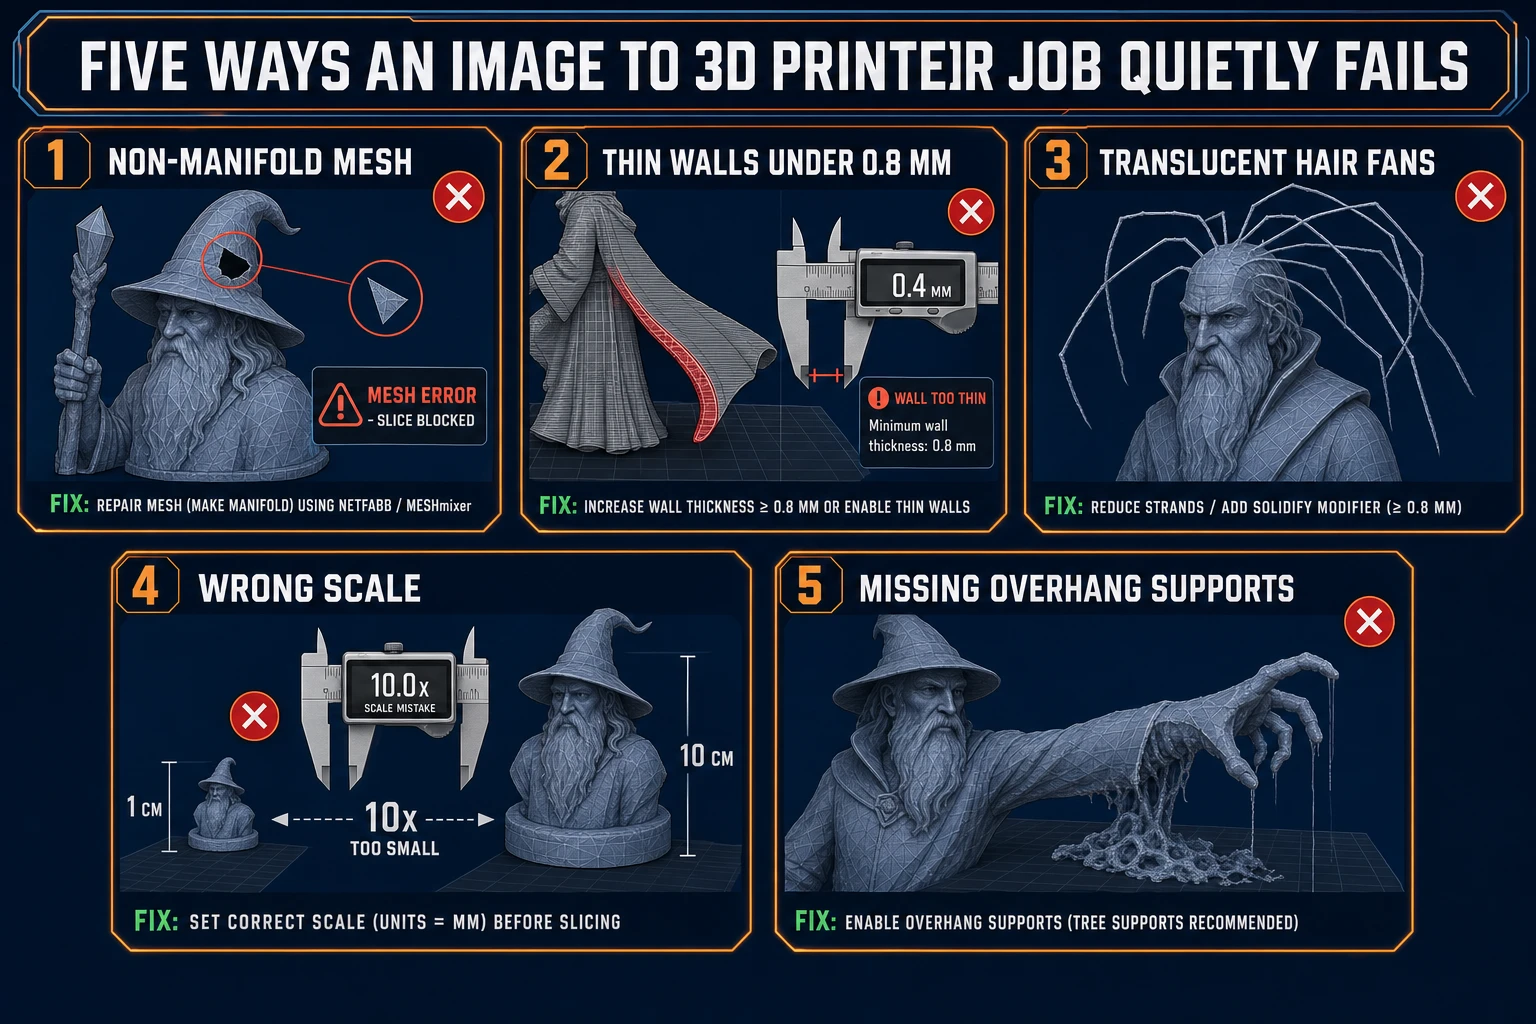
Step 1 — Get the source photo right

The output mesh is bounded above by the input photo. The same image to 3D printer pipeline that produces a clean printable bust from a clean front-facing portrait produces a melted blob from a low-quality reference. Five input rules cover most of the decisions, and they are the cheapest way to save credits and print time:

  • Single subject, clean background. The conversion model masks the foreground from the background as a first step. A busy background that overlaps the subject’s silhouette confuses the mask, and the resulting mesh either includes a chunk of background as floating geometry or loses detail along the silhouette. A plain colour or simple gradient background is best; pre-pass real photos through Sorceress BG Remover for a clean alpha-cut input.
  • Front-facing or three-quarter view. A pure side or pure back view forces the model to hallucinate the front face, which is the most-trained-on view and the one anyone holding the printed object will inspect first. Front or three-quarter input gives the model the strongest signal.
  • Even, soft lighting. Hard shadows in the source photo bake surface artefacts into the mesh. Soft global lighting gives the cleanest extracted geometry. Diffuse window light or a single softbox produces measurably better results than direct sun or an on-camera flash.
  • Resolution between 1024 and 2048 pixels on the long axis. Below 1024, the model has too few pixels to extract surface detail. Above 2048, most providers downsample anyway. The sweet spot for the image to 3D printer path is 1024 to 1536.
  • Pose with limbs separated from the torso. A character with arms tight against the body becomes a blob where the arms are fused into the torso, and that blob is hard to print without merging the supports into the mesh. A T-pose, A-pose, or hands-on-hips photo gives the slicer clean negative space to work with.

If you do not already have a usable photo, generate one. AI Image Gen in the same suite produces front-facing reference renders at the right resolution in seconds, with cleaner lighting and a plainer background than most smartphone shots. The combination of AI Image Gen for the source plus 3D Studio for the lift is the cleanest end-to-end image to 3D printer path that does not involve any photography skill at all.

Step 2 — Lift the photo to a 3D mesh inside 3D Studio

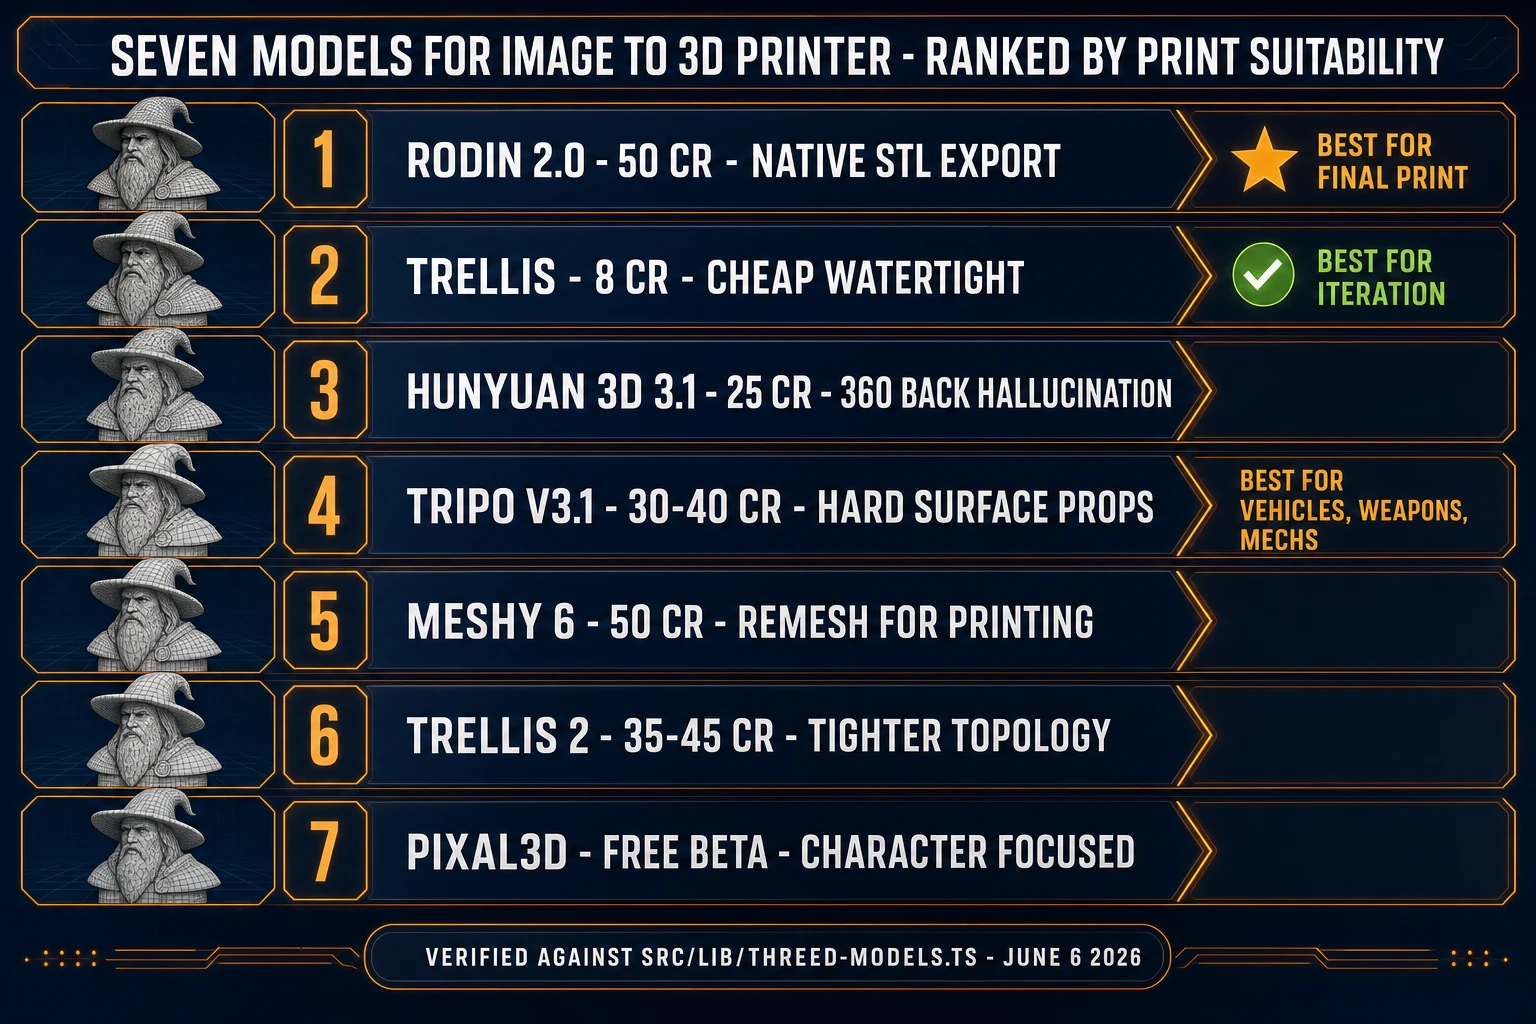
3D Studio exposes seven distinct image-to-3D backends inside one model picker, all reachable from the same Generate tab. Each routes to a separate provider, each has a separate strength, and each costs a different number of credits per run. Verified against src/lib/threed-models.ts on June 6, 2026:

  • Rodin 2.0 — 50 credits per run. Hyper3D’s Gen-2 model. Rodin is the canonical pick for the image to 3D printer path because it is the only model in the picker that emits STL directly from the API (the geometry_file_format dropdown lists glb, fbx, obj, usdz, and stl) and its Quad mesh mode produces the cleanest topology for slicer repair passes. Rodin’s strength on stylised inputs (anime characters, painted concept art, cel-shaded renders) makes it especially well-suited to figurine-style prints.
  • TRELLIS — 8 credits per run. Microsoft Research’s image-to-3D model on Replicate. The cheapest of the seven and the most reliably watertight, which makes it the safest pick when the goal is image to 3D printer rather than image to render. TRELLIS bakes the texture into a coarser map than Rodin, but for printing the texture is irrelevant: you only care about geometry, and the geometry is clean.
  • Hunyuan 3D 3.1 — 25 credits per run, recommended in the picker. Tencent’s image-to-3D model. The most aggressive of the seven at hallucinating the unseen back side from a single front view, which is good for printing a 360-degree figurine and unnecessary for a shallow relief.
  • Tripo v3.1 — 30 credits no-texture, 40 with HD texture. Tripo’s third-generation HD model. The strongest of the seven for hard-surface props and architectural shapes — the right image to 3D printer pick for vehicles, weapons, replica parts, or geometric objects where the silhouette matters more than the character.
  • TRELLIS 2 — 35 credits at 512p, 40 at 1024p, 45 at 1536p. The second-generation TRELLIS on the fal.ai backend. Tighter mesh topology than TRELLIS 1 at a higher per-run price; the Remesh toggle is on by default for cleaner triangulation.
  • Meshy 6 — 50 credits base, +25 with texture, +13 with remesh. The strongest all-rounder for character figurines. The Remesh option matters for printing — it rebuilds the topology so the slicer sees uniform triangles rather than the long thin slivers that 3D-generation models tend to emit by default.
  • Pixal3D — free for now (beta), runs on Sorceress GPU pods. Optimized for character meshes from photo or soft-painted reference; not the right pick for pixel-art or hard-edged sprite inputs, which become blocky 3D at any resolution.

For the image to 3D printer workflow the recommendation collapses to two defaults: TRELLIS for cheap exploration, Rodin 2.0 for the final print-quality pass on the locked source image. Use TRELLIS to iterate the source photo until the front and back of the mesh both look reasonable, then spend 50 credits on one Rodin 2.0 run with the STL output format selected. Skip Meshy 6's texture flag entirely — texture costs 25 extra credits and a printable mesh has no use for a UV map. If the subject is a vehicle or a hard-surface prop, swap Rodin 2.0 for Tripo v3.1 at the final-pass stage; the silhouette quality justifies the format conversion step.

Comparison of seven image-to-3D models in Sorceress 3D Studio ranked by image to 3D printer suitability: Rodin 2.0, TRELLIS, Hunyuan 3D 3.1, Tripo v3.1, Meshy 6, TRELLIS 2, Pixal3D with credit costs and printable-mesh strengths
The seven image-to-3D models in 3D Studio ranked by image to 3D printer suitability. Rodin 2.0 for native STL export on the final pass, TRELLIS for cheap iteration.

Step 3 — Export to STL (the printable format)

Once the in-tab GLB preview shows a clean watertight mesh, the next step is exporting to STL so the slicer can read it. There are two paths and one trade-off:

  • Direct STL export from Rodin 2.0. Rodin’s parameter panel exposes a geometry_file_format dropdown with five options: GLB, FBX, OBJ, USDZ, and STL. Pick STL before clicking Generate and the API returns the STL file directly. Verified in src/lib/threed-models.ts on June 6, 2026 against the Rodin route handler. This is the cleanest image to 3D printer path because the STL is generated server-side and downloaded as a single binary file ready to drop into the slicer.
  • GLB-to-STL conversion for the other six models. TRELLIS, TRELLIS 2, Hunyuan 3D 3.1, Tripo v3.1, Meshy 6, and Pixal3D all output GLB by default. Every modern slicer accepts GLB and OBJ inputs and converts to its internal mesh representation on import — Bambu Studio, OrcaSlicer, and Cura have all shipped GLB import for at least the last two years. If your slicer is older or stricter, free converters turn GLB into binary STL in one click; the good ones run entirely client-side in a browser tab and never upload your file anywhere.

STL itself is a deliberately simple format. As the STL specification documents, every triangle is encoded as three vertices plus one outward-facing normal vector, with no colour, no texture, no unit declaration, and no metadata. Two physical encodings exist: ASCII (human-readable, large file size) and binary (compact, the practical default). Always choose binary unless you have a specific reason to inspect the file in a text editor; binary STL files run roughly five to seven times smaller than ASCII for the same mesh and load faster in every slicer.

The STL is the asset you keep. Save it under a clear name (wizard-bust-rodin-v3.stl beats output.stl) and version it as you iterate the source photo — the image to 3D printer loop almost always involves three or four mesh re-rolls before you commit to a print, and a clean naming convention saves the wrong-file-on-the-printer mistake that wastes a four-hour print.

Step 4 — Slice and send to your 3D printer

The slicer is where the printable file becomes G-code — the line-by-line instructions that tell the printer exactly where to move the nozzle and when to extrude. Four mainstream slicers handle the image to 3D printer output without complaint:

  • Bambu Studio — the canonical pick if you own a Bambu Lab A1, A1 Mini, P1S, P2S, X1 Carbon, H2D, or H2C. Bambu Studio ships with hardware-tuned profiles for every Bambu printer plus AMS multicolor logic for the 3MF path. STL import is one drag.
  • PrusaSlicer — the open-source canonical pick for Prusa MK4S, Mini+, CORE One+, CORE One L, and XL. Auto-repair runs on import; the Windows build also ships the Fix through Netfabb option for stubborn meshes (the standalone Netfabb Online web service was discontinued in 2026 — older tutorials that link to it now dead-end; use the in-slicer fix instead).
  • OrcaSlicer — a community fork of Bambu Studio with broader printer support. OrcaSlicer 2.3.2 is the current stable as of June 6, 2026; the post-2.3.2 development branch added a CGAL-based Fix Model path that runs on Linux and macOS as well as Windows, removing the historical Windows-SDK dependency that left non-Windows users without a built-in repair option.
  • Cura — the most-installed slicer overall. Cura auto-repairs small mesh errors silently on import and ships profiles for almost every consumer printer ever made, including older Creality Ender, Anycubic, and Elegoo machines.

All four are free and run on Windows, macOS, and Linux. Pick whichever matches your printer and ignore the rest. Inside the slicer, three settings matter most for AI-generated meshes:

  1. Orientation. AI-lifted meshes often arrive in an awkward orientation — head down, lying on the side, rotated 90 degrees from the print bed plane. Use the slicer’s auto-orient feature, then rotate to put the largest flat surface against the bed and the smallest amount of overhang in the air. Good orientation cuts support material by half and surface artefacts by more.
  2. Scale. STL files have no unit. The slicer interprets the raw numbers as millimetres by default, so an image to 3D printer output that arrives at 100 units tall prints as a 100mm (10cm) figurine. If you want a 60mm desk piece, scale to 60 percent before slicing. The preview shows real-world dimensions on the bounding box — trust those numbers, not the abstract STL coordinates.
  3. Supports. Any overhang steeper than roughly 45 degrees needs supports under it for FDM printing — the printer cannot extrude plastic into thin air. AI-lifted busts and figurines almost always need supports under the chin, the underside of arms, and any cape or hair that curls outward. Tree supports (every modern slicer offers them) leave the cleanest surface; traditional grid supports are stronger but uglier. For resin printers the angle threshold is shallower (around 30 degrees) and supports are essential almost everywhere.

Layer height is the other big knob. For FDM printing, 0.2mm is the standard default. Drop to 0.12mm for fine surface detail and triple the print time; bump up to 0.3mm for fast drafts. For resin printing, 0.05mm is standard and produces visibly cleaner surfaces than any FDM machine can manage. Once the slicer reports the time and material estimate, save the G-code, send it to the printer, and walk away. The hardest part of the image to 3D printer workflow ends at “press print”.

Common image to 3D printer failure modes diagram: non-manifold mesh blocking the slice, thin walls under 0.8mm, translucent hair fan-out, wrong scale, missing supports on overhangs
The five common image to 3D printer failure modes — non-manifold mesh, thin walls, translucent details, scale mistakes, and missing supports — and the input-side fix for each.

What separates a printable mesh from a renderable mesh

An asset that looks great in a game engine can fail every check the slicer runs. The two are subtly different artefacts and the difference matters once you commit to printing. Five properties separate a printable mesh from a merely renderable one:

  • Watertight and manifold. Every edge in the mesh must belong to exactly two triangles, the surface must have no holes, and the inside must be unambiguously distinguishable from the outside. Slicers refuse to slice a non-manifold mesh because they cannot decide where to deposit material. AI image-to-3D models almost always produce manifold output — especially TRELLIS, Rodin 2.0, and Hunyuan 3D — but a mesh that has been hand-edited or boolean-combined can lose that property. Run the slicer’s repair pass before exporting G-code.
  • No thin walls. Anything thinner than the nozzle diameter cannot be extruded. The standard FDM nozzle is 0.4mm; the practical minimum wall is roughly 0.8mm (two perimeters). The AI lift will happily produce a 0.3mm cape or whisker that looks correct in the preview and disappears entirely on the print bed. Slicer overlays highlight thin walls in red; fix them by thickening in the slicer or re-lifting the source photo with a different model.
  • No floating geometry. Some image-to-3D models hallucinate stray polygons in the negative space around the subject when the input has translucent edges (long hair, particle effects, smoke). These show up as floating triangles in the slicer view and either become invisible printed dots or jam the print head. The repair pass deletes them; if the model keeps emitting them, switch backbones.
  • Reasonable triangle count. AI-generated meshes tend to come in heavy: Hunyuan 3D 3.1 defaults to a 1.5 million-face budget, Meshy 6 to 300,000, TRELLIS 2 to 500,000. Most consumer slicers handle a million triangles fine but slow down on slicer preview at five million. If your slicer feels sluggish, decimate the mesh in the slicer’s mesh tools or re-run with a lower face budget upstream.
  • Sensible scale and orientation. A mesh that prints upside down or scales to a 1cm figurine because someone misread the unit is technically printable and practically wrong. Always check the slicer’s bounding-box preview before saving G-code.

The first three properties live in the mesh file; the slicer can fix them but only if the mesh is close to correct. The last two are policy choices in the slicer. The image to 3D printer workflow trains you to read all five in five seconds.

The right printer for an AI-generated STL in 2026

The slicer is the bridge between AI mesh and printer firmware. The printer itself does not care that the STL came from a neural network — it only cares that the slicer profile is tuned for the machine. Five printer categories cover almost every image to 3D printer use case in mid-2026:

  • Best-overall FDM: Bambu Lab P1S (~$700) or P2S (the newer mid-range CoreXY) for enclosed, 500 mm/s printing with optional AMS multicolor. Bambu Studio plus a one-drag STL import is the shortest possible image to 3D printer pipeline if you own a Bambu rig.
  • Best beginner FDM: Bambu Lab A1 Mini (~$300) or A1 (256mm bed, AMS Lite-compatible). The polished setup and out-of-box quality are the right path for someone running the AI image to 3D printer pipeline for the first time and not wanting to debug filament profiles.
  • Best open-source FDM: Prusa MK4S, CORE One+, or XL. PrusaSlicer is the most-documented slicer in the space and the easiest path to learning what the AI-lifted mesh is actually doing under the hood. The XL with its toolchanger is the canonical multi-material rig for AI STL plus distinct-colour parts.
  • Best large-format FDM: Creality K2 Plus (350mm bed) or Bambu H2D (350mm dual-nozzle prosumer). When the image to 3D printer output you want is a 300mm display piece rather than a 100mm desk figurine, build volume becomes the only thing that matters.
  • Best resin (for fine-detail figurines): Elegoo Saturn, Anycubic Photon Mono, or any modern MSLA machine with a 6K-8K screen. Resin produces visibly finer features than any FDM machine can manage and is the right path when the AI lift is a miniature, a jewellery piece, or a fine-detail figurine.

None of these picks lock you into a specific image to 3D printer workflow on the AI side. The STL is portable: the same Rodin 2.0 output prints on a Bambu A1 Mini, a Prusa MK4S, a Creality K2 Plus, or a resin Saturn with no file conversion. The slicer profile is what you swap, not the source mesh.

When the slicer rejects the AI mesh

Most AI-lifted meshes from 3D Studio slice cleanly. When they do not, the slicer flags one of three errors and gives you a path to fix:

  • “Mesh is non-manifold” — one or more edges belong to more or fewer than two triangles. Run the slicer’s auto-repair pass (Repair Object in Bambu Studio, Fix through Netfabb in PrusaSlicer on Windows, Fix Model in OrcaSlicer 2.3.3+ on any OS, automatic on import in Cura). If the repair pass still leaves errors, the right move is not Blender — it is to re-run the image to 3D printer conversion with a cleaner source photo. AI re-rolls are cheaper than CAD time.
  • “Wall too thin for nozzle” — one or more surfaces fall below the minimum wall thickness for your nozzle. Either thicken in the slicer’s mesh tools (most slicers expose a numeric wall-thickness modifier), redesign the source photo to avoid the thin element, or switch to a smaller nozzle (0.2mm if your printer accepts one).
  • “Floating geometry detected” — stray triangles in the air. The repair pass usually deletes them; if it does not, manually select and delete in the slicer object panel.

If you reach the point where every repair pass fails and you genuinely need a CAD-grade edit on the mesh, the free tools that still actually work in 2026 are Microsoft 3D Builder (Windows-only, ships with Windows 10/11) and the Blender 3D-Print Toolbox add-on (cross-platform, open source). Skip Meshmixer — it has been unmaintained for years and the download mirror is unreliable. Skip the old Netfabb Online web service — it was discontinued in 2026 and any tutorial that points there is out of date.

Working example: Rodin 2.0, STL out, sliced in PrusaSlicer

A concrete walk-through of the image to 3D printer workflow on a single subject:

  1. Source. Generate a front-facing wizard portrait in AI Image Gen at 1024×1024: “stylised wizard bust, three-quarter view, plain navy background, soft global lighting, fantasy concept art”. Cost: roughly 10 credits depending on the image model you pick.
  2. Lift. Open 3D Studio, set input mode to image-to-3D, drop the wizard portrait, pick Rodin 2.0, set mesh_density to High, material to None (we do not need PBR maps for a single-colour print), mesh_mode to Quad, tapose off, and geometry_file_format to STL. Click Generate. Wait roughly 90 seconds. Cost: 50 credits.
  3. Download. The job completes with an STL download link. Save as wizard-bust-rodin-v1.stl.
  4. Slice. Open PrusaSlicer (or Bambu Studio, or OrcaSlicer), drag in the STL. Auto-orient to put the flat base on the bed. Scale to 80mm tall. Enable tree supports with the default 45-degree threshold. Set layer height to 0.2mm. Slice. PrusaSlicer reports a 4-hour 18-minute print at 28 grams of PLA filament.
  5. Print. Send the G-code to your printer over Wi-Fi (every modern machine accepts a cloud upload or a USB stick). Walk away. Come back four hours later. Remove from the bed, clip the supports, light sanding pass. Done.

Total AI cost: ~60 credits ($0.60 at the standard top-up rate). Total human time: ~10 minutes of attention plus the print window. Total tooling cost: $0 if you stay on the Sorceress trial credits, $49 one-time for Lifetime Access if you intend to keep printing.

Where the image to 3D printer workflow goes next

The honest 2026 state of the image to 3D printer pipeline is that the AI part is now boring — the heavy work (depth estimation, mesh extraction, watertight reconstruction) is solved well enough that the bottleneck is the printer, not the model. A 60-credit Rodin 2.0 run produces a printable STL in 90 seconds; the same physical print takes four hours on the bed. The next frontier is not better meshes (the meshes are already good) but tighter slicer integration: one-click sends from 3D Studio to Bambu Studio with the AMS colour assignments already populated, automatic scale-to-bed for the active printer profile, and slicer-aware support pre-generation. Those features sit upstream of any AI improvement and they save the user the only step that still requires manual attention.

The other quiet shift is the role of 3MF. STL is the universal default and will be for years — every slicer accepts it, every printer slices from it, and no one is replacing it — but 3MF is winning the multicolor sub-market because it preserves the per-object colour and material data that the AMS, the Prusa toolchanger, and Snapmaker U1's SnapSwap depend on. If your image to 3D printer workflow involves multicolor output, set 3D Studio’s Material parameter to PBR on Rodin or All on Tripo, then export to a format that round-trips colour into Bambu Studio’s 3MF importer. For single-colour FDM, stay on STL.

For everything else in the AI game-dev pipeline — rigging the same character for an in-engine animation, generating tilemaps and sound effects, prompting a playable demo — the rest of the Sorceress suite picks up where 3D Studio stops. The sister Image to 3D Print article covers the print-action framing in more depth; the six-model image-to-3D comparison ranks every model in the picker on benchmark inputs; the free AI 3D model generator guide unpacks the trial-credit path for users who have not opened a Sorceress account yet; and the no-sign-up alternatives roundup covers the tools that skip account creation entirely. 3D Studio is the AI side of the image to 3D printer pipeline; the slicer plus the printer are the rest. Both halves are honest in 2026, and that is finally what makes the workflow worth using.

Frequently Asked Questions

Can I really go from a single image to 3D printer file in 2026?

Yes, and the round trip is genuinely short. A working image to 3D printer pipeline today is: drop a clean photo into Sorceress 3D Studio, pick TRELLIS (8 credits) or Rodin 2.0 (50 credits) from the model picker, wait 60 to 180 seconds for the AI lift, then export to STL. Rodin 2.0 emits STL directly via its geometry_file_format parameter (verified against src/lib/threed-models.ts on June 6, 2026), so you can skip the GLB-to-STL converter step entirely. From STL it is one drag into Bambu Studio, PrusaSlicer, OrcaSlicer, or Cura, then auto-orient, auto-supports, slice, and send to your printer. Five minutes of human attention plus whatever your printer needs on the bed. The reason this is finally honest in 2026 (and was not in 2023) is that the underlying image-to-3D models now produce watertight manifold meshes by default; you almost never need a Blender repair pass before slicing.

What file format does a 3D printer actually want?

STL for almost every consumer machine, 3MF when you want to preserve color and multi-material data. STL (Stereolithography) has been the universal 3D printing exchange format since the late 1980s. It stores only triangle geometry plus per-triangle outward normals: no color, no texture, no scale unit, no material info. That is exactly what a single-extruder FDM printer needs because everything else (extrusion temperature, layer height, infill, supports) lives in the slicer profile, not the file. The image to 3D printer pipeline ends with an STL because the slicer expects STL on the input side. 3MF is the modern alternative: it preserves color, texture, and per-object material assignments, which matters for Bambu Lab printers with the AMS multicolor system. OBJ is accepted everywhere but is less common. Avoid GLB, FBX, or USDZ as primary print formats; they are render formats, not print formats. Rodin 2.0 in Sorceress 3D Studio writes STL natively, so the print-side conversion is one click.

Which 3D Studio model is best for the image to 3D printer path?

Rodin 2.0 for the final print pass, TRELLIS for iteration, Tripo v3.1 for hard-surface props. Rodin 2.0 is the canonical pick for image to 3D printer work because it is the only model in the picker that emits STL directly from the API (the geometry_file_format dropdown lists glb, fbx, obj, usdz, and stl), and its Quad mesh mode produces the cleanest topology for slicer repair passes. Verified against src/lib/threed-models.ts on June 6, 2026. The cost is 50 credits per run. TRELLIS at 8 credits is the cheap-iteration choice; burn three or four TRELLIS runs to lock in a clean source photo, then spend 50 credits on one Rodin pass for the print-quality output. Tripo v3.1 at 30 to 40 credits is the alternative for hard-surface props (vehicles, weapons, replica parts, mechanical shapes) where the silhouette matters more than the character. Hunyuan 3D 3.1 at 25 credits is the second-best back-side hallucinator for 360-degree figurines. Pixal3D is free for now in beta but optimized for character meshes rather than print-first geometry.

Do I need to repair the AI mesh before sending it to my 3D printer?

Usually no, always check. The image-to-3D models in 3D Studio (TRELLIS, Rodin 2.0, and Hunyuan 3D in particular) reliably produce manifold watertight meshes that slicers accept without intervention. The exceptions are translucent inputs (flowing hair, smoke, particle effects), multi-subject inputs (two characters in one frame), or extremely thin features (whiskers, antennae, fingertips), all of which can produce non-manifold geometry that the slicer flags. Every modern slicer ships a one-click mesh repair pass: in Bambu Studio it is Repair Object on the right-click menu; in PrusaSlicer it is Fix through Netfabb on Windows or the auto-repair on import; in OrcaSlicer 2.3.2 and later, a CGAL-based Fix Model is now available on Linux and macOS as well as Windows (verified June 6, 2026); in Cura the auto-repair runs silently on import. Run the slicer's repair pass before saving G-code. If it fails, the right move is not to hand-edit the mesh in CAD: it is to re-run the image to 3D printer conversion with a cleaner source photo. The AI roundtrip is fast enough that re-rolling beats hand-fixing on every count.

How do I scale my image to 3D printer file to the right size?

In the slicer, not in 3D Studio. STL files have no unit declaration, so the AI image to 3D printer output arrives at whatever raw scale the model picked, typically around 100 units, which a slicer interprets as 100mm (10cm). To print at a different physical size, scale the model in the slicer panel: every modern slicer has a numeric scale field (percentage or absolute millimeters) on the object inspector. Common targets: 60mm for a desk figurine, 100mm for a shelf bust, 180mm for a display piece on a Bambu Lab A1 or P1S, 280mm on a Bambu H2D or Creality K2 Plus build plate. The slicer preview shows real-world dimensions on the bounding box, which is the truth; trust those numbers rather than the abstract STL coordinates. Scale interacts with print time and support load: doubling the linear size makes the print roughly eight times longer and turns gentle overhangs into unsupportable cliffs.

What does the AI image to 3D printer workflow cost in 2026?

Cheaper than the printer's spool of filament, and it can start free. Sorceress grants every new account 100 starter credits on signup with no card on file, which is enough for somewhere between two and twelve image to 3D printer runs depending on which model you pick. The cheapest model (TRELLIS at 8 credits) stretches the trial to about twelve free runs, enough to iterate the source photo and still have credits left for a single 50-credit Rodin 2.0 final pass. Once the trial is gone, the top-up rate is one cent per credit (Starter $10/1000 cr, Creator $20/2000 cr, Plus $50/5000 cr, Studio $100/10000 cr) and Lifetime Access unlocks all non-AI tools forever for $49 one-time. A typical end-to-end print job from a fresh photo costs about 58 credits ($0.58) on the AI side, plus whatever your filament costs. The hidden costs in other AI-to-print workflows (mostly daily-capped freemium tiers from single-model vendors) are watermarks, lower resolution, or vendor lock-in to one slicer integration.

Which 3D printers in 2026 work best with AI-generated STL files?

Any modern consumer FDM or resin printer reads AI-generated STL files without complaint. The slicer is the bridge, not the printer firmware. On the FDM side, the Bambu Lab A1 Mini, A1, P1S, and P2S handle figurine-style AI prints out of the box at 500 mm/s through Bambu Studio; the Prusa MK4S and CORE One+ are the open-source-friendly pick with PrusaSlicer; Creality K1C and K2 Plus offer the largest build volumes for prosumer rigs. On the resin side, the Elegoo Saturn and Anycubic Photon Mono lines are the most-used for fine-detail AI figurines. For multicolor AI prints, the Bambu A1 with AMS Lite and the Prusa XL with the toolchanger remain the only consumer paths that handle color data from 3MF files reliably. AI-generated STLs care about geometric quality, not printer brand: any printer with a level bed and a tuned slicer profile prints them. The image to 3D printer workflow is printer-agnostic on purpose.

Sources

  1. STL (file format) - Wikipedia
  2. 3D printing - Wikipedia
  3. Fused deposition modeling - Wikipedia
  4. Stereolithography - Wikipedia
  5. Polygon mesh - Wikipedia
  6. Marching cubes - Wikipedia
  7. Monocular depth estimation - Wikipedia
  8. 3MF (file format) - Wikipedia
Written by Arron R.·4,344 words·19 min read

Related posts