How to Make Pixel Art in Procreate (Or Skip the App)

By Arron R.13 min read
How to make pixel art in Procreate on iPad: build a hard-edge pixel brush in Brush Studio, lock the canvas to a small grid, animate with Animation Assist. Or sk

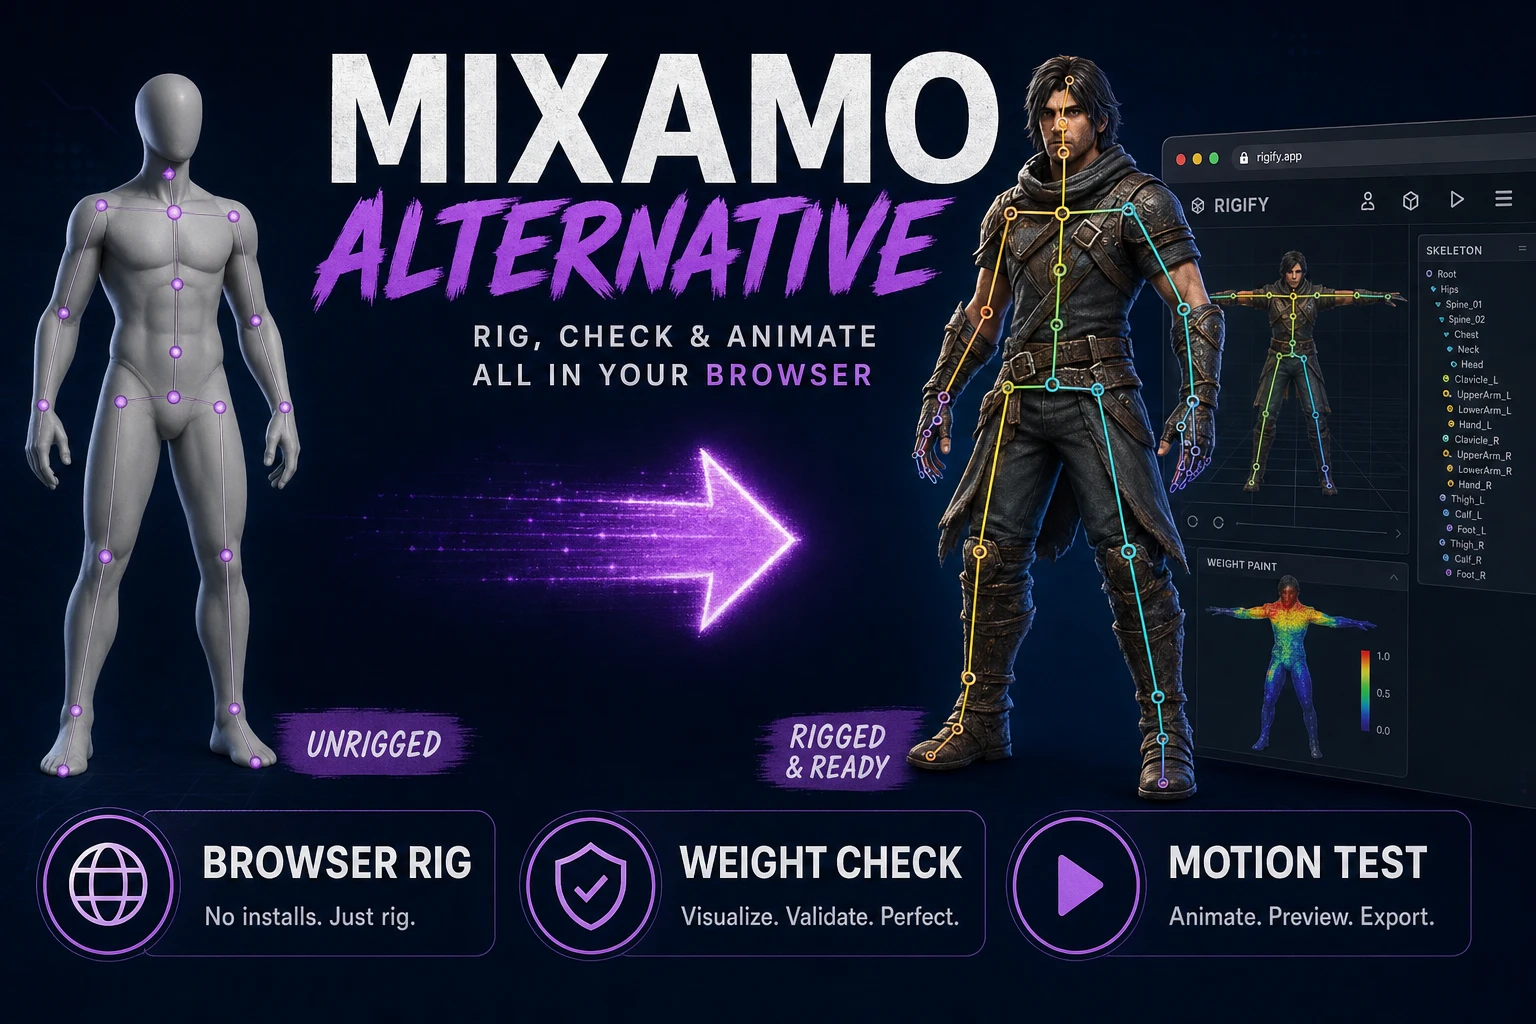
A solo indie dev who picks up an iPad and Apple Pencil in 2026 hits the same fork as everyone else trying to make pixel art on a tablet. Procreate is the leading creative app on iPad, priced at $12.99 USD as a one-time purchase, current version 5.4.10 with iPadOS 16.3 or later required (verified against the live Procreate FAQ on June 1, 2026), and it can absolutely make pixel art — but the app does not ship a dedicated pixel-art brush out of the box, and the canvas sizing, palette locking, and sprite-sheet export steps are not labelled the way pixel artists expect. This post walks the five-step workflow for how to make pixel art in Procreate the right way, then shows the browser-native escape hatch for the parts where the iPad app stops being the fastest tool.

Five-panel diagram showing how to make pixel art in Procreate — brush, canvas, palette, animate, export — plus the Sorceress browser fallback
The five-step Procreate workflow for how to make pixel art in Procreate — pixel brush, small canvas, locked palette, Animation Assist, packed PNG — with the Sorceress browser path as the volume tool. Hero image generated with GPT Image 2.

What “how to make pixel art in procreate” actually means in 2026

Pixel art is a constrained image format with three properties that separate it from pixel-shaped illustration. First, every pixel is intentional — the canvas is small (typically 16×16 to 96×96 per sprite) so each pixel is a deliberate choice. Second, the color palette is locked at 4 to 32 colors so the whole piece reads as one coherent style. Third, the output is a flat PNG with hard edges, no anti-aliasing, and a transparent background. Procreate is not built around any of those three constraints by default, which is what makes the “how to make pixel art in Procreate” question different from “how to draw in Procreate.”

The good news is the app’s underlying Valkyrie brush engine is flexible enough to do all three correctly once it is configured. The constraints have to be enforced manually: build a hard-edge single-pixel brush in Brush Studio, set the canvas to the small target resolution before drawing the first stroke, import and lock a palette, and turn on Animation Assist when the sprite needs to move. Skip any of those steps and the output is technically “pixel art” in the same way a rasterised illustration with low-res pixels is — visually close, but with the anti-aliased blur and palette drift that makes the difference between pixel art and pixelated art.

This post treats how to make pixel art in Procreate as a five-step workflow plus an honest assessment of where the iPad-only app stops being the fastest tool. For the bulk-generation step that a small team cannot reasonably do by hand — a full enemy roster, a tilemap, a VFX pack — the post then walks through the browser-native pipeline inside Sorceress as the second stage of the workflow.

How to make pixel art in Procreate in five steps

The five steps below are the canonical recipe for how to make pixel art in Procreate without paying for a third-party brush pack. Every step is verifiable inside the app and reproducible across iPad models running iPadOS 16.3 or later.

Step 1: Build a one-pixel brush in Brush Studio

Procreate does not ship a dedicated pixel-art brush, but the built-in Brush Studio converts any brush into a hard-edge single-pixel brush in under a minute. Open the Brushes panel, swipe left on the Technical Pen inside the Inking set and tap Duplicate, then tap the duplicate to open Brush Studio. Set Stroke Path → Spacing to 100% so each pen tap places one discrete pixel instead of a continuous stroke. Set Properties → Apple Pencil → Pressure → Size to 0% so the pixel size stays fixed across the entire stroke. Set the Shape source to a hard square via the Edit button under Shape if the existing shape has soft falloff. Toggle Properties → Behavior → Use Pencil Tool on so the brush bypasses anti-aliasing entirely. Save the result to a new Pixel Art set at the top of the Brushes panel so the brush persists across projects.

The configured brush is now mathematically equivalent to the pixel pen in any dedicated pixel-art editor: one pen tap places one square pixel of one fixed color on the active layer with no anti-aliasing. The same recipe works on the Studio Pen, the Monoline brush, or any custom brush the artist starts from — the four settings (Spacing 100%, Pressure-to-Size 0%, hard square shape, Use Pencil Tool on) are the universal rule for how to make pixel art in Procreate with the native brush engine.

Step 2: Pick the canvas size before the first stroke

The single biggest decision in how to make pixel art in Procreate is the canvas resolution, because it locks the era, the palette range, and the readable detail level for the entire project. Set the canvas at file-creation time: tap the + button in the Gallery, then Create custom size, then enter the target resolution explicitly. 16×16 is the smallest practical sprite size for an NES-era RPG character or a single tile. 32×32 is the modern indie default for top-down RPGs and platformers; the Sorceress Quick Sprites Small Sprites preset is locked at 32×32 (verified at ANIMATION_STYLES[1].size = ''32x32'' in the live /quick-sprites page source on June 1, 2026). 48×48 is the workhorse for a humanoid character with a readable four-direction walk cycle; the Four Angle Walking preset is locked at 48×48 (verified at ANIMATION_STYLES[0].size = ''48x48'' in the same source). 24×24 up to 96×96 fits VFX loops, and the VFX preset spans the same range on a square aspect.

Picking the canvas at the target resolution is the rule. Drawing a 128×128 character at 4× the target size and then downsampling at export loses every intentional pixel placement the format requires. Procreate’s pinch-to-zoom on a tiny canvas plus the Reference companion window lets the artist see the full sprite at runtime size while painting at 800% zoom, which is the workflow every pixel-art DCC ships and which Procreate handles natively.

Step 3: Import a locked palette

Pick the palette that matches the era the art direction is borrowing from, and lock it before drawing the first pixel. The four palettes a beginner should know are PICO-8 (16 colors, the modern indie jam-game default), Game Boy (4 greens, NES-era nostalgia), SWEETIE-16 (16 colors, soft pastels), and Endesga 32 (32 colors, the broad-palette modern indie RPG default). All four are built-in palette presets in the Sorceress True Pixel tool (verified in the PALETTE_PRESETS array at the top of src/app/pixel-art/page.tsx on June 1, 2026), which makes them easy to grab as palette PNGs for import into Procreate. Inside Procreate, open the Palettes panel, tap the + button, and pick New from File or New from Photo to import the palette PNG. Tap the menu icon on the imported palette and choose Set as default. Lock the active palette so the color picker stays inside the chosen swatches.

Painting outside the locked palette by accident is the single biggest source of off-model pixel art for beginners. Procreate does not enforce a strict palette lock in the sense that it refuses to mix two locked colors during a smudge or fill, but combined with the hard-edge pixel brush and the Use Pencil Tool toggle, the active palette functions as a tight discipline tool: pick a swatch, stamp a pixel, repeat.

Step 4: Draw with Animation Assist on

Procreate ships Animation Assist as a built-in feature on the main app, no separate purchase needed. Toggle it on via Actions → Canvas → Animation Assist. A frame-by-frame timeline appears at the bottom of the canvas with onion-skinning for the previous and next frames, frame-rate control, looping and ping-pong cycle modes, and an Add Frame button. Animation Assist treats each Procreate layer as a separate animation frame, which is the convention every frame-by-frame pixel-art tool ships. For a four-frame walk cycle, the workflow is: draw frame 1 on layer 1, tap the layer count to add layer 2, ghost-trace frame 2 from the onion-skin of frame 1, repeat for frames 3 and 4, then tap the play button at the top of the timeline to preview at 8 to 12 frames per second.

For more advanced motion graphics, a multi-track timeline, audio sync, and longer-form 2D animation, Procreate Dreams is the separate sibling app from Savage Interactive, priced at $19.99 USD as a one-time purchase on the App Store (verified against the official Procreate Dreams Help Center FAQ on June 1, 2026, iPadOS 16.3 or later required). Both apps share the same Valkyrie brush engine, so a pixel brush built in main Procreate transfers to Procreate Dreams without modification. For a single pixel-art sprite sheet of a single character, Animation Assist in main Procreate is enough; for a longer cinematic the artist plans to score with audio, Procreate Dreams adds the timeline and the multi-track surface the work requires.

Step 5: Export and pack the sprite sheet

Procreate exports a flat PNG of the active canvas via Actions → Share → PNG, and exports an Animation Assist timeline as an animated GIF or MP4 via the same menu. The app does not pack multiple frames into a single sprite-sheet atlas natively, which is the last gap a game-dev pixel-art workflow has to fill. Two paths close the gap. First, export each animation frame as a separate PNG, then run the frames through a packer such as the Sorceress Spritesheet Analyzer, which aligns frames into a grid and writes the packed PNG plus frame metadata. Second, export the Animation Assist timeline as an animated GIF and drop the GIF into Sorceress True Pixel, which extracts frames at 30 frames per second, locks the palette across every frame, and writes the packed PNG in one pass. The second path is faster for any cycle longer than four frames.

Four-panel diagram of pixel brush setup inside Procreate Brush Studio — spacing 100 percent, hard square shape, use pencil tool on, pressure to size zero
The four Brush Studio settings that convert any Procreate brush into a true pixel-art brush — 100% spacing, hard square shape, Use Pencil Tool on, Pressure-to-Size at 0%.

Where Procreate’s pixel art workflow stops being the fastest tool

The five steps above are the canonical answer to how to make pixel art in Procreate, and they ship a beautiful single sprite or single animation cycle in an afternoon. The honest assessment is that the iPad-only app has three ceilings a game-dev workflow eventually hits. First, volume — a five-character enemy roster with four-direction walk cycles at 32×32 is 5 characters × 4 directions × 4 frames = 80 individual frames, which is a week of hand-pixel work even with the brush, palette, and Animation Assist configured perfectly. Second, tilemaps — Procreate has no tile-grid alignment tool, no tile-boundary detection, no nine-position anchor for per-tile placement, so building a 32×32-tile dungeon set means hand-drawing every tile on a custom canvas and slicing later. Third, device lock-in — Procreate runs only on iPad, which means the same project is not accessible from a desktop, a Windows tablet, or any other device the artist owns.

None of those three ceilings is a bug; they are tradeoffs for an iPad-native single-canvas paint experience. They are also the three things a browser-native pixel-art toolchain solves directly.

How to make pixel art without Procreate — the Sorceress browser path

The browser-native answer to the question of how to make pixel art without an iPad in 2026 is a three-tool pipeline inside Sorceress that runs on any device with a modern browser. Sorceress True Pixel converts any existing image or video into palette-locked pixel art, with classic palette presets (PICO-8 16, Sweetie-16, Endesga 32, Game Boy 4, NES 54, CGA 16, grayscale, 1-bit) or an auto-quantizer between 16 and 32 colors. Sorceress Quick Sprites generates animated sprite sheets directly from a text prompt, running the Retro Diffusion rd-animation model at 9 credits per generation (verified at MODEL_ID = ''retro-diffusion/rd-animation'' and CREDITS_PER_GEN = 9 in the live /quick-sprites page source on June 1, 2026) and writing a packed PNG sprite sheet plus an animated GIF preview to the user’s collection. Sorceress Canvas is a browser-native paint editor with layers, transform tools, and a quick pixel-grid view for the hand-touch step after generation.

The three tools chain naturally. Generate the bulk of the sprite roster with Quick Sprites, drop the packed sheet into True Pixel for palette unification across the whole roster, then open the final PNGs in Canvas for the three or four hero-frame touch-ups that define the art direction. The Sorceress 100-credit starter grant (verified against the “Try the tools free — get 100 starter credits on us” copy in the home-page hero on June 1, 2026) covers the protagonist plus six enemies at 9 credits each.

For tilemaps specifically, the Sorceress Tileset Forge tool runs alpha-aware tile-boundary detection on AI-generated tile art and snaps the result onto a clean 16×16 or 32×32 grid, with per-tile nudge, flip, rotate, and overscale controls. It is the part of the pixel-art-for-games surface Procreate simply does not address, and the browser tool handles it in two clicks per tile.

Side-by-side comparison of Procreate versus Sorceress browser pixel art — iPad-only hand art versus any-device AI-volume sprite-sheet generation
Procreate covers the hand-art-on-iPad surface; Sorceress covers the browser-native sprite-volume and tileset-alignment surface. The two tools are complementary, not competing.

Procreate plus Sorceress — the hybrid workflow for game devs

The fastest 2026 workflow for how to make pixel art for a game uses both tools in sequence. Generate the bulk with Sorceress: prompt Quick Sprites for the enemy roster and the protagonist walk cycle, drop reference renders into True Pixel for any character that already exists as a higher-res illustration, and run AI tile art through Tileset Forge for the world geometry. That gets a 50-sprite roster, three tilemaps, and a VFX loop pack onto disk inside an afternoon. Then take the three or four hero frames the art lead wants to feel hand-crafted — the protagonist’s walk-cycle keyframes, the boss design, a custom particle — open them in Procreate on the iPad, and hand-touch each pixel with the configured pixel brush. AI generation handles the volume; hand-touch handles the highlights.

The hybrid workflow is also the cheapest path. Procreate is $12.99 once. Sorceress ships 100 starter credits free, then $10 buys 1,000 credits with no expiration (verified against the live plans page on June 1, 2026). A 50-sprite roster at 9 credits per Quick Sprites generation costs 450 credits, well under one $10 top-up. The total spend to ship a full pixel-art roster for a game in 2026 is under $25, and the workflow is repeatable per project without further license fees.

Common mistakes when making pixel art in Procreate

Five mistakes account for most of the “why does my pixel art look blurry” questions after a how-to-make-pixel-art-in-Procreate run. First, the canvas was drawn at 4× the target resolution and downsampled at export — every intentional pixel placement is lost. The fix is to draw at the target resolution exactly and let the engine upscale with nearest-neighbor at render time. Second, the brush still has soft falloff because the Shape source was left on the default soft circle — pixels render with a slight gradient around every stroke. The fix is to set Shape source to a hard square in Brush Studio. Third, anti-aliasing is on because Use Pencil Tool was never toggled — the brush is still rendering smooth strokes between pen taps. The fix is the toggle.

Fourth, the palette is not locked and the color picker drifted to a near-match shade between frames — the animation flickers between two purples that look identical at 800% zoom but separate cleanly at 1× runtime. The fix is to import a palette PNG, set it as the default, and pick swatches from the locked panel instead of the freehand color disc. Fifth, the export was set to JPEG instead of PNG with transparency — the sprite has a white background no game engine will accept as a sprite atlas. The fix is to export as PNG with the background layer hidden and confirm the alpha channel is preserved in the engine’s 2D Sprite importer.

The verdict on how to make pixel art in Procreate in 2026

The honest answer to how to make pixel art in Procreate in 2026 is that the iPad app is excellent for the hand-art surface and not designed for the volume surface. The five-step workflow above — pixel brush, small canvas, locked palette, Animation Assist, packed PNG — ships a beautiful single sprite or single animation cycle in an afternoon, and the Apple Pencil plus the tactile iPad feedback is a faster hand-art surface than any browser tool. For a one-or-two-sprite hero pass, Procreate is the right tool.

For the rest of the pixel-art-for-games workload — the enemy roster, the tilemap, the VFX pack, the placeholder sprite sheet during the prototype stage — the browser-native pipeline inside Sorceress is faster, cheaper, and accessible from every device the artist owns. The 2026 indie pixel-art workflow that wins is the one that combines both: prompt the volume in Sorceress, hand-touch the highlights in Procreate, ship the packed PNG to the engine. For the deeper companion guides, see the existing posts on making pixel art without Aseprite, making pixel art for games end-to-end, the browser-native image-to-pixel-art converter, and spinning up an AI sprite sheet generator. Together those four pieces plus this one cover the complete pixel-art pipeline from iPad to browser to engine, with honest tradeoffs on every step.

Frequently Asked Questions

How do I make pixel art in Procreate without buying a third-party brush pack?

Procreate does not ship a dedicated pixel-art brush, but the built-in Brush Studio can turn any existing brush into a hard-edge single-pixel brush in under a minute. The recipe (verified against the Procreate Brush Studio documentation on June 1, 2026) is: tap the Brushes panel, duplicate the Technical Pen or Studio Pen, open Brush Studio, set <em>Stroke Path &rarr; Spacing</em> to 100% so each pen tap places one discrete pixel instead of a smooth stroke, set <em>Properties &rarr; Apple Pencil &rarr; Pressure &rarr; Size</em> to 0% so every pixel renders at one fixed size, set the <em>Shape</em> source to a hard square, and toggle <em>Properties &rarr; Behavior &rarr; Use Pencil Tool</em> on so the brush bypasses anti-aliasing entirely. The result is a true pixel brush built from Procreate&rsquo;s own engine, no $8&ndash;$17 third-party brushset required. Save the brush to a new <em>Pixel Art</em> set so it persists across projects.

What canvas size should I use to make pixel art in Procreate?

Match the canvas to the per-sprite target resolution your game expects, then upscale at render time. The canonical pixel-art sizes are 16&times;16 for NES-era tiles and tiny RPG characters, 32&times;32 for the modern indie standard (top-down RPGs, platformers, the Sorceress Quick Sprites <em>Small Sprites</em> preset), 48&times;48 for a humanoid character with a readable four-direction walk cycle (the Quick Sprites <em>Four Angle Walking</em> preset is locked at 48&times;48), and 24&times;24 up to 96&times;96 for VFX loops (fire, explosions, lightning). Set the Procreate canvas to a multiple of the target (16&times;16, 32&times;32, 48&times;48) and let the engine upscale with nearest-neighbor at render time. Drawing at 4&times; the target resolution and downsampling later destroys the intentional pixel placement pixel art needs to read correctly.

Can I make pixel art animations in Procreate?

Yes. Procreate ships <em>Animation Assist</em> directly in the main app (Actions menu &rarr; Canvas &rarr; toggle <em>Animation Assist</em> on). The feature exposes a frame-by-frame timeline at the bottom of the canvas with onion-skinning for the previous and next frames, configurable frame-per-second playback, looping and ping-pong cycle modes, and export to animated GIF or MP4. For more advanced motion graphics, multi-track audio, and longer-form 2D animation, Procreate Dreams is the separate sibling app from Savage Interactive ($19.99 USD one-time on the App Store, verified against the Procreate Dreams Help Center FAQ on June 1, 2026, iPadOS 16.3 or later required). Both apps share the same Valkyrie brush engine, so a pixel brush built in main Procreate transfers to Procreate Dreams without modification.

Is Procreate or a browser tool better for making pixel art for a game?

It depends on the bottleneck. Procreate is best when the bottleneck is hand-art quality on a small number of hero sprites &mdash; a key-frame animation cycle for the protagonist, a single boss design, a custom particle loop the designer wants to feel hand-crafted. The 100%-spacing pixel brush plus Animation Assist on an iPad with an Apple Pencil is a fast, tactile, single-device workflow for one or two sprites at a time. A browser tool like Sorceress <a href="/quick-sprites?ref=blog">Quick Sprites</a> is best when the bottleneck is volume &mdash; generating a five-character enemy roster, a tilemap, a VFX pack, or a placeholder sprite sheet during the prototype stage. Quick Sprites runs the Retro Diffusion <code>rd-animation</code> model at 9 credits per generation (verified at <code>MODEL_ID = ''retro-diffusion/rd-animation''</code> and <code>CREDITS_PER_GEN = 9</code> in the live <code>/quick-sprites</code> page source on June 1, 2026) and ships a packed sprite sheet in under a minute. Most indie teams use both: Sorceress for volume, Procreate for the hand-touch on the three or four hero frames that define the art direction.

How do I export a Procreate pixel art canvas as a sprite sheet?

Procreate exports a flat PNG of the active canvas via Actions &rarr; Share &rarr; PNG, but it does not pack multiple frames into a sprite-sheet atlas natively. Two paths work in 2026. First, export each animation frame as a separate PNG from Animation Assist (Actions &rarr; Share &rarr; PNG with frames flattened), then use a packer such as the Sorceress <a href="/spritesheet-analyzer?ref=blog">Spritesheet Analyzer</a> to align the frames into a grid and write the packed PNG plus frame metadata. Second, export the Animation Assist timeline directly as an animated GIF (Actions &rarr; Share &rarr; Animated GIF), drop the GIF into Sorceress <a href="/pixel-art?ref=blog">True Pixel</a> to extract frames cleanly, lock the palette, and write the packed PNG sprite sheet in one pass. The second path is faster because True Pixel runs frame extraction at 30 FPS plus palette quantization and packed-sheet export from a single GIF source.

What is the best palette to use for pixel art in Procreate?

Pick the palette that matches the era your art direction is borrowing from, and lock it before drawing the first pixel. The four canonical pixel-art palettes a beginner should know are PICO-8 (16 colors, the modern indie default for jam games, verified as a built-in palette preset in the Sorceress <code>/pixel-art</code> page source on June 1, 2026), Game Boy (4 greens, NES-era nostalgia, also a Sorceress preset), SWEETIE-16 (16 colors, soft pastel range, also a Sorceress preset), and Endesga 32 (32 colors, the modern broad-palette default for indie RPGs, also a Sorceress preset). Inside Procreate, import the palette PNG via Palettes &rarr; + &rarr; <em>New from File</em> or <em>New from Photo</em>, then lock the active palette so the color picker stays inside the chosen swatches. Painting outside the locked palette by accident is the single biggest source of off-model pixel art for beginners.

Do I need an iPad to make pixel art in Procreate?

Yes. Procreate is exclusive to iPad and is not available on Mac, Windows, Android tablets, or in the browser (verified against the Procreate FAQ on June 1, 2026, where the current iPad version is listed as 5.4.10 with iPadOS 16.3 or later required). Procreate Pocket runs on iPhone but is a stripped-down companion app priced at $5.99 one-time, not the full Procreate experience. If the goal is making pixel art without an iPad in 2026, the browser-native paths are Sorceress <a href="/pixel-art?ref=blog">True Pixel</a> for converting an existing image or video into palette-locked pixel art, Sorceress <a href="/quick-sprites?ref=blog">Quick Sprites</a> for generating animated sprite sheets from a text prompt, and Sorceress <a href="/canvas?ref=blog">Canvas</a> for a quick browser-native paint editor with layers and transform. Open-source desktop pixel editors run on every operating system and remain a strong option for hand-art workflows.

Sources

  1. Pixel art - Wikipedia
  2. Procreate Dreams FAQ - Procreate Help Center
  3. Sprite (computer graphics) - Wikipedia
  4. Indexed color - Wikipedia
  5. Apple Pencil - Wikipedia
  6. Color quantization - Wikipedia
  7. Texture atlas - Wikipedia
Written by Arron R.·2,908 words·13 min read

Related posts