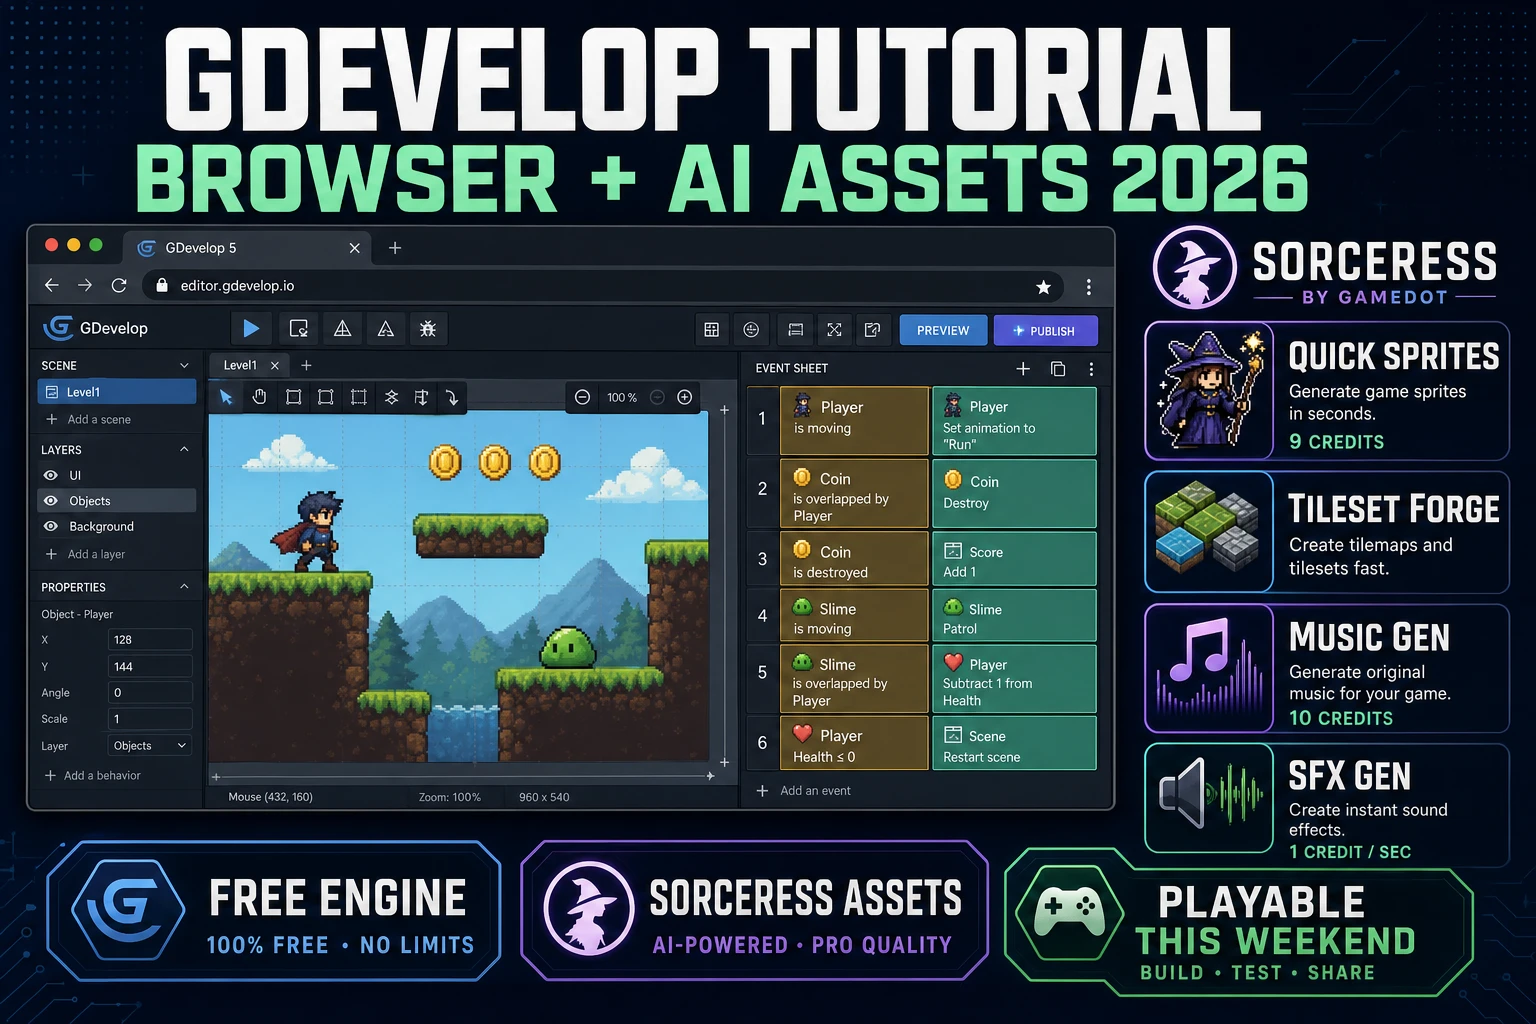
People searching for a gdevelop tutorial in 2026 are usually one of two people: a first-time game developer who has never opened an engine before and wants the free path with the shortest install, or a returning hobbyist who already knows the drag-and-drop editor but wants to see how the AI-asset workflow slots in. Both audiences get skipped by most tutorials, which either dump the reader into a three-hour recorded course or spend twenty minutes explaining what a game engine is. This guide covers both honestly: the fastest useful GDevelop install, the event sheet in one sitting, and the exact asset pipeline that pairs GDevelop 5.6.277 with the Sorceress tools so the first playable slice ships this weekend.
What a gdevelop tutorial actually needs to cover in 2026
GDevelop is a free open-source game engine that runs on Windows, macOS, Linux, and in the browser at editor.gdevelop.io. It targets 2D and 3D games (mostly 2D) and its defining feature is the event sheet: a spreadsheet-shaped visual programming interface where each row is a rule with Conditions on the left and Actions on the right. There is no scripting language between you and the game — you drag and drop the conditions and actions from a picker. According to the GDevelop entry on Wikipedia, the engine has been around since 2008, went fully open-source under the MIT license, and now sits alongside GameMaker, Construct, and Scratch as one of the standard no-code entry points into commercial game development.
What most gdevelop tutorial content misses is the honest 2026 workflow: install the free desktop app (five minutes), learn the event sheet with the built-in platformer template (one hour), then skip the built-in asset store for anything visual and drop in AI-generated art from a separate pipeline instead. The built-in asset store is fine for learning — free packs, decent placeholders — but every GDevelop game shipped from it looks like every other GDevelop game shipped from it. The AI-asset step is what makes your platformer visually read as yours instead of another asset-store demo. This tutorial walks the entire recipe end to end.
Install GDevelop 5.6.277 and get oriented in the editor (5 minutes)
Head to gdevelop.io/download and pick the installer for your OS. As of 2026-08-06 the current stable release is GDevelop 5.6.277 (released 2026-08-05, verified against the official GitHub releases page at github.com/4ian/GDevelop/releases). The Windows installer is around 190 MB, the macOS bundle around 195 MB, and there is also a portable AppImage for Linux. Alternatively skip the download and open editor.gdevelop.io in a browser tab — the web editor is functionally identical for tutorial purposes and requires no install. The desktop app is slightly faster for large projects and gives you offline access; the web version is the fastest path from "I have not opened this yet" to "I am editing an event sheet."
First launch: pick New Project, then Platformer from the template list. GDevelop opens the platformer template with a demo scene already loaded: a hero, three ground platforms, a coin, and a game-over trigger. Take 90 seconds to click Preview (top toolbar) and play the demo. Arrow keys move; up jumps; walk into the coin to collect. That is a working GDevelop game — someone else already wired the events for you.
Now poke at the four panels you will live in for the rest of the tutorial:
- Scene editor (center): the drag-and-drop canvas where you place objects (hero, platforms, coins, enemies). Everything you drop here becomes a persistent object with a name and behaviors attached.
- Objects panel (right): the list of every object type in the scene. Each type has properties (sprite, size) and behaviors (Platformer Character, Platformer Object, Draggable).
- Event sheet (bottom or new tab): the logic. Rows of Conditions → Actions that run every frame.
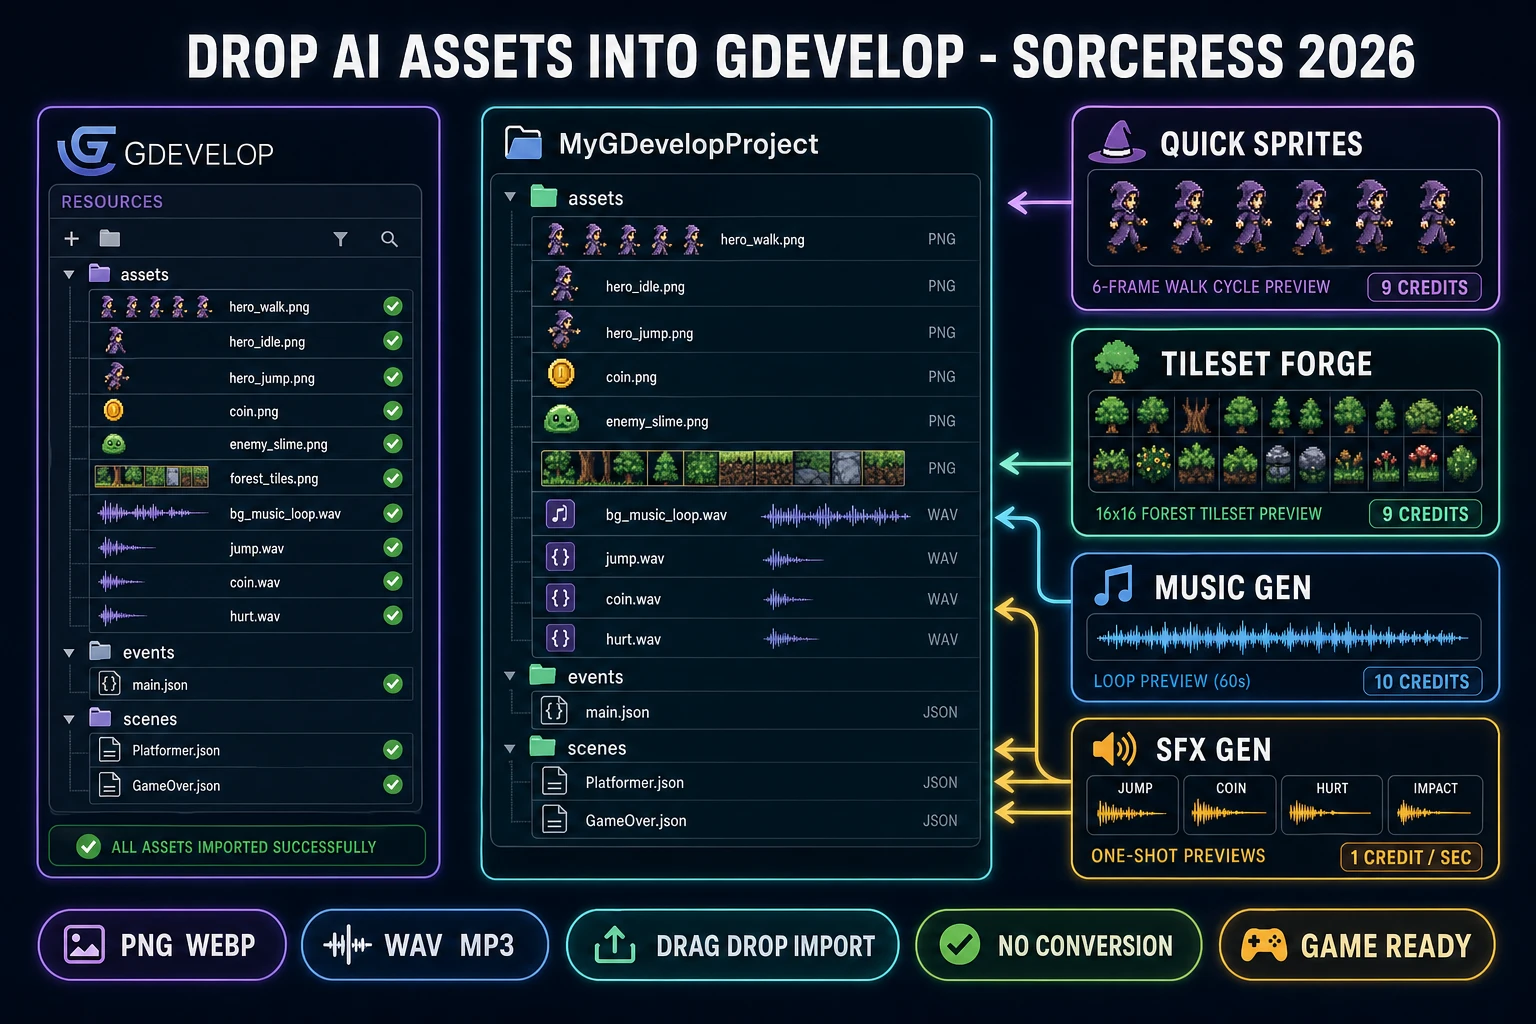
- Resources tab (left sidebar): the file browser for every image, sound, tile map, and JSON file in the project. This is where you drop the Sorceress assets in step three.
Preview updates live — you can drag an object in the scene editor and it moves in the preview window without a reload. That live loop is the whole reason GDevelop is a good beginner engine. Every change you make is visible in under a second.
The Sorceress gdevelop tutorial asset pipeline in five steps
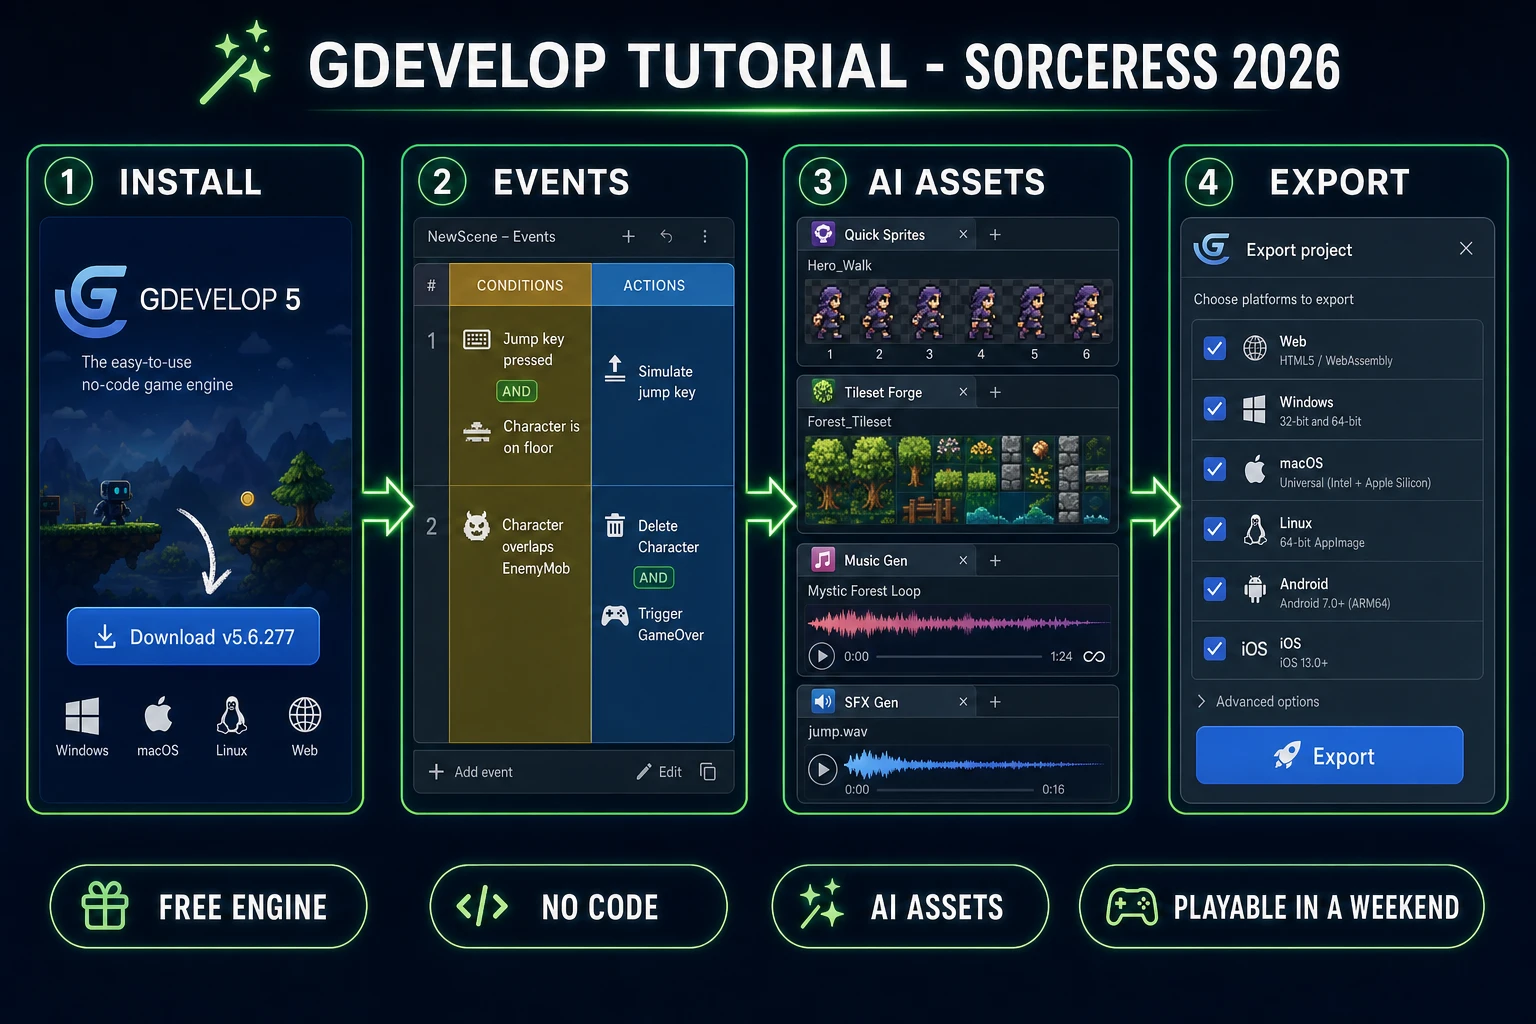
The recipe below is what a beginner-friendly gdevelop tutorial actually looks like in 2026 — the engine handles the logic in event sheets, and Sorceress handles the art and audio in parallel browser tabs. Five steps, roughly one weekend, one playable browser slice at the end:
- Build the platformer scene with objects and behaviors in the GDevelop scene editor. Start from the built-in Platformer template and swap in your own object list (hero, ground, platform, coin, enemy, exit door).
- Wire the event sheet. Six to twelve events cover the entire core loop — movement, jump, coin pickup, enemy collision, game-over screen, level restart. No code, no compiling.
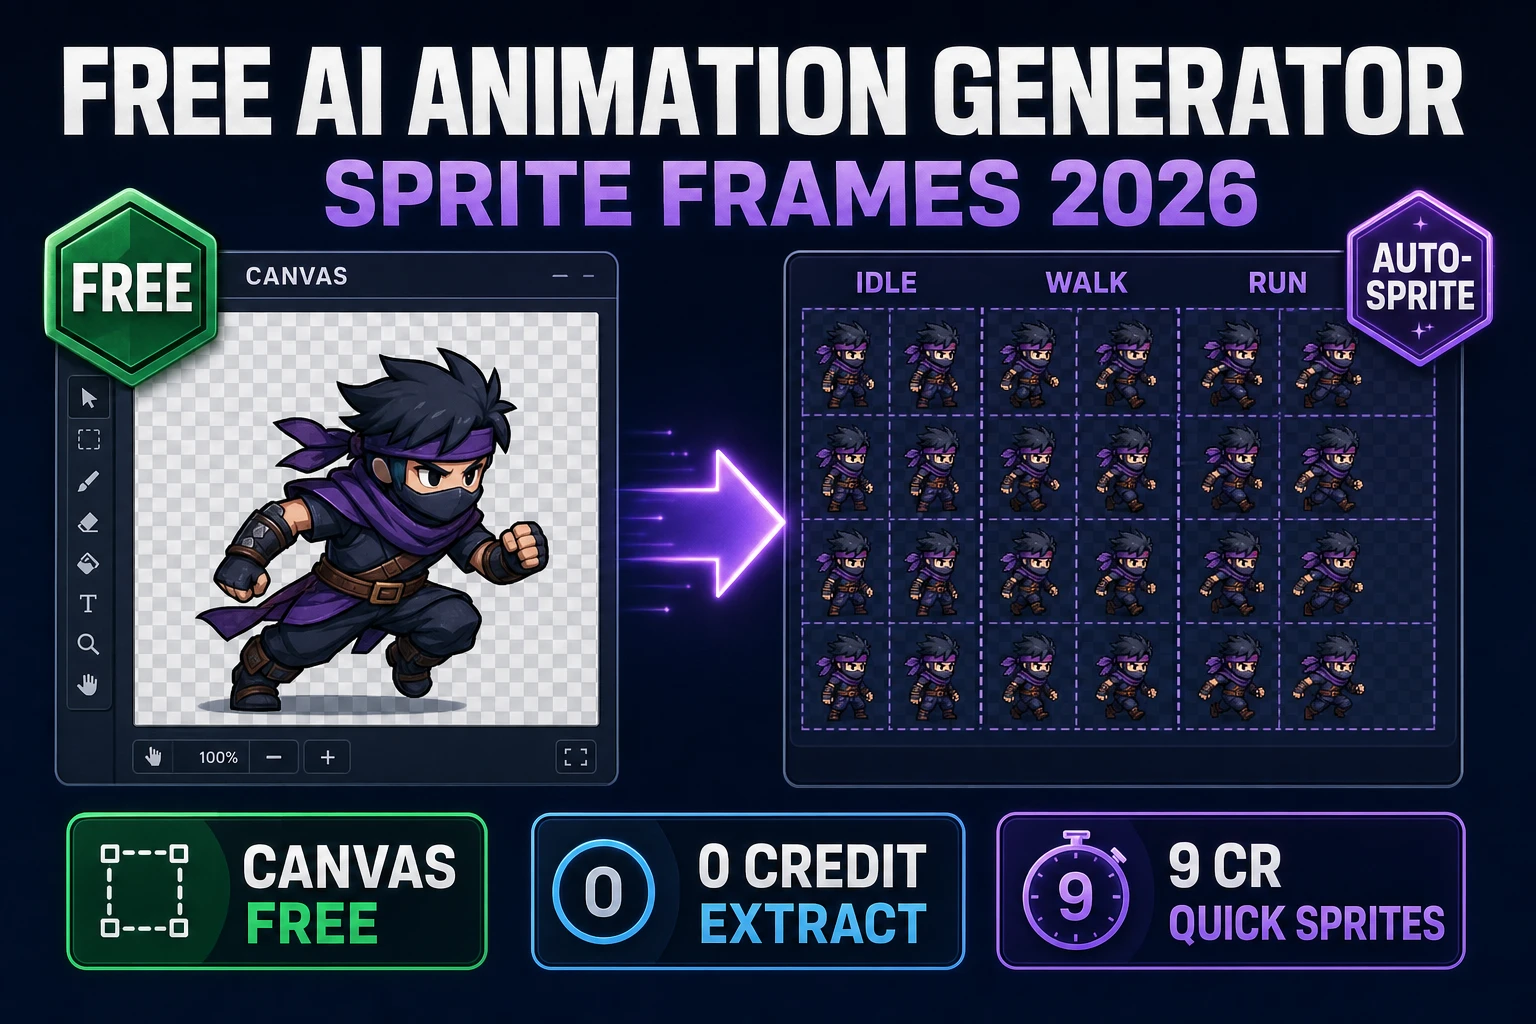
- Generate the asset pack in Sorceress. Open a second browser tab and use Quick Sprites for the hero and enemies, Tileset Forge for the biome tiles, Music Gen for the background loop, and SFX Gen for jump/coin/hurt one-shots.
- Drop the assets into the GDevelop Resources tab and re-point each object's sprite/tile/sound to the new file. This step is drag-and-drop — GDevelop accepts PNG, WebP, WAV, MP3, and OGG straight from the file system with zero conversion.
- Export to web (or desktop / mobile). One click ships an HTML5 bundle to gd.games (GDevelop's own hosting), or a Windows / macOS / Linux native build. Sell it on Steam, or drop the web bundle onto itch.io for free.
The next three sections walk steps 1, 2, and 3 in detail. Steps 4 and 5 are single clicks and are covered in the export step at the end.
Step 1 — build a platformer scene with objects and behaviors
Open the platformer template's default scene (called NewScene or similar). Delete the demo hero and platforms — you will re-add them with your own placeholder sprites before the AI pass. Right-click the Objects panel and pick Add a new object → Sprite for each of these five object types:
- Hero. Add three animations: Idle (1 frame), Walk (6 frames), Jump (1 frame). Attach the Platformer character behavior. That behavior gives you gravity, jump physics, walk speed, and collision resolution with any object marked as a Platformer object — all configurable from the properties inspector, no code.
- Ground / Platform. A single 32x32 sprite that will tile. Attach the Platformer object behavior with type set to Platform. The Hero will land on it automatically.
- Coin. A small 16x16 sprite with a 4-frame spin animation. No behavior needed — the event sheet will handle pickup collision.
- Enemy (Slime). A 24x24 sprite with a 4-frame walk cycle. No behavior yet; you will script simple patrol AI in the event sheet.
- ExitDoor. A 32x48 sprite. No behavior — event sheet will trigger the level-complete scene on hero overlap.
Use any placeholder art for now — GDevelop ships with free asset packs in the built-in store you can drag in as temporary sprites, or just use solid-colored rectangles. The point right now is to lay out the scene, not to make it pretty. Drop the Hero at the left edge of the scene, tile the Ground across the bottom, sprinkle five coins in reachable spots, place two Slimes on platforms, and put the ExitDoor at the right edge. Save the scene as Level1.
The Platformer character and Platformer object behaviors do a lot of quiet work here. Under the hood they run collision checks against all Platformer objects each frame in sync with the browser's requestAnimationFrame heartbeat as documented on MDN, resolve overlaps by pushing the character out along the smallest axis, and apply gravity when nothing is under the character's feet. You do not have to write any of that — you attach the behaviors and it just works. That is the "engine" part of "game engine."
Step 2 — wire the event sheet (no-code logic in condition + action pairs)
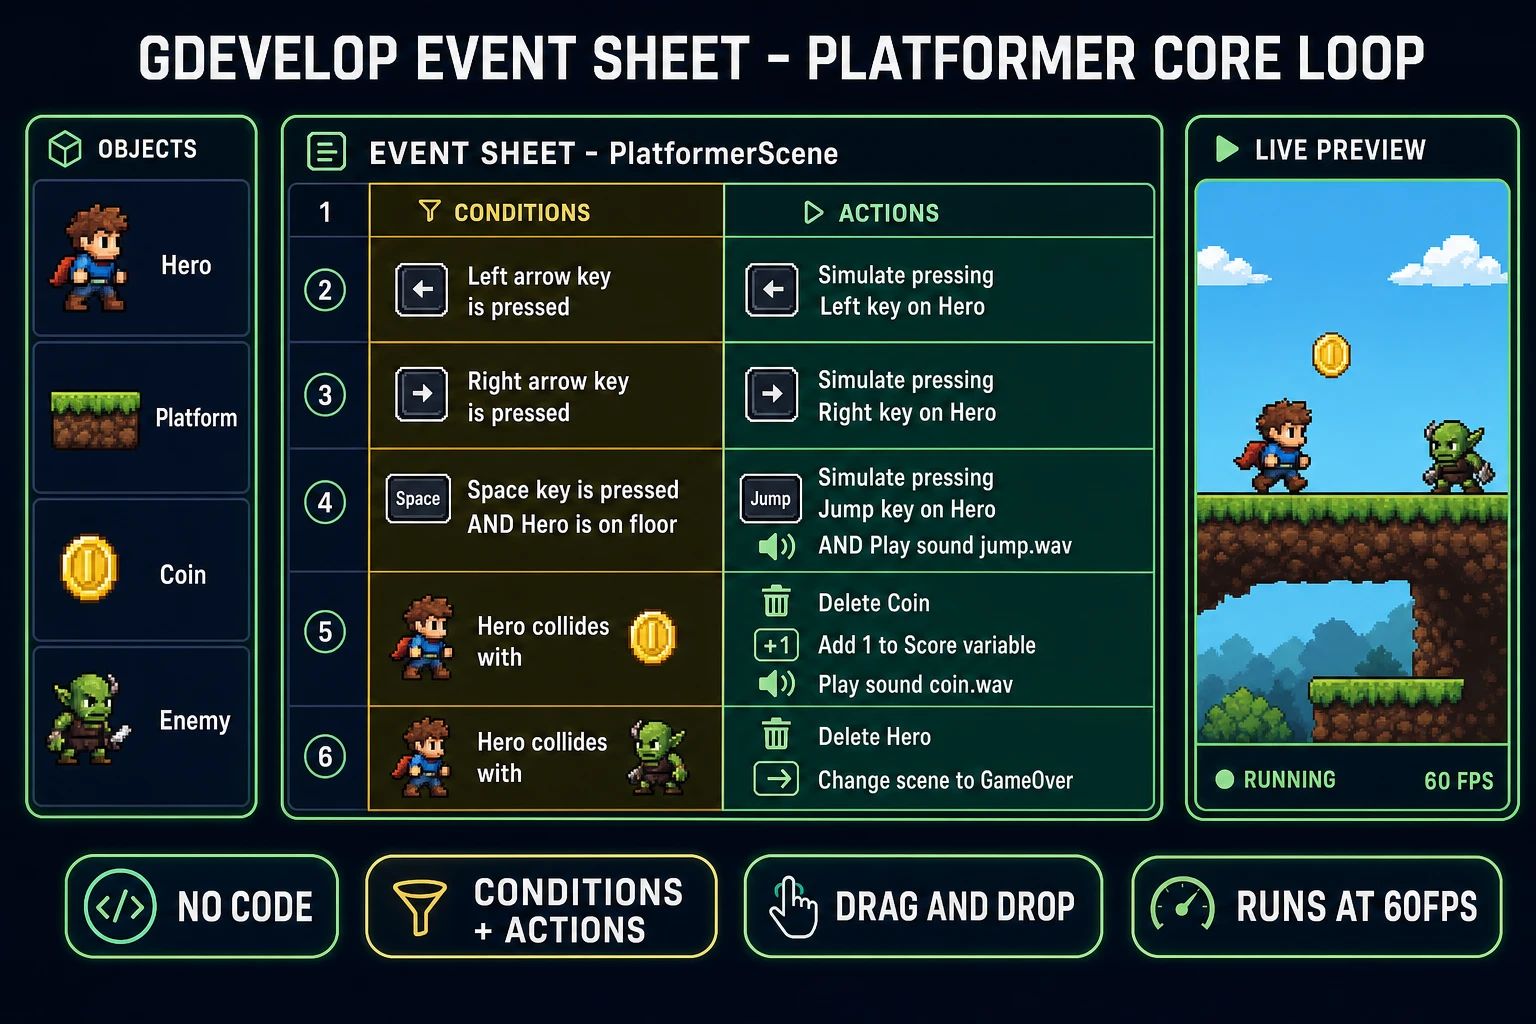
Open the event sheet tab for Level1. The event sheet is the entire game logic in one scrollable spreadsheet — every row is either an event (with Conditions and Actions), a comment, or a sub-event nested under a parent. The event-driven programming pattern documented on Wikipedia is the exact same shape: when this happens, do that. GDevelop just draws it as a table instead of as text. Add these six events in order:
- Movement. Event 1 — Condition: Left arrow key is pressed. Action: Simulate pressing Left key on Hero. Event 2 — mirror it for Right. The Platformer character behavior wires the actual walk motion.
- Jump. Event 3 — Conditions: Space key is pressed AND Hero is on floor. Actions: Simulate pressing Jump key on Hero AND Play sound jump.wav.
- Coin pickup. Event 4 — Condition: Hero collides with Coin. Actions: Delete Coin AND Add 1 to Score variable AND Play sound coin.wav. Score is a scene variable you create from the Variables tab.
- Enemy patrol. Event 5 — Condition: The animation of Slime is Walk. Sub-events: two events flipping Slime direction at the edges of a patrol zone. Alternatively use the free Platformer AI extension from the Extensions Store for one-click patrol.
- Enemy collision. Event 6 — Condition: Hero collides with Slime. Actions: Play sound hurt.wav AND Change scene to GameOver. Create the GameOver scene as a second scene tab with a text object showing "Game Over" and a "Press R to Restart" hint.
- Level complete. Event 7 — Condition: Hero collides with ExitDoor. Action: Change scene to LevelComplete. Add a third scene for the win screen.
Click Preview. Play the level. Every event you added is now live and each collision, keypress, and scene change works. There was no code. There was no compile step. The whole platformer game loop runs on those seven events plus the two built-in Platformer behaviors. This is what a real gdevelop tutorial looks like once you strip out the ceremony — a spreadsheet, six rows, and a preview button.