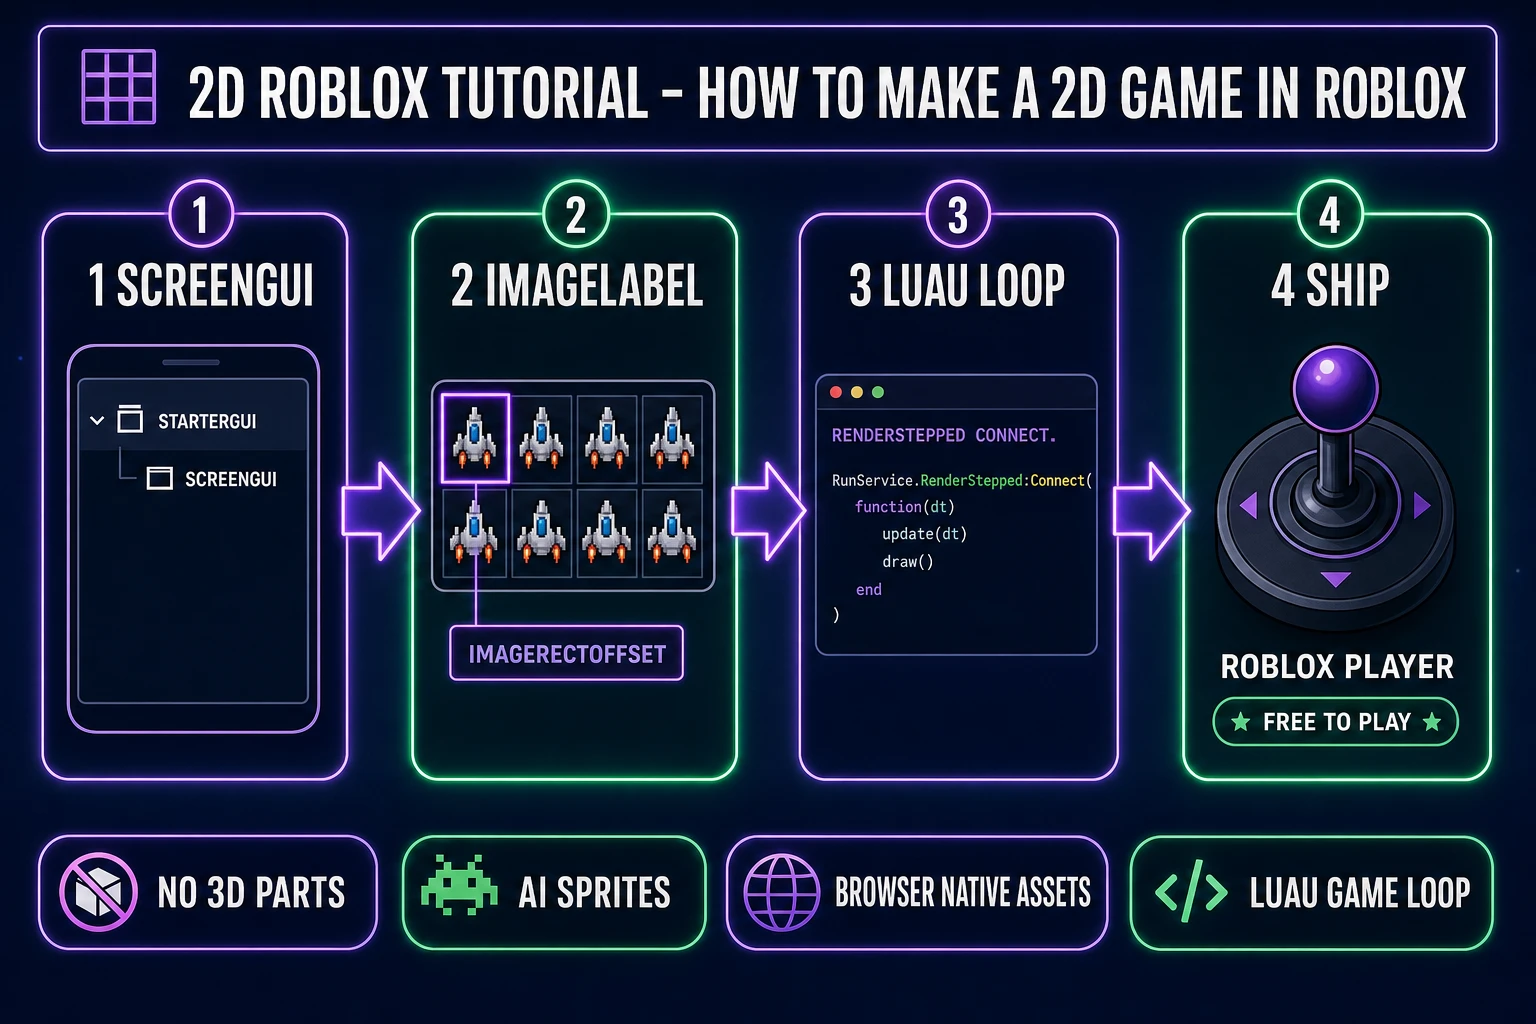
Figuring out how to make a 2D game in Roblox in 2026 looks intimidating from the outside — the platform is famously 3D-first, every tutorial assumes Parts and the workspace, and the Studio template gallery does not ship a "2D" preset. But the path is straightforward once the trick lands: build the entire game inside a ScreenGui with ImageLabel children, drive every sprite frame through ImageRectOffset on a packed atlas, and let a LocalScript on RunService.RenderStepped run the game loop. No 3D Parts. No physics simulation. No camera math. Just a 2D canvas living inside Roblox’s distribution network. This guide walks the honest 2026 pipeline — Sorceress AI tools for the visual layer, Roblox Assistant’s new agentic Planning Mode for the engine scaffolding — with every credit cost, asset path, and Luau API verified against the live source on June 15, 2026.
What "how to make a 2D game in Roblox" actually means in 2026
The phrase reads as a contradiction at first. Roblox is built around a 3D world simulation — Parts, BasePart physics, character humanoids, a 3D camera that follows the player. Every default template assumes the game lives in the workspace as 3D geometry. So when a creator types "how to make a 2D game in Roblox" into Google, the answer they actually want is rarely "use 2D physics" — the answer is "render the game entirely through the GUI layer, skip the 3D simulation, and treat Roblox as a free distribution channel for a 2D experience." That is the path this guide covers.
The practical impact for an indie developer in 2026 is real. Roblox ships with a built-in player install base measured in hundreds of millions of monthly active users, free hosting, free networking infrastructure, free monetization rails via Robux, and a Studio editor that is genuinely free to download on Windows 10+ and macOS 10.13+. Shipping a 2D game inside that container is materially cheaper than the equivalent 2D HTML5 game stack (custom hosting, custom landing pages, custom payment integration, custom CDN). The cost-side trade-off is the platform constraints — Luau as the only scripting language, the asset upload moderation queue, the Roblox-platform aesthetic expectation, and the limitation of a single sprite-sheet asset to 1024 by 1024 pixels.
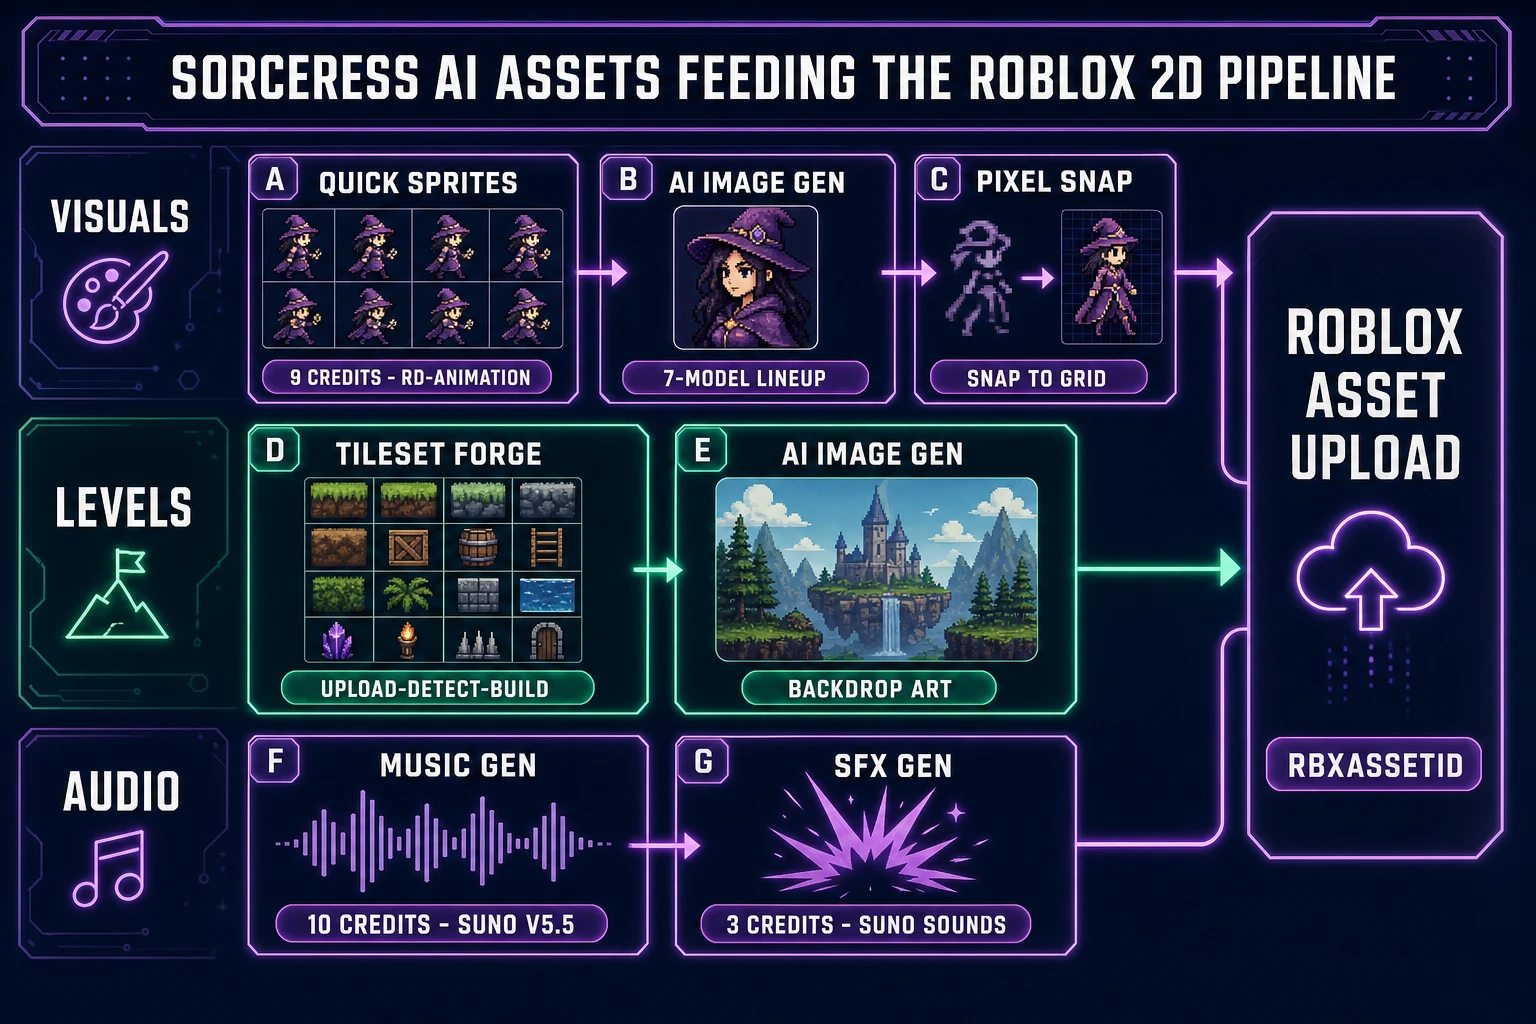
The honest 2026 stack for the question of how to make a 2D game in Roblox splits into two halves that need different tools. The visual half — sprites, tilesets, characters, HUD art, music, sound effects — is owned cleanly by Sorceress AI tools: Quick Sprites for animated character sheets, AI Image Gen for static art across seven image models, Pixel Snap for cleaning rough AI art into crisp sprites, Tileset Forge for grid-aligned level art, Music Gen for soundtrack, and Sound Studio for spot SFX. The engine half — ScreenGui scaffolding, ImageLabel wiring, Luau game loop, scoring, input — is owned by Roblox Studio plus the in-Studio Assistant. The next sections wire both halves together.
The honest 2D Roblox stack — ScreenGui, ImageLabel, ImageRectOffset
Three Roblox Studio classes carry 80 percent of the load for a 2D game. Naming them up front makes the rest of this guide tractable.
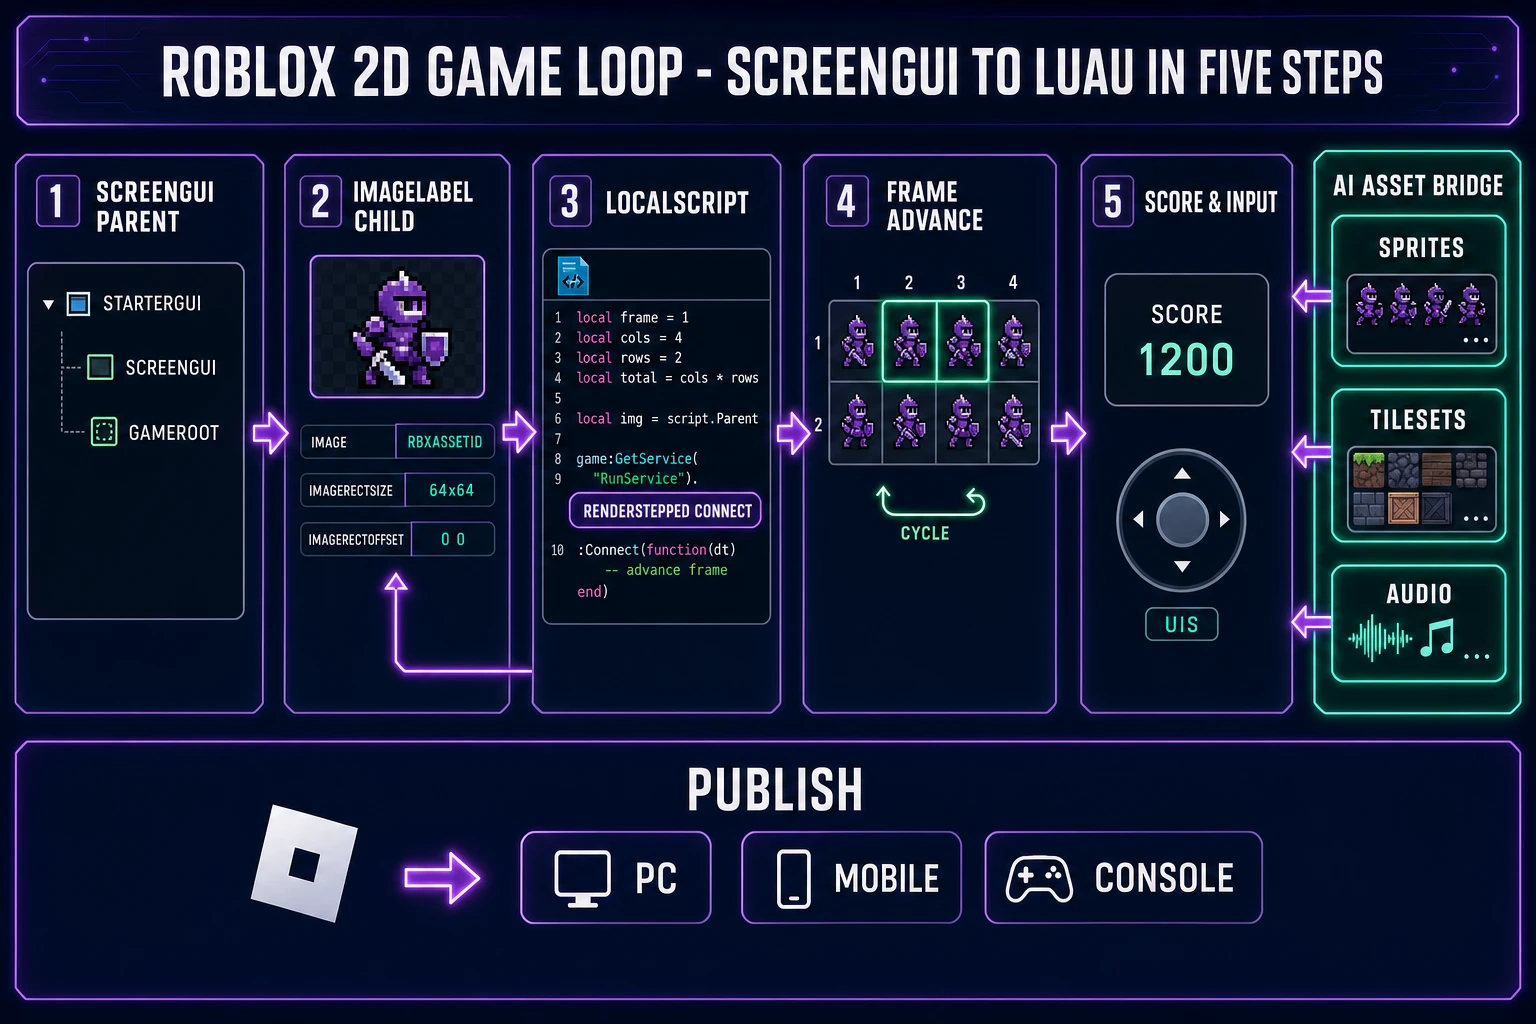
ScreenGui— the top-level container parented toStarterGui(or toPlayerGuiat runtime). Every 2D element in the game lives inside one or more ScreenGuis. Setting the ScreenGui’sIgnoreGuiInsetproperty totruemakes the canvas fill the full screen including the Roblox topbar area. SetZIndexBehaviortoEnum.ZIndexBehavior.Globalso HUD layering reads predictably across nested frames.ImageLabel— the visual workhorse. An ImageLabel renders a rectangle with an image asset, and the image properties (Image,ImageColor3,ImageTransparency,ImageRectOffset,ImageRectSize) define what shows up. To display only the image with no rectangle background, setBackgroundTransparencyto1. TheScaleTypeproperty supportsStretch(the default — fits the image to the rectangle),Tile(usesTileSizeto repeat the image), andSlice(9-slice scaling usingSliceCenter). For sprite sheets, leave ScaleType at Stretch and use the rect-offset pair below.ImageRectOffset+ImageRectSize— the two properties that together implement the sprite-sheet pattern.ImageRectSizeis aVector2giving the per-frame width and height in pixels;ImageRectOffsetis aVector2giving the top-left corner of the current frame inside the source image. AdvanceImageRectOffsetby one cell each frame to play an animation; jump to specific cells for state-driven sprite swaps (idle vs walk vs attack). Verified against the official ImageLabel reference on June 15, 2026.
The other classes that show up regularly in a 2D Roblox project: Frame (a plain rectangle, useful as a parent for grouped ImageLabels), TextLabel (for the score, life count, dialog text, button captions), UICorner (rounds rectangle corners), UIStroke (adds a border), UIPadding and UIListLayout (for HUD layout), and UIScale (for resolution-independent scaling).
One platform decision to make early: render the 2D game inside the standard player character experience (the player still spawns, the camera still exists, the world still simulates — the 2D scene just overlays it as a GUI), or strip the platform down to a pure 2D canvas. The pure-canvas pattern: set StarterPlayer.CameraType to Enum.CameraType.Scriptable and lock the camera to a fixed position, disable the default character spawn by setting StarterPlayer.CharacterAutoLoads to false, and parent every visual to a ScreenGui in StarterGui with IgnoreGuiInset true. The result reads as a flat 2D experience with no 3D world interfering. The sister post on how to make a Roblox game with AI from June 4 covers the broader Roblox AI workflow at a higher level; this guide drills into the 2D-specific pattern.
How to make a 2D game in Roblox without 3D Parts — the GUI-first authoring loop
The full sequence on how to make a 2D game in Roblox with zero 3D Parts in the workspace runs in seven steps. Each step is mechanical once the previous one is in place.
- Open Roblox Studio on Windows or macOS and create a new Baseplate template. The baseplate is fine to leave in workspace — it stays out of frame once the camera is scripted. Free download, no subscription, no platform fee beyond the cut Roblox takes on Robux sales.
- Lock the camera and disable default character spawn. In
StarterPlayerproperties, setCharacterAutoLoadsto false. In a newStarterPlayerScriptsLocalScript, setworkspace.CurrentCamera.CameraType = Enum.CameraType.Scriptableand lock its CFrame to a fixed position. The world stops mattering visually from here on. - Build the ScreenGui scaffolding. In
StarterGui, insert aScreenGuinamedGameRoot. SetIgnoreGuiInsetto true,ZIndexBehaviorto Global,ResetOnSpawnto false. Inside, insert aFramenamedWorldsized to the play area, aFramenamedHUDsized to the screen, and aFramenamedMenusfor pause and game-over states. - Upload AI-generated assets. Generate the sprite sheets in Sorceress Quick Sprites and the tileset in Sorceress Tileset Forge (covered in detail in the next two sections), then upload each PNG through Studio’s Create → Decals (or directly via the Asset Manager). Each upload returns an
rbxassetid://<numeric-id>reference that the ImageLabelImageproperty accepts. - Build the world out of ImageLabels. For each entity in the game (player character, enemy, projectile, pickup, NPC), instantiate one
ImageLabelas a child of theWorldframe. SetImageto the sprite-sheet asset ID,ImageRectSizeto the per-frame dimensions,ImageRectOffsettoVector2.new(0, 0)(the first frame),BackgroundTransparencyto1, andSizeto the on-screen render dimensions. The world position becomes the ImageLabel’sPositionUDim2. - Wire the Luau game loop. A single
LocalScriptparented to theGameRootScreenGui owns the loop. Connect toRunService.RenderSteppedfor client-side animation and input polling, advance per-entity frame counters, and update each ImageLabel’sImageRectOffsetper frame. The Luau code skeleton is in the dedicated section further down. - Test in Play Solo and publish. Hit Play in Studio to preview locally. When the loop is stable, click File → Publish to Roblox and set the game’s icon plus the game-info text. The game goes live on the Roblox platform under the developer’s account and is immediately playable on PC, mobile, and console.
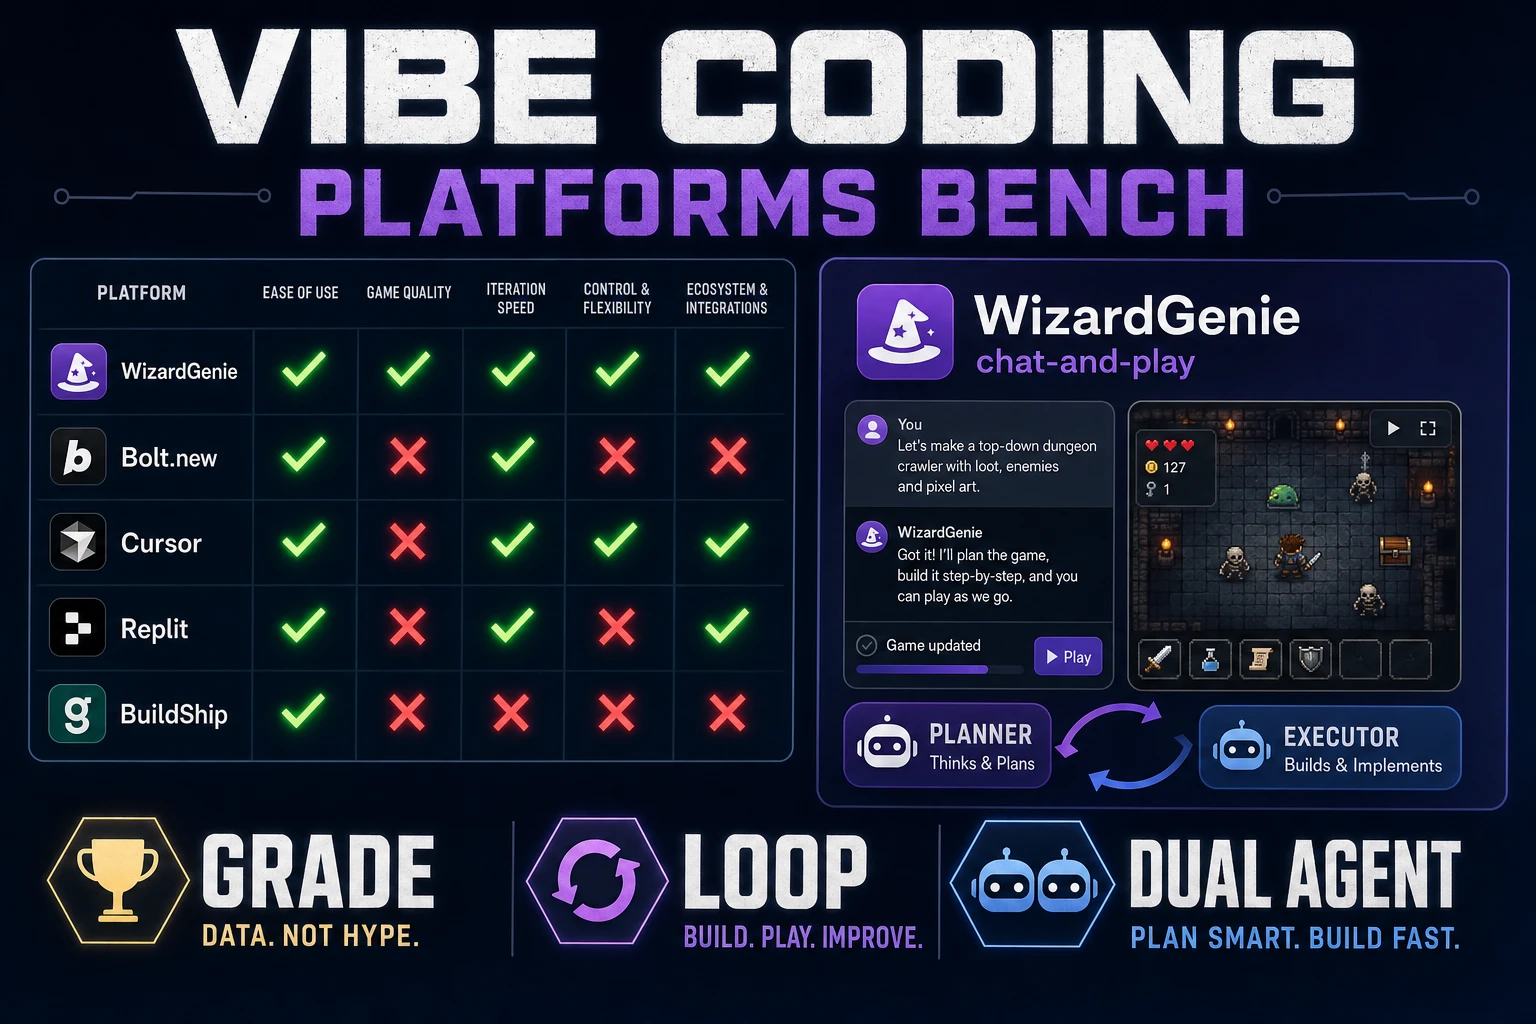
The sister post on how to make a 2D game with AI without installing any engine from May 6 covers the engine-agnostic browser-native path through WizardGenie. Use it when the project genuinely should run in a normal browser tab outside Roblox’s container — the two paths trade Roblox’s distribution reach against WizardGenie’s no-install browser deploy.
rbxassetid asset.The AI sprite pipeline — Quick Sprites, AI Image Gen, and Pixel Snap for the visuals
Three Sorceress tools cover the character and prop sprite layer of a 2D Roblox project end to end. Each tool ships with a verifiable credit cost, a documented model lineup, and a PNG output that drops directly into the Roblox asset upload step.
Quick Sprites at /quick-sprites runs the Retro Diffusion rd-animation model at a flat 9 credits per generation, verified against src/app/quick-sprites/page.tsx on June 15, 2026. The preset shapes that pair cleanly with Roblox ImageLabel sprite sheets: four_angle_walking packs an eight-frame top-down walk cycle at 48 by 48 pixels per frame (perfect for top-down 2D Roblox characters viewed from above); small_sprites packs frames at 32 by 32 pixels (perfect for retro-pixel Roblox games inspired by NES-era aesthetics); vfx packs at 24 by 24 up to 96 by 96 pixels depending on the input (perfect for explosion bursts, dust puffs, projectile trails). The output is a single PNG sheet with the frames packed in a regular row-major grid that Roblox ImageRectOffset indexes cleanly. The earlier AI sprite generator walkthrough from May 10 covers Quick Sprites in depth across walk cycles, idles, and VFX.
AI Image Gen at /generate runs seven image models verified against src/app/_home-v2/_data/tools.ts on June 15, 2026: Nano Banana Pro at 18 credits per image, Nano Banana 2 at 9 to 17 by quality, GPT Image 2, Seedream 5 Lite at 6 credits per image at 2K resolution, Flux 2 Pro at 6 base credits plus 3 per reference image, Z-Image Turbo at 2 credits per image (the cheapest rail), and Grok Imagine. Use AI Image Gen for one-shot static art that does not need animation — boss portraits in dialog frames, HUD icons (heart, shield, coin, key), background art parented to the World frame, item-pickup sprites. The reference-image controls on Nano Banana 2 and Flux 2 Pro maintain visual consistency across a multi-character cast.
Pixel Snap at /spritely cleans rough AI-generated art into crisp grid-aligned pixel sprites and exports as a sheet. The pipeline handles the snap-to-grid cleanup that diffusion models do not deliver natively — every output gets quantized to a target palette (PICO-8 16, SWEETIE-16, NES 54, or a custom palette), aligned to a target grid (16, 32, 48, 64, or 96 pixels per cell), and packed into a row-major sprite sheet. Pair Pixel Snap with Quick Sprites when the project aesthetic is hard-edge pixel art; skip it when the project runs higher-resolution painterly art.
The 100 starter credits at sign-up cover roughly 11 Quick Sprites generations end to end — enough for one player character, two NPCs, two enemy types, a small VFX pack, and a HUD icon set. The $49 Lifetime tier at the plans page unlocks every non-AI-generative tool capability permanently. Credit packs at $10 for 1000 credits (Starter), $20 for 2000 credits (Creator), $50 for 5000 credits (Plus), and $100 for 10000 credits (Studio) stretch the AI-generation budget when the project scales. Verified against src/app/plans/page.tsx on June 15, 2026. The sister post on how to make a sprite sheet in 2 minutes with AI from May 4 covers the head-end pattern with a different engine target.