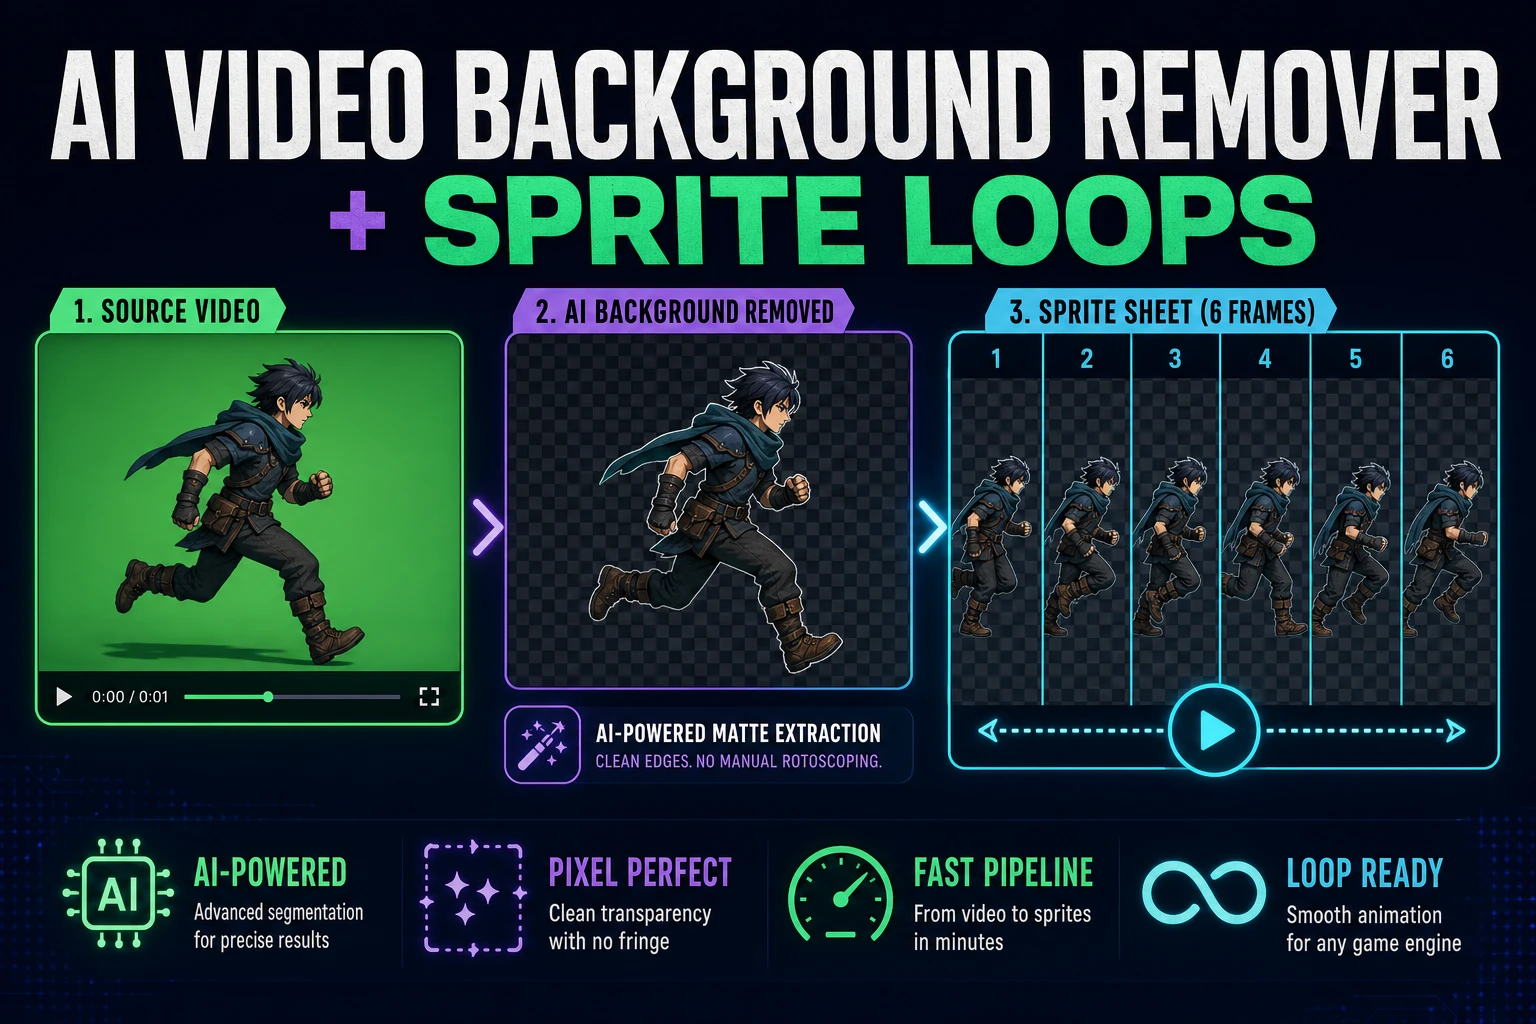
Clean an AI Video Background Remover for Sprite Loops

By Arron R.10 min read
An AI video background remover should preserve motion, edge alpha, framing, and frame order. Extract a short clip in Auto-Sprite v2, remove the backdrop, inspec

A clean cutout can still make a bad game animation. Hair may disappear for one frame, a boot may jump inside its cell, or a dark fringe may flash whenever the character crosses a bright background. For a sprite loop, background removal is only useful when it preserves the motion, frame order, edge transparency, and a stable canvas around the subject.

This tutorial is for game developers turning a short generated clip into transparent animation frames. You will choose the right removal method, extract only the useful poses, clean contaminated edges, and test the finished sheet as motion. The source implementation and technical references in this guide were verified July 19, 2026.
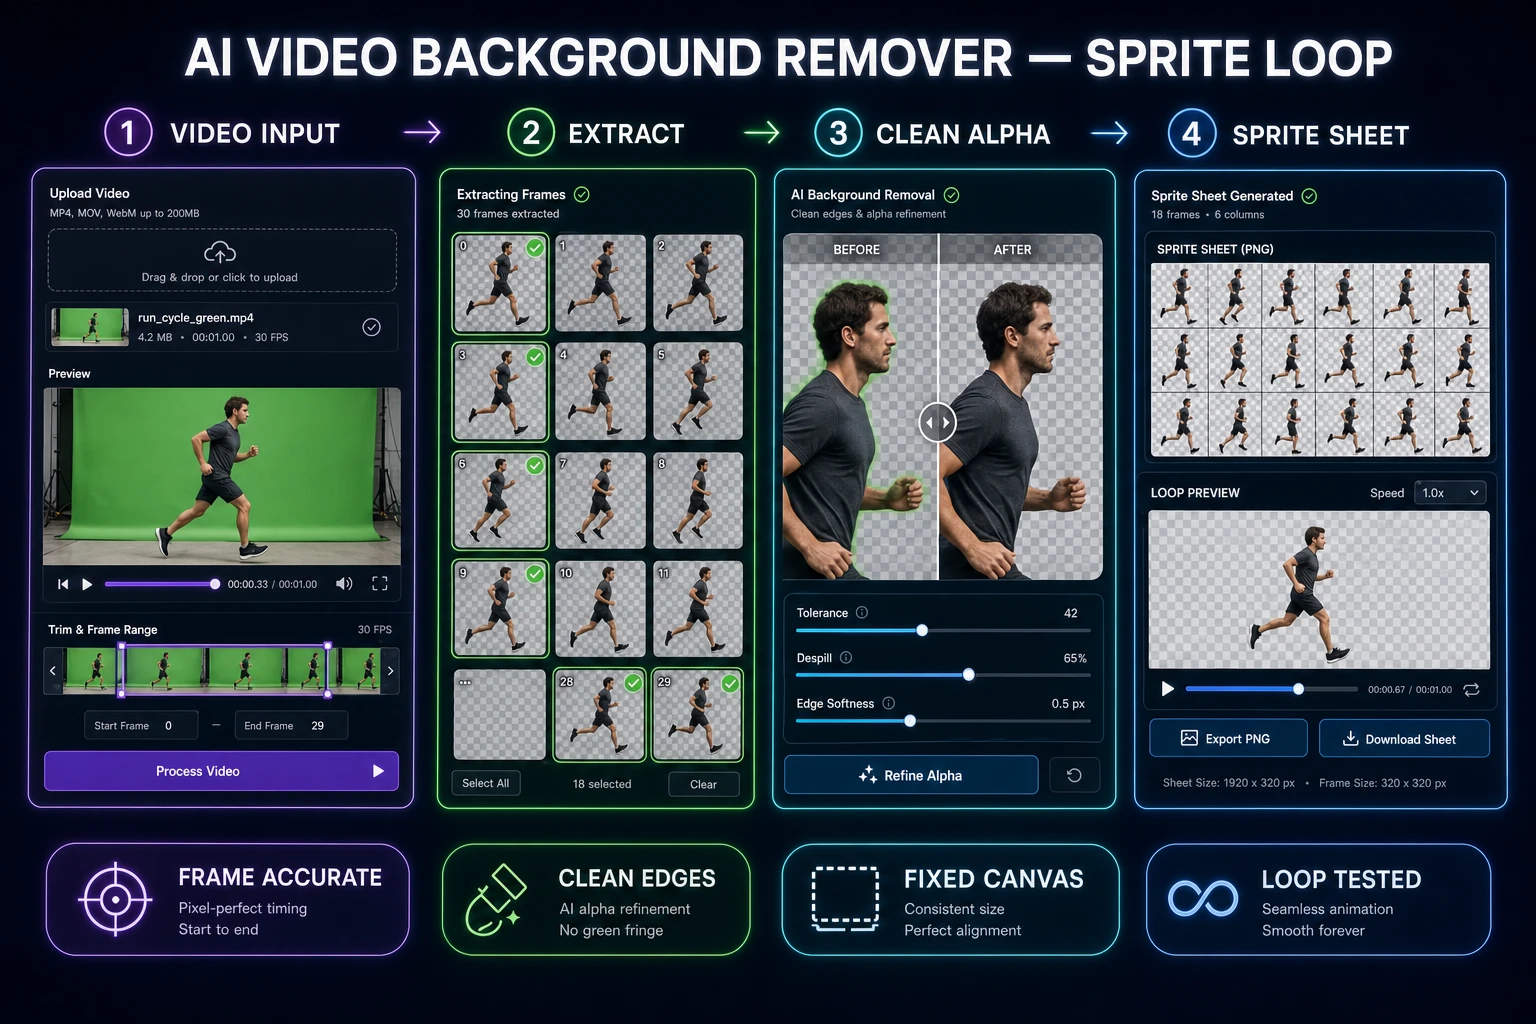
AI video background remover workflow from a short green-screen clip through transparent frames to a tested sprite loop
A usable sprite pipeline preserves motion, transparent edges, stable framing, and frame order together.

What an AI video background remover must preserve for sprites

An AI video background remover for ordinary editing can hide small mistakes because every frame appears briefly. A sprite sheet exposes those mistakes in a grid, then repeats them in a loop. The goal is not merely “no background.” The goal is a sequence whose silhouette, alpha, position, and timing remain coherent from cell to cell.

Protect four properties while you work:

  • Pose continuity: Keep the anticipation, contact, follow-through, and recovery poses that explain the action. Removing an awkward frame is fine; removing the pose that carries the weight is not.
  • Edge continuity: Hair, cloth, weapons, and blurred limbs should not grow and shrink because the mask changes its mind. Inspect the sequence as a loop, not as a stack of attractive stills.
  • Stable framing: Every exported cell needs the same dimensions and a consistent anchor. A tight crop that moves around the character creates jitter even when the source motion is smooth.
  • Useful transparency: Semitransparent edge pixels should blend over the game scene without green, dark, or pale halos. Alpha is the amount of coverage in a pixel; it is not proof that the pixel’s color is clean.

Start with the shortest clip that contains one complete action. A walk, hit reaction, or spell cast is easier to judge when it is isolated from idle footage and camera movement. Keep an untouched source copy so you can return to it if removal damages a hand, prop, or effect.

If the source was generated specifically for sprites, ask for a fixed camera, an unmoving character origin, even lighting, and a plain contrasting backdrop. Camera shake, zoom, floor reflections, cast shadows, and motion blur all make segmentation harder. They can be artistic choices later; they are poor ingredients for a clean extraction pass.

Decide between direct frame removal and green-screen keying

Use direct background removal when the clip already exists, the background is varied, or the subject was generated against scenery. Use chroma keying when you control the source and can render a flat green screen that does not overlap important costume colors. Chroma keying removes pixels near a selected color; direct removal tries to identify the subject without depending on one backdrop color.

The choice matters because the Sorceress tools accept different inputs. Auto-Sprite v2 accepts video or images and handles frame extraction as part of the pipeline. Corridor Chroma accepts still images only in PNG, JPG, or WebP format. It does not accept a video file, and it is specifically a green-screen tool. If you want its tighter key controls, extract the video into still frames first.

Source condition Best starting path Main risk
Mixed or detailed background Direct removal in Auto-Sprite v2 Fine features may flicker between masks
Even green screen Extract frames, then use Corridor Chroma Green spill and similar costume colors
Uneven or compressed green screen Corridor Chroma with careful tolerance and despill Shadows may require a looser key
Still-image animation sequence Either path, chosen by backdrop type Inconsistent framing between source images

Do not choose by the word “AI.” Choose by the pixels you have. A uniform backdrop gives a color key a simple, inspectable rule. A complex environment needs subject segmentation. If a green costume, glowing green spell, or translucent green prop is central to the animation, direct removal is usually safer than trying to protect it with a narrow key.

Run the Sorceress AI video background remover workflow

The Sorceress AI video background remover workflow is a frame pipeline: isolate the useful motion, extract frames, remove the background, clean the crop and edges, preview the loop, and export a regular sheet. That order prevents you from polishing frames that will later be discarded.

  1. Open Auto-Sprite v2 and load the source video or image sequence.
  2. Set the start, end, and frame interval so extraction covers one action without redundant poses.
  3. Run background removal, then use crop and edge cleanup while preserving a fixed frame box.
  4. Watch the loop preview and revise the range or interval if the action stutters.
  5. For green-screen material needing a controlled key, export still frames and batch them through Corridor Chroma.
  6. Build the sheet, then validate its grid and playback in Sprite Analyzer.

Browser frame extraction should follow decoded video frames rather than assuming that a timer maps perfectly to presentation. MDN documents HTMLVideoElement.requestVideoFrameCallback() as a way to run work when a new video frame is sent to the compositor. For sprite work, the practical lesson is simple: judge extracted poses from the actual output, especially with variable-frame-rate or heavily compressed clips.

If you are building a wider asset pipeline, the Sorceress tools guide maps the surrounding utilities, while this sprite animation loop workflow covers timing and readability after extraction. Keep removal and animation review connected: a technically transparent frame is not finished until it survives playback.
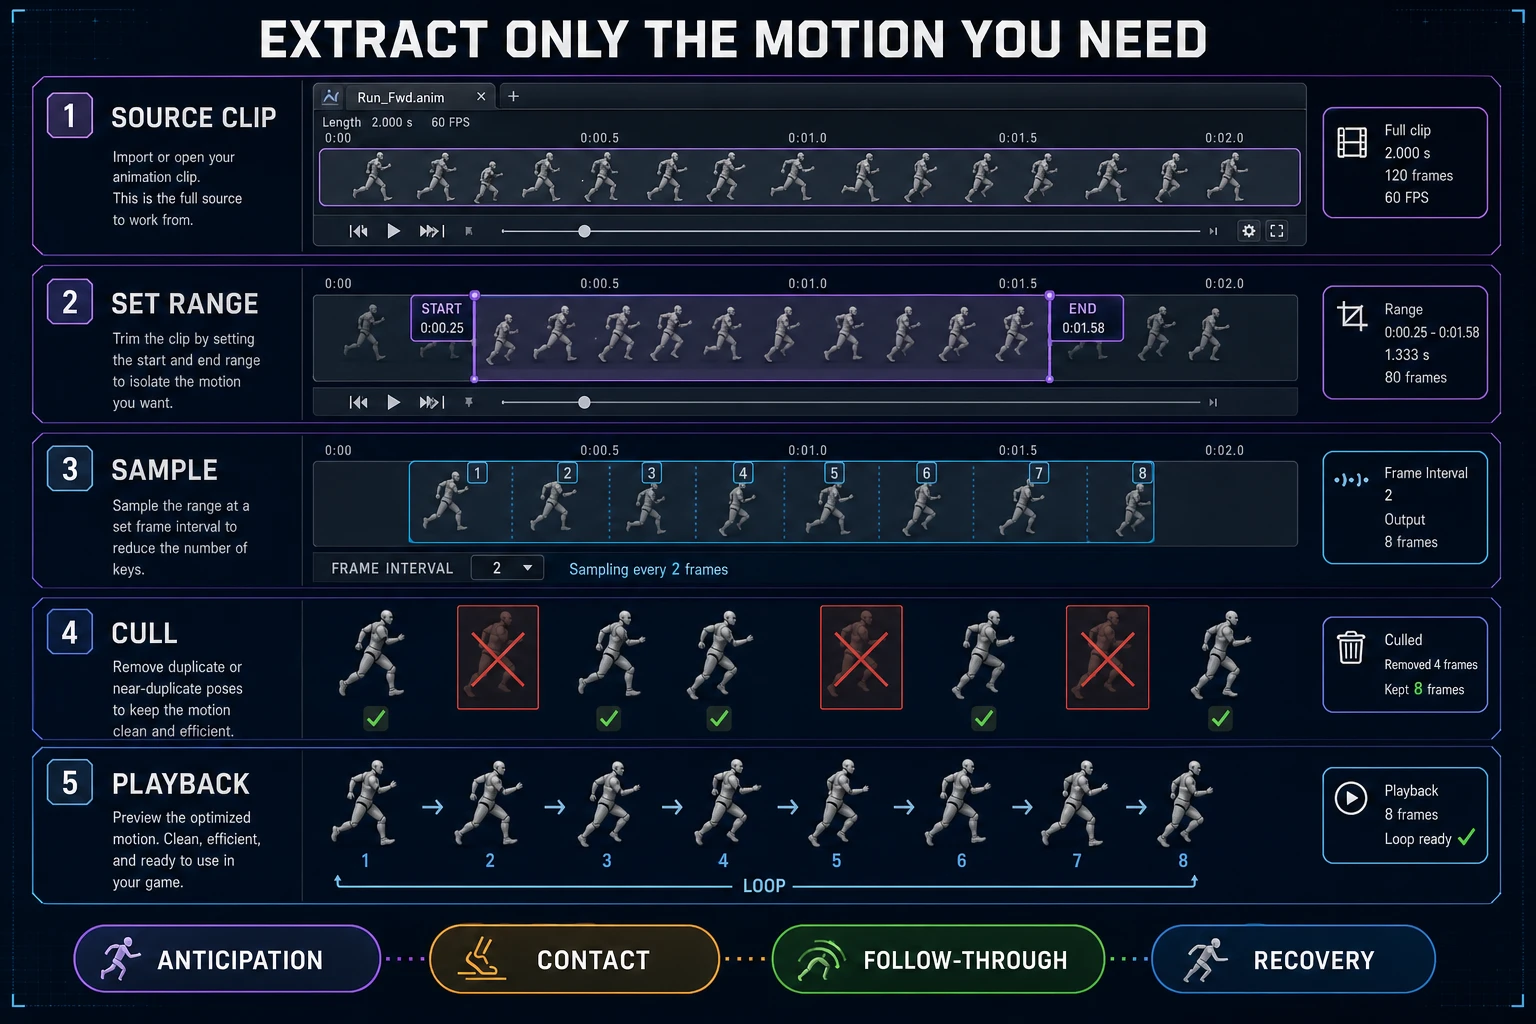
Step 1 — extract the useful motion range in Auto-Sprite v2

Load the video into Auto-Sprite v2, then scrub for the first pose that belongs to the action. Set Start there. Find the final recovery pose and set End before the clip drifts into another action. For a looping run, compare the first and last silhouettes; two nearly identical endpoint poses can create a visible pause if both remain.

Set the Frame interval according to motion, not file length. Begin with a denser extraction, preview it, and increase the interval only when neighboring frames repeat the same readable pose. Fast limbs, weapon arcs, particles, and contact moments often need closer sampling than a slow torso turn. A mechanically even sample can still miss the exact pose that sells impact, so scrub around important contacts before committing.

AI video background remover frame extraction with range selection, frame interval, duplicate removal, and loop playback
Extract around one complete action, then keep the poses that explain its weight and timing.

Auto-Sprite v2 accepts both video and images, so the same stage also works for an existing frame sequence. After extraction, scan the thumbnails in order. Look for accidental duplicates, large jumps, sudden scale changes, or a frame where compression smears the face or hands. Remove a bad frame only if the surrounding poses still describe a smooth path.

Keep the character’s anchor in mind while choosing the range. For grounded movement, the planted foot is often more useful than the center of the visible crop. For flying characters or effects, choose a logical pivot and keep it stable. The crop can include breathing room, but that room must be identical across every cell.

The browser eventually draws decoded source imagery into destination rectangles. MDN’s CanvasRenderingContext2D.drawImage() reference shows that drawing can use a source rectangle and a destination rectangle. That distinction explains a common quality problem: changing destination dimensions during extraction silently resamples frames. Decide the output size once, avoid repeated scaling, and do any deliberate pixel-art conversion afterward in True Pixel.

Step 2 — remove the background and inspect transparent edges

Run Auto-Sprite v2’s background removal after the frame set is stable. Then use its crop and edge-cleanup controls while checking more than the checkerboard preview. A transparency checkerboard confirms that alpha exists, but its midtone pattern can conceal both dark fringes and pale contamination.

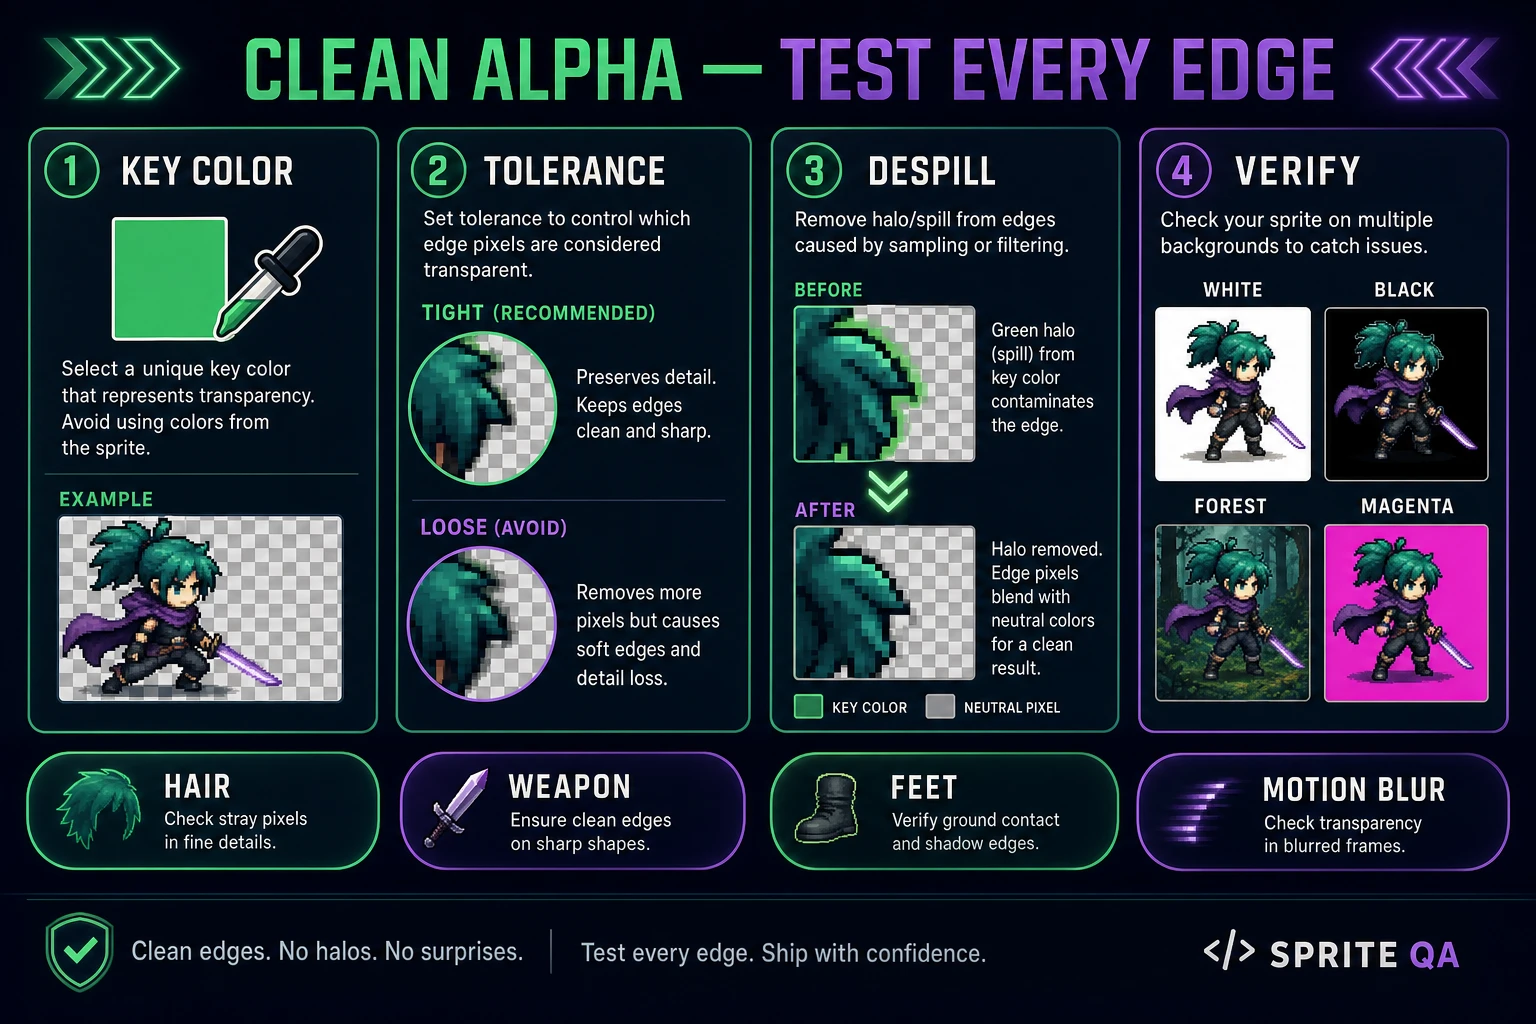
Inspect at least these regions at high zoom: hair tips, the gap between limbs, fingers, weapon edges, feet touching the ground, cloth folds, particles, and motion-blurred extremities. Toggle among white, black, saturated magenta, and a background resembling the target level. A fringe that disappears on gray may glow against a forest or night scene.

Distinguish missing alpha from contaminated color. If a pixel is too opaque, the old background remains visible. If its alpha is reasonable but its red, green, and blue channels still contain backdrop color, it produces a halo when composited. Edge cleanup should preserve soft coverage where the source genuinely contains blur while neutralizing color that belongs to the removed scene.

Use crop cleanup to remove empty borders or stray remnants, but keep one fixed canvas for the sequence. Do not individually trim each frame to its visible bounds. That makes every sprite cell a different implicit coordinate system and causes the subject to wobble during playback. Reserve enough padding for hair, weapon tips, and effect trails across the entire action.

PNG is the right export container for this stage because it supports alpha and lossless image data. The W3C PNG Third Edition specification defines PNG’s color types, including formats with an alpha channel. The format can store transparency faithfully, but it cannot repair a poor mask, dirty RGB edge values, or inconsistent framing. Those are authoring problems you must catch before export.

Step 3 — batch-clean green-screen frames in Corridor Chroma

Use Corridor Chroma only after a video has become still frames. Drop in a batch of PNG, JPG, or WebP images; do not try to upload the source video. The tool is designed for green-screen removal, not general subject detection.

Start with color autodetect when the backdrop is even. If it selects a shadow, highlight, or costume detail, use the eyedropper on a representative area of the green screen. Check several frames before tuning because generated or compressed footage may shift the backdrop color during motion.

Adjust tolerance gradually. Too little tolerance leaves a green rim and screen-colored pockets. Too much eats into green eyes, clothing, particles, reflections, and soft edges. Watch the alpha preview while changing the control: the subject should remain solid where appropriate, the screen should become transparent, and fine details should change smoothly rather than breaking into noise.

AI video background remover edge test using key color, tolerance, despill, and multiple preview backgrounds
Alpha shape and edge color are separate checks; both must remain stable across the moving sequence.

Apply despill after the key shape is sound. Despill neutralizes green contamination reflected onto edge pixels; it should not be used to compensate for a badly chosen key color or an excessively broad tolerance. Compare skin, light fabric, metallic edges, and translucent effects before and after. If neutral areas turn dull or purple, reduce the correction.

Use the batch preview to move through the full action, not merely the cleanest frame. Motion blur and compression often make the fastest pose the hardest one to key. Once every frame passes, export the batch as transparent PNG files. Keep filenames sortable in animation order, and retain the keyed frames separately from the originals so later changes remain reversible.

Green-screen cleanup can remove intentional green content. If preserving that content requires a tolerance so narrow that the backdrop remains, return to direct removal in Auto-Sprite v2 or regenerate against another contrasting screen color. There is no virtue in forcing every source through the same method.

Export AI video background remover results as a tested sprite sheet

Exporting AI video background remover results is the final quality check, not an administrative step. In Auto-Sprite v2, inspect the loop preview at the intended game speed before creating the sheet. Watch the anchor, silhouette, and edge alpha together. If the action hesitates, revisit the range or frame interval. If the body jitters while the motion itself looks correct, revisit crop consistency.

When the export contains at least six frames, Auto-Sprite v2 uses a fixed six-column layout. That rule makes the grid predictable: rows continue beneath the first six cells, and every cell keeps the same dimensions. With fewer than six frames, verify the actual grid rather than assuming six empty columns. Record the column count, row count, cell width, cell height, and intended playback rate beside the asset.

Open the result in Sprite Analyzer. Set or confirm the grid, then play the cells in order. The analyzer validates the grid and playback; it does not repair a damaged edge or invent a missing pose. Look for a partial cell at the sheet boundary, swapped frame order, inconsistent padding, duplicate poses, anchor drift, and a hitch where the last frame returns to the first.

Test over multiple backgrounds again because atlas assembly can expose mistakes that were easy to miss in separate files. Zoom in for halos, then zoom out to the game’s real display size. At small sizes, pose readability matters more than perfect hair detail. At large sizes, one contaminated pixel row can become obvious.

  • Halo remains: Return to edge cleanup or Corridor Chroma’s despill. Do not solve it by hardening every alpha edge.
  • Character bounces: Restore a fixed canvas and align a consistent anchor across frames.
  • Loop pauses: Remove a duplicate endpoint or revise the sampled range.
  • Grid slices the sprite: Confirm sheet dimensions divide cleanly by the recorded columns and rows.
  • Green detail disappears: Narrow the tolerance, choose another key color, or use direct removal.

For another atlas example, see the GIF-to-sprite-sheet grid guide. The same acceptance test applies regardless of source: a finished sheet has ordered poses, equal cells, stable anchors, clean color under partial alpha, and a loop that reads at gameplay size. Keep the source clip, extracted originals, cleaned PNG frames, and final atlas as separate stages. That small amount of file discipline makes later timing, mask, and export changes much safer.

Frequently Asked Questions

Can an AI video background remover create a sprite sheet directly?

It can be one stage in the pipeline, but a usable sprite sheet also needs controlled frame extraction, stable framing, a consistent canvas, ordered cells, and a loop preview. Auto-Sprite v2 combines those jobs around its removal stage so the result can be judged as animation rather than as isolated cutouts.

Should I use green screen footage for game sprites?

Green screen is useful when the subject does not contain similar green colors and the backdrop is evenly lit. It gives the removal stage a clear boundary, but compressed spill, shadows, motion blur, and green costume details still need inspection. Use a contrasting screen color and preserve the original clip.

How many frames should I extract from a short animation?

Extract enough distinct poses to preserve anticipation, contact, follow-through, and recovery, then remove duplicates by watching the loop. The correct count depends on the motion and target playback rate. A fast effect may need fewer frames than a readable walk, even when both clips have the same duration.

Why do transparent sprite edges show a green or dark halo?

Edge pixels often contain a mixture of subject color and background color from antialiasing, blur, compression, or light spill. Hard deletion changes alpha but may leave contaminated RGB values. Despill and edge cleanup repair those mixed pixels before the sheet is composited over the game background.

How do I verify a background-removed sprite sheet?

Preview the animation over light, dark, and game-like backgrounds. Check feet and anchors for jitter, verify every cell has the same dimensions, watch the loop at its intended rate, and inspect hair, weapons, particles, and motion-blurred limbs at high zoom before export.

Sources

  1. HTMLVideoElement.requestVideoFrameCallback() — MDN
  2. CanvasRenderingContext2D.drawImage() — MDN
  3. Portable Network Graphics (PNG) Specification, Third Edition — W3C
Written by Arron R.·2,277 words·10 min read

Related posts