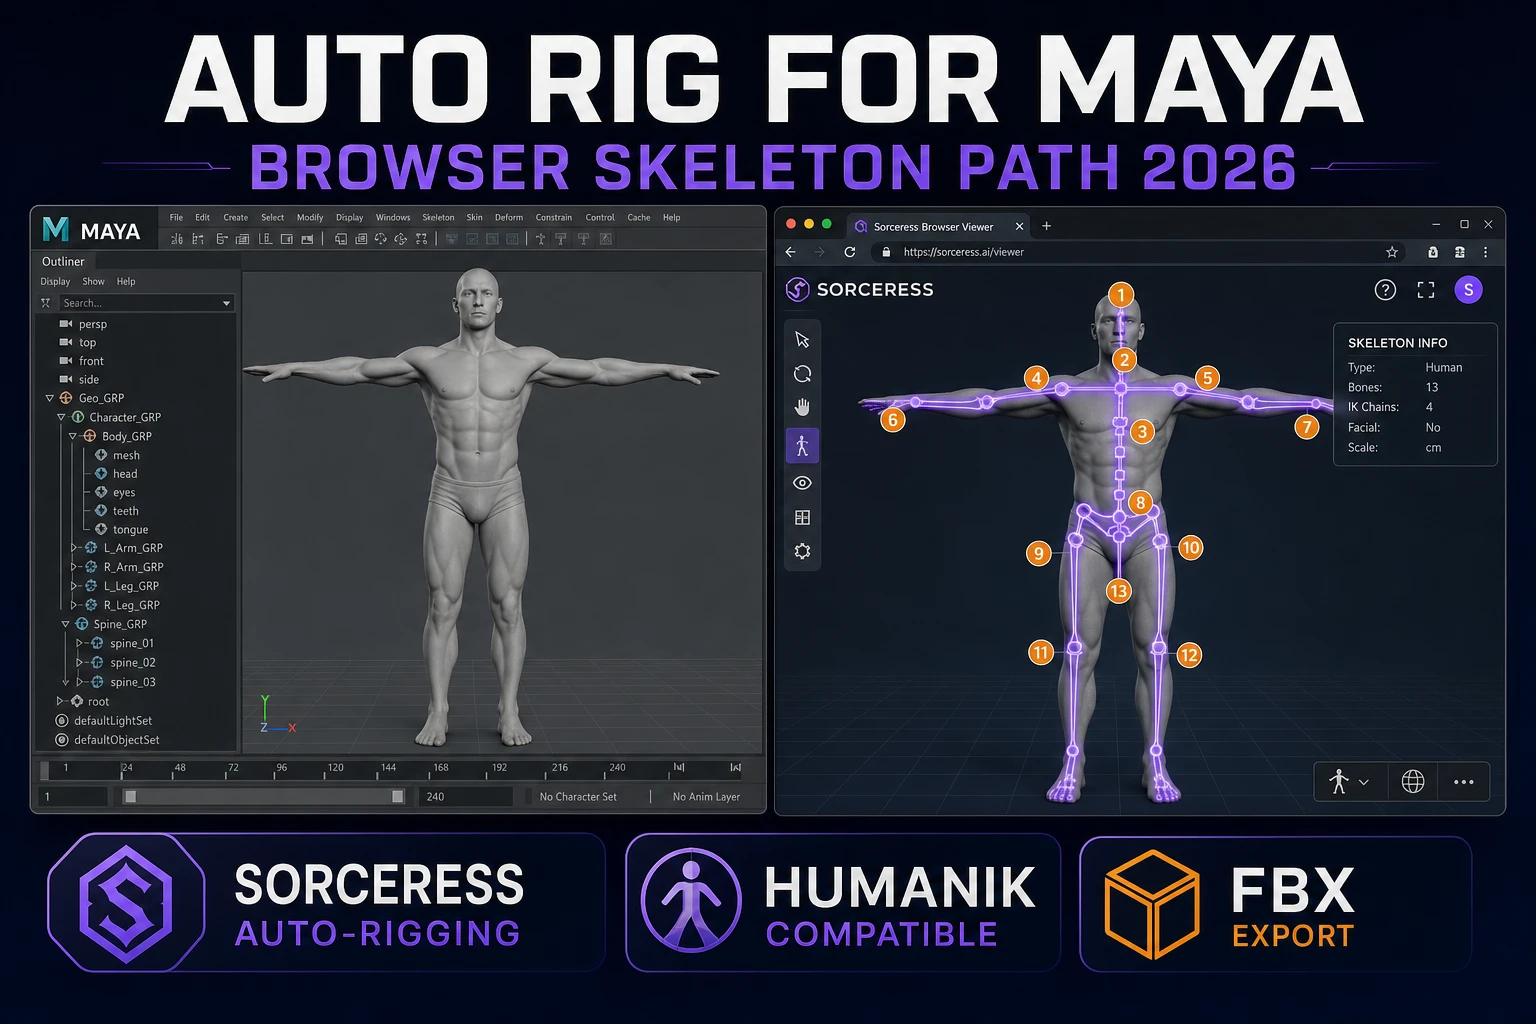
Bind an Auto Rig for Maya (Browser Skeleton Path 2026)

By Arron R.12 min read
An auto rig for maya replacement needs an FBX export, a browser tool that fits a Mixamo-style skeleton from 13 body markers, and a re-import HumanIK's Auto Matc

People searching auto rig for maya in 2026 are almost never asking "what is a skeleton?" They already own the software, they already know what HumanIK is, and they usually already have a humanoid mesh sitting in a Maya scene file that needs joints, weights, and an FBX export before the deadline. What they actually want is the shortest honest path from "T-pose mesh in Maya" to "rigged and skinned character an animator can pose", ideally without another plugin licence or another twenty-minute HumanIK ceremony per character.

The Maya-native path (HumanIK plus manual weight painting) works fine for hero characters. It stops being competitive the moment the game jam roster is eight goblins, four townsfolk, and a boss, all needed by Friday. This piece walks a five-step auto rig for maya replacement pipeline that treats Maya as the modelling and animation host, and runs the auto-rig step in a browser tab using the Sorceress Auto-Rigging tool. All facts about Maya, HumanIK, Bifrost, and MotionMaker verified 2026-08-04 against Autodesk's live documentation.
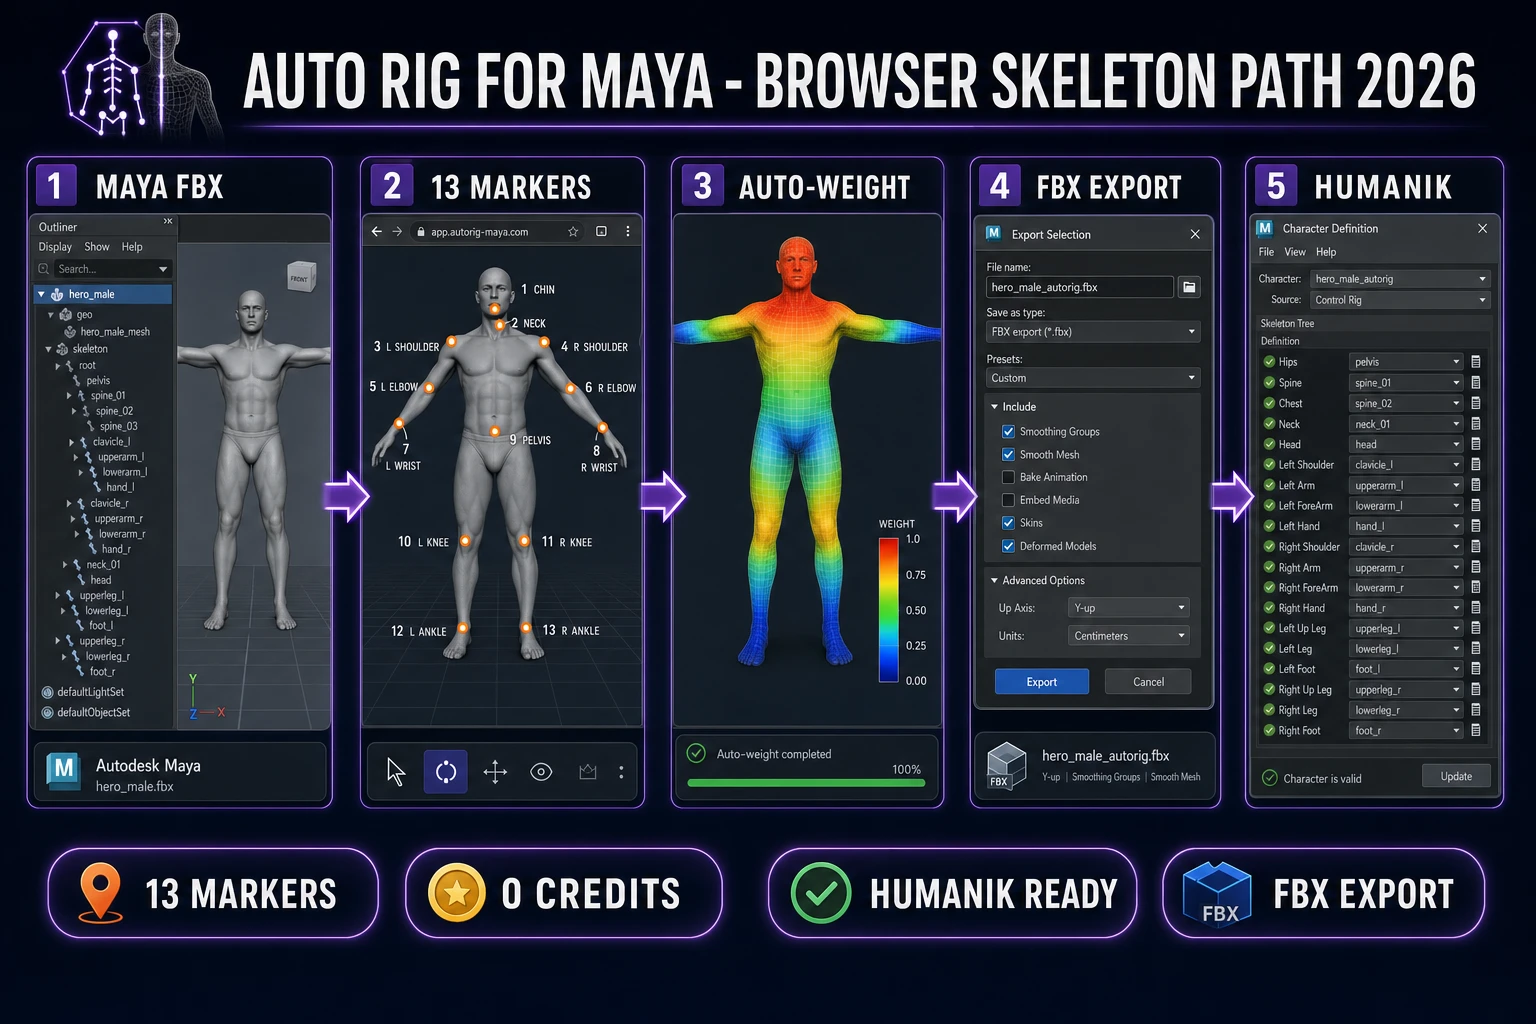
auto rig for maya browser skeleton pipeline: Maya humanoid FBX export, 13 markers on Sorceress Auto-Rigging, auto-weight skin, FBX re-import into Maya, HumanIK definition
Maya humanoid FBX, 13 body markers on Sorceress Auto-Rigging, auto-weighted skin, FBX re-import. Each panel replaces one Maya-native step.

What an auto rig for Maya search actually wants in 2026

The phrase auto rig for maya clusters with three overlapping intents. First, indie devs and students moving humanoid meshes from Maya into a game engine (Phaser, Godot, Unity, Unreal) who want a Mixamo-style rig without touching Mixamo's intermittently-broken login. Second, small studios who own Maya but not a paid rigging plugin (Advanced Skeleton is free, mGear is free, but the initial setup is a project on its own). Third, animators who own MotionBuilder and want a HumanIK-compatible skeleton so retargeting works, but do not want to hand-place joints for every side character.

Autodesk's own answer to all three is HumanIK — verified 2026-08-04 against Autodesk's official HumanIK documentation: it is a full-body inverse kinematics solver and retargeting engine, shipped as the auto-loaded mayaHIK plug-in, with a "Create an automatic character rig for a mesh" workflow. Maya 2026.1 (released June 2025, verified against the official Maya 2026.1 What's New page on 2026-08-04) added a new modular rigging framework inside Bifrost 2.14.0.0 and an AI animation tool called MotionMaker for roughing out biped and quadruped motion. Neither replaces the pure "give me joints on this mesh" step that a game-dev workflow needs first.

Search intent here is transactional. The reader wants a workflow they can run today, on the mesh in front of them, with no new licence, no long learning curve, and no dependency on a broken third-party login. The five-step pipeline below assumes exactly that reader.

Where HumanIK works and where indie game-dev workflows hit its ceiling

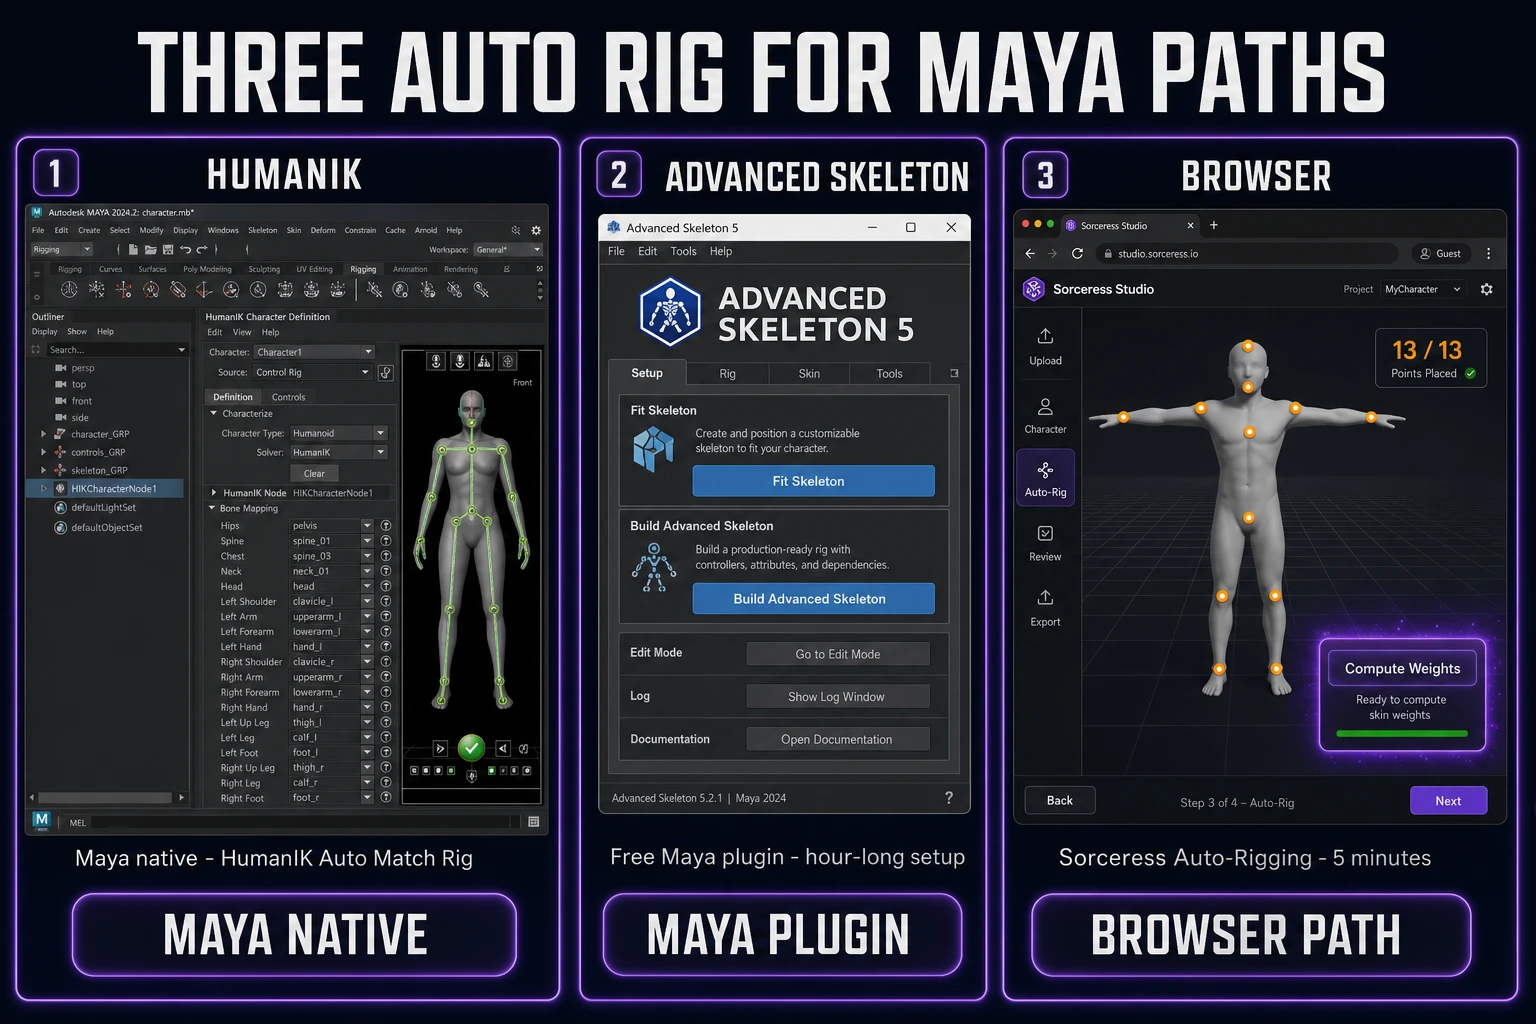
HumanIK is genuinely good software. It is a full-body IK solver with retargeting, effectors, pivots, pinning, and a character definition system that lets you send rigs to MotionBuilder for motion-capture cleanup and back to Maya for layered animation refinement (verified 2026-08-04 against Autodesk's HumanIK feature docs). If the destination is a Maya-native animation pipeline with layers, constraints, and Trax editing, staying inside HumanIK is the right call.

The ceiling for a game-dev workflow shows up in three places. First, HumanIK's "Create an automatic character rig for a mesh" flow needs a HumanIK skeleton definition with every joint mapped by hand or by matching a template. The template pass is fast for the T-pose default, but the moment a character has non-standard proportions (chibi head, short legs, exaggerated shoulders) the template pass fails silently and you spend the afternoon nudging joints. Second, HumanIK does not compute skin weights. You still need to bind the skin (rigid, smooth, or the interactive skin bind) and paint corrections — Maya's Paint Skin Weights Tool works but is time-consuming per character. Third, HumanIK's control rig is a Maya-first construct; if the target is a game engine, you often end up baking the animation out to plain joints anyway, which erases most of the HumanIK-specific benefit.

Advanced Skeleton and mGear both close some of those gaps and are widely respected in the Maya community. Both are free downloads that install as Maya plugins. The trade-off is setup time: a first-time Advanced Skeleton install plus a walk through the Fit Skeleton and Build Advanced Skeleton dialog is a real hour, and mGear's PyQt-based UI has its own learning curve. Neither is wrong — both are the right choice for a studio building a Maya-native rig library. Neither is the fastest path when the reader has one mesh, no rigging library yet, and a Friday deadline.

The Sorceress auto rig for Maya alternative pipeline in five steps

Every Sorceress auto rig for maya run has the same five steps, and each step maps to either a Maya action, a browser action, or a file handoff:

  1. Export from Maya. Take the T-pose humanoid mesh out of Maya as FBX or GLB. This is a two-click File → Export Selection with the default settings; no plugin required.
  2. Drop 13 body markers. Open Sorceress Auto-Rigging in a browser tab, drag the FBX or GLB in, and click chin, neck, pelvis, and the seven left-side joints (auto-mirror handles the right side). Verified 2026-08-04, the required markers are pelvis, neck, chin, shoulder × 2, elbow × 2, wrist × 2, knee × 2, ankle × 2 (thirteen required plus two optional hip markers) per src/lib/rigging/types.ts.
  3. Auto-weight the skin. Trigger the Blender-backed automatic weight computation. This runs the same envelope-and-heatmap algorithm as Blender's Weights from Bones but headlessly against your mesh in the cloud, and returns bone weights per vertex.
  4. Export as FBX or GLB. Save the rigged mesh with the skeleton and skin weights embedded. FBX is the default when the target is Maya or a Unity Mecanim pipeline; GLB is the default for a browser or Godot 4 target.
  5. Re-import into Maya (optional). If Maya is the final animation host, drag the rigged FBX back into a Maya scene, characterize it in HumanIK if you want IK controls, and refine the weights in the Paint Skin Weights Tool where the auto-weight result needs cleanup (armpits, hip crease, elbow inner fold).

Only step 3 touches paid infrastructure. Verified 2026-08-04 in src/lib/rigging/external-rig/autoRigPricing.ts, an optional AI auto-rig via the Meshy provider costs 20 credits per rig; the local marker-based rig with Blender ARP auto-weight costs 0 credits on top of the browser session. Steps 1, 2, 4, and 5 are file work.

Name every file boringly (hero_male_tpose.fbx, hero_male_rigged.fbx, hero_male_maya_final.mb) so a future you three months from now can still tell which export produced which rig.

Step 1 — export your humanoid mesh as FBX or GLB from Maya

Open the Maya scene with the T-pose mesh. Confirm three things before exporting:

  • Neutral T-pose or A-pose. The character stands upright, feet under hips, palms facing the ground (T-pose) or angled 45° downward (A-pose). Same rule as Mixamo, HumanIK, Advanced Skeleton, and mGear: a posed character breaks every auto-rigger.
  • Origin at (0, 0, 0). The pelvis sits on the world origin, character facing +Z or -Z. If the mesh sits at (500, 20, 300), Freeze Transformations before export or the skeleton auto-detect will place the joints at the mesh origin, not the world origin.
  • Clean mesh, no extras. No cameras, no locators, no reference imageplanes, no leftover joint chains from a previous rig attempt. Delete or hide anything that is not the character mesh itself.

Then File → Export Selection. Set the file type to FBX export. In the FBX Export options, tick Smoothing Groups, Smooth Mesh, Referenced Assets Content, and set Up Axis to Y-up (Maya's default) or Z-up if the target engine is Godot. Untick Animation — the mesh is not yet rigged, there is nothing to bake. FBX 2020 or FBX 2019 both work; both are read cleanly by the Sorceress import path.

For a GLB export instead, use the Maya glTF plug-in (Autodesk ships it in Maya 2026 by default). File → Export Selection → glTF Binary (.glb). This produces a smaller file and works better if the destination engine is a browser-rendered Three.js or Babylon.js target.

The Sorceress import path accepts FBX, GLB, GLTF, and OBJ. Verified 2026-08-04 against the detectModelFormat helper in src/lib/rigging/mesh-utils.ts, the format is auto-detected from the file signature — no manual toggle in the browser.
Step 2 — drop 13 body markers on Sorceress Auto-Rigging

Open Sorceress Auto-Rigging at /rigging. Drag the exported FBX or GLB onto the drop zone. The mesh renders in a Three.js viewport with orbit controls; rotate to a front-facing view before placing markers.

The guided marker order is deliberately short — verified 2026-08-04 in src/lib/rigging/types.ts, the left-side order is chin, neck, pelvis, hipLeft, shoulderLeft, elbowLeft, wristLeft, kneeLeft, ankleLeft. Nine clicks. Auto-mirror handles the right side by reflecting each placed marker across the character's plane of symmetry. The two hip markers are optional; the thirteen head, spine, arm, and leg markers are required.

Click each marker location on the mesh surface. The interactive gizmo lets you nudge a marker after placement if the click landed slightly off — a marker one voxel wide of the actual joint will produce a rig that solves slightly off, so the nudge matters. Bind pose accuracy compounds: a marker one centimetre out at the elbow becomes a bent forearm at the wrist.

When all thirteen required markers are placed and auto-mirror has filled in the right side, the skeleton preview renders. The preview shows the fitted humanoid skeleton in the same coordinate space as the mesh, with bones running pelvis → spine → neck → head, shoulder → arm → forearm → hand for each side, and pelvis → upperLeg → lowerLeg → foot → toes for each leg. This is the same anatomical hierarchy that HumanIK, Mixamo, Ready Player Me, and Unreal's default mannequin all use, so retargeting later works cleanly.

If the preview looks wrong — one shoulder too high, a knee inside the calf — reopen the marker panel and nudge the offending marker. The skeleton refits in real time.

Step 3 — auto-weight the skin and re-import into Maya

Once the skeleton preview is green, click Compute Weights. Verified 2026-08-04 in src/lib/rigging/blender-client.ts, the tool posts the mesh plus skeleton to a Blender headless backend which runs the same envelope-and-heatmap automatic weight algorithm as Blender's Parent With Automatic Weights. The result comes back as per-vertex bone weights, four influences per vertex maximum (the game-engine standard), and renders as a colour heatmap on the mesh so you can see which regions of skin bind to which bone.

Colour-check the weight paint. Reds and oranges near a joint mean strong influence; blues and greens elsewhere mean spillover. Check the four honest failure zones: armpits (should be a mix of shoulder and upper arm), hip crease (should be a mix of pelvis and upper leg), elbow inner fold (should transition cleanly from upper arm to forearm), and neck-shoulder join (should not paint the whole shoulder as neck).

If a zone looks wrong, adjust before exporting. The paint tab exposes a brush-based paint UI that overwrites the auto-weight in a specific region — click the bone you want to bind to, then paint on the mesh surface. This is a much smaller edit than Maya's Paint Skin Weights Tool because auto-weight has already done 95% of the work; the paint step here is just fixing the four failure zones.

When the weights look correct, click Export. Pick FBX for a Maya re-import, GLB for a browser or Godot 4 target, or GLTF if you want a JSON container. The exported file carries the skeleton bone hierarchy, the per-vertex weights, and (if you keep the option ticked) a T-pose bind stored as the reference pose.

Re-import into Maya: File → Import → select the FBX. The rigged character arrives with joints, skinCluster, and bindPose already set. If the destination is HumanIK-driven animation, Window → Animation Editors → HumanIK, then click Create Character Definition, then Auto Match Rig — HumanIK's own auto-match reads the standard humanoid bone names and populates the character definition without further clicking. The rig is now a HumanIK character in Maya, ready for retargeting animation from MotionBuilder or the HumanIK animation library.

Three auto rig for maya paths compared: HumanIK Maya-native, Advanced Skeleton plugin, and Sorceress Auto-Rigging browser workflow
HumanIK native, Advanced Skeleton plugin, browser auto-rig. The browser path is the fastest for one-off game-jam humanoids; the Maya-native paths win for studio rig libraries.

Common issues (and where the browser path saves time)

The failure modes cluster in a few predictable places:

  • Skeleton lands off-centre. The mesh had non-frozen transforms in Maya. Fix in Maya (Modify → Freeze Transformations → Translate + Rotate + Scale), re-export FBX, re-import into Sorceress Auto-Rigging.
  • Auto-weight bleeds across the hip crease. A common auto-weight failure. Paint-fix in the browser (30 seconds) or in Maya after re-import using the Paint Skin Weights Tool.
  • Character loads facing sideways. Maya default is Y-up with characters facing +Z. If the exported FBX has Z-up, rotate 90° in the Sorceress viewport before placing markers or the auto-mirror axis will be wrong.
  • HumanIK Auto Match fails after Maya re-import. Bone names do not match HumanIK's expected identifiers. Manually map Hips, Spine, LeftShoulder, etc., in the HumanIK Character Definition tab — a five-minute one-time exercise per character.
  • Finger bones missing. The 13-marker skeleton is body-only. Fingers are optional and either added by hand in Maya after re-import, or triggered by the Blender-backed finger-detect pass in the same Sorceress panel (verified 2026-08-04 in src/lib/rigging/blender-client.ts, function requestBlenderFingerDetect).
  • Wanting Mixamo's back-catalog of motion clips. The rigged FBX exported from Sorceress uses a Mixamo-compatible joint hierarchy — Mixamo animation clips retarget cleanly onto it. This is separate from the rigging step and lives in Maya's Time Editor or MotionBuilder.

What an auto rig for Maya replacement costs in Sorceress in 2026

Adding it up with today's numbers, all verified 2026-08-04 against the local Sorceress source:

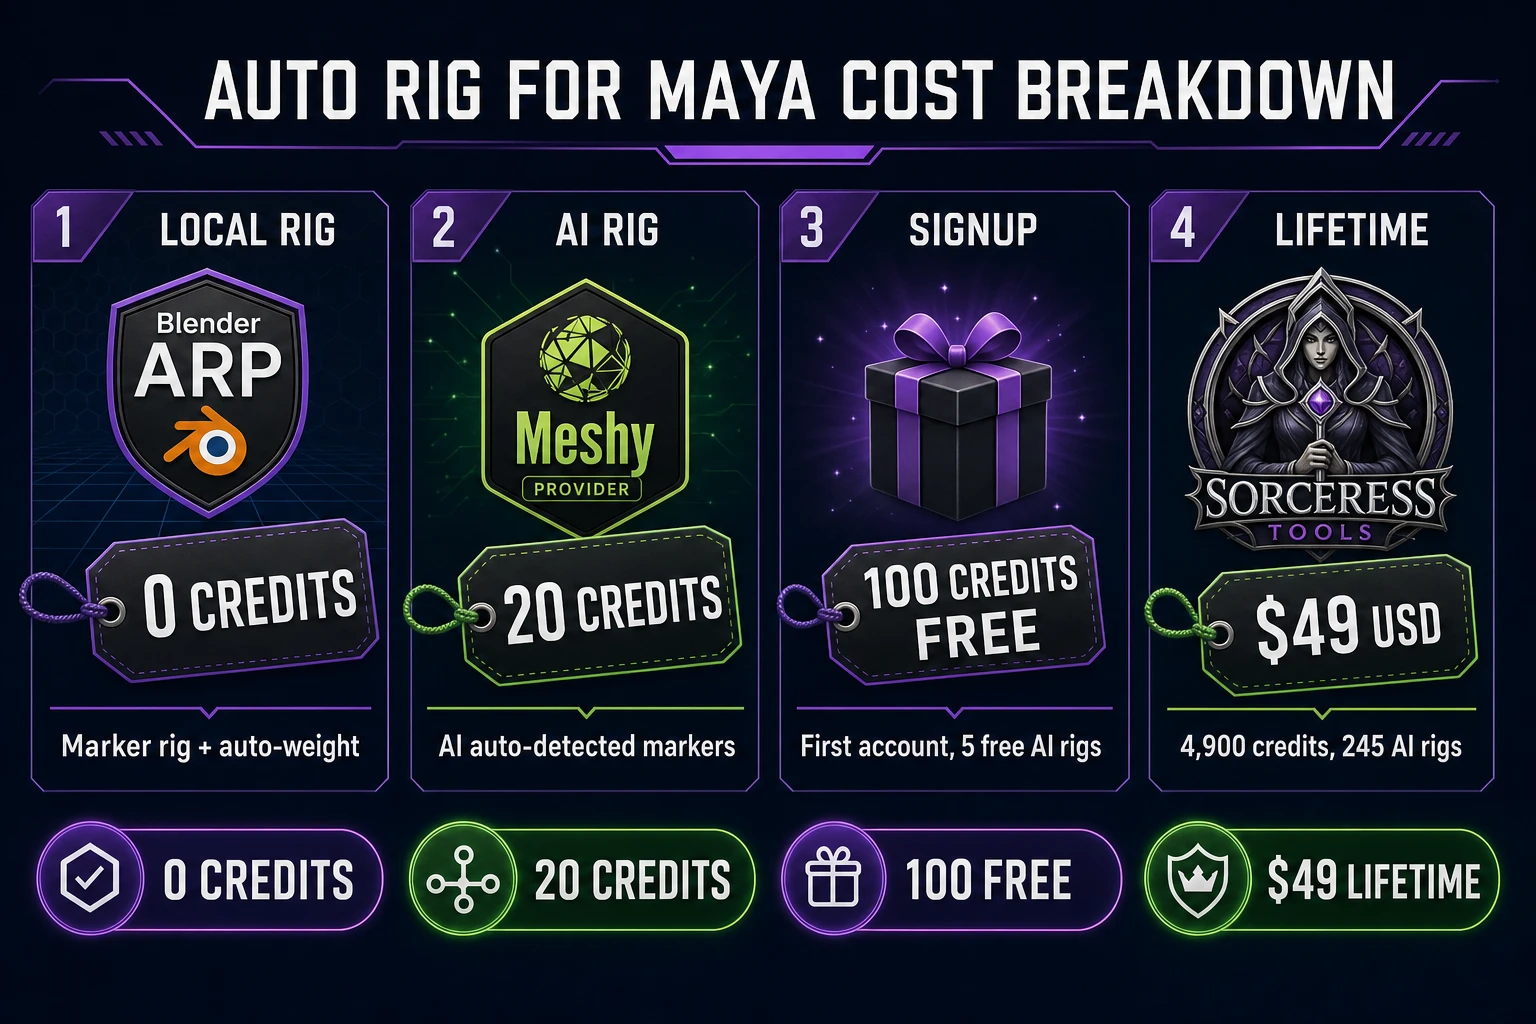
  • Sorceress Auto-Rigging local marker rig (Blender ARP auto-weight) — 0 credits. Verified in the Rig tab, which does not bill for the marker-based path (the Blender backend call is a fixed-cost server operation covered by the Pro subscription).
  • Optional AI auto-rig via Meshy provider — 20 credits per rig, verified in src/lib/rigging/external-rig/autoRigPricing.ts. Useful when you want an AI-detected marker pass instead of clicking markers by hand.
  • Signup grant (verified 2026-08-04 in src/app/api/admin/credits/route.ts) — 100 credits on first account creation. Five AI auto-rigs on the house before touching a paid credit.

The Sorceress Lifetime tier is LIFETIME_PRICE = 49 USD (verified 2026-08-04 in src/app/plans/page.tsx). At 100 credits per dollar (CREDITS_PER_DOLLAR = 100, verified in src/lib/models.ts), that is 4,900 credits for the lifetime tier, or 245 AI auto-rigs at 20 credits each. For a studio grinding through humanoid characters weekly, that is roughly five years of rigging capacity for a one-time price.

Maya itself is a separate Autodesk Named User subscription; the reader still owns Maya for modelling, rendering, and animation. The point of the browser rig is that it costs $0 additional per rig once you own Sorceress, and it does not require a second plugin install or a second software licence. For a game-jam roster of eight characters, the browser path finishes on Friday.

auto rig for maya cost breakdown: 0 credits marker rig, 20 credits Meshy AI rig, 100 signup credits, 49 dollar Sorceress Lifetime
Credits, signup grant, lifetime price. The browser rig replaces the plugin step, not the Maya licence.

For related workflows: if the target is Blender rather than Maya, the Auto-Rig Pro Blender Workflow post covers the Blender-specific path; if the target is Mixamo compatibility specifically, the Try a Mixamo Alternative post walks the same tool with a Mixamo focus. For the raw auto-rig weight-check story, the Rig With Auto Rig for Game Characters post drills into weight painting. If the reader also needs to rig non-humanoids (spiders, quadrupeds, insects), the sibling Skip Auto-Rig Pro post explains where the browser humanoid rig hands off to the Procedural Walk tool. The Tools Guide is the wide index when you want the full Sorceress tool list, and WizardGenie is the browser-native coding agent that consumes the exported rig once the character reaches your game project.

Frequently Asked Questions

What is the difference between an auto rig for Maya and Maya's own HumanIK?

HumanIK is Maya's built-in full-body IK solver and retargeting engine (verified 2026-08-04 against Autodesk's HumanIK documentation). It defines a character skeleton and creates a control rig for animation, but it does not compute skin weights automatically. An auto rig for Maya in the game-dev sense usually means the joints, the skin binding, and the weight computation as one operation. The Sorceress browser path fits joints from 13 markers, runs an automatic skin weight pass via a Blender backend, and exports an FBX that HumanIK's Auto Match Rig characterizes on re-import.

Do I need Maya to use Sorceress Auto-Rigging?

No. Sorceress Auto-Rigging accepts FBX, GLB, GLTF, and OBJ humanoid meshes from any 3D software (Blender, Maya, 3ds Max, ZBrush, Cinema 4D, or generated meshes from image-to-3D tools). Maya is one of several sources. This article focuses on Maya specifically because 'auto rig for maya' is the query being answered, but the same browser workflow serves any modelling package that exports FBX or GLB.

Does the Sorceress rig work with HumanIK Auto Match Rig in Maya?

Yes, in most cases. The exported skeleton uses standard humanoid bone names (Hips, Spine, LeftShoulder, RightShoulder, LeftUpLeg, etc.) that HumanIK's Auto Match Rig reads without further clicking. If a bone name is off, the HumanIK Character Definition tab lets you map it manually in about five minutes. This is a one-time setup per character; retargeting animations from MotionBuilder or the HumanIK library works after that.

How many credits does an auto rig for Maya cost in Sorceress?

Zero credits for the local marker-based rig with Blender ARP auto-weight (verified 2026-08-04 against the Rig tab in src/app/rigging/page.tsx). Twenty credits per rig for the optional AI auto-rig via the Meshy provider (verified 2026-08-04 in src/lib/rigging/external-rig/autoRigPricing.ts). The signup grant is 100 credits, so five AI auto-rigs come free before you touch a paid credit; the local marker path is unlimited.

Can Sorceress Auto-Rigging handle non-humanoid characters?

The main tool is humanoid-only, matching the same body-shape ceiling Mixamo enforces. For spiders, quadrupeds, centipedes, insects, or any non-biped, Sorceress ships a separate Procedural Walk tool at /rigging-multileg that auto-rigs multi-legged creatures and drives them with real-time inverse kinematics. Both tools export FBX or GLB that Maya re-imports cleanly.

Sources

  1. HumanIK - Autodesk Maya 2026 documentation
  2. What's New in Maya 2026.1 Update - Autodesk documentation
  3. Skeletal animation - Wikipedia
  4. glTF 2.0 skinning specification - Khronos Group
Written by Arron R.·2,680 words·12 min read

Related posts