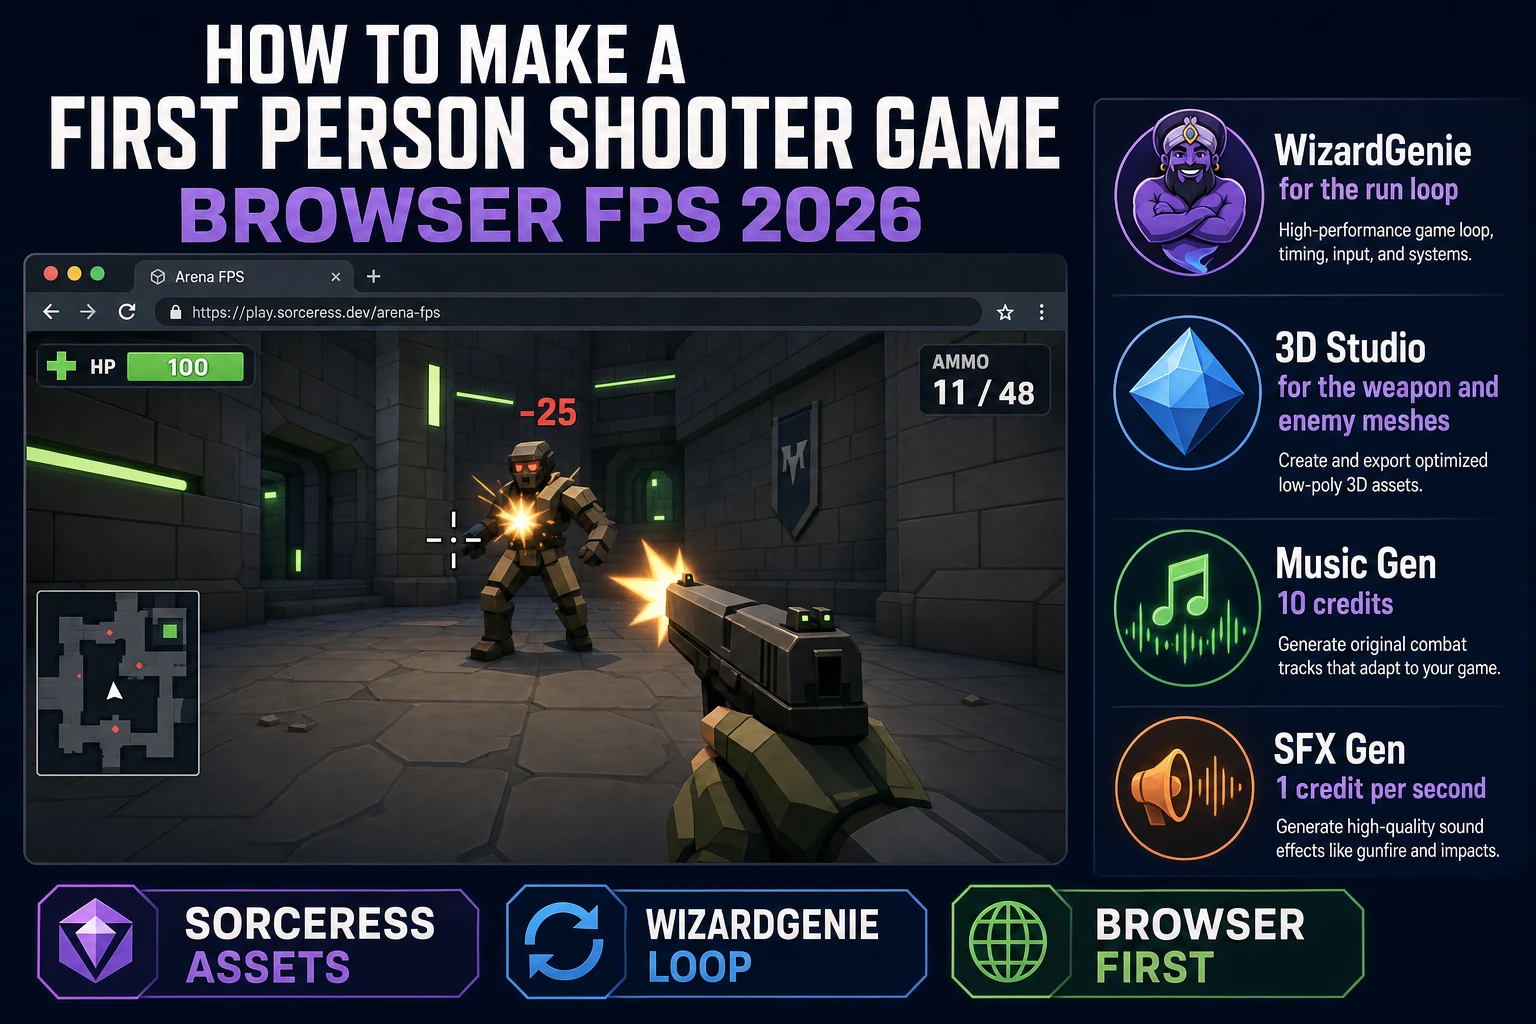
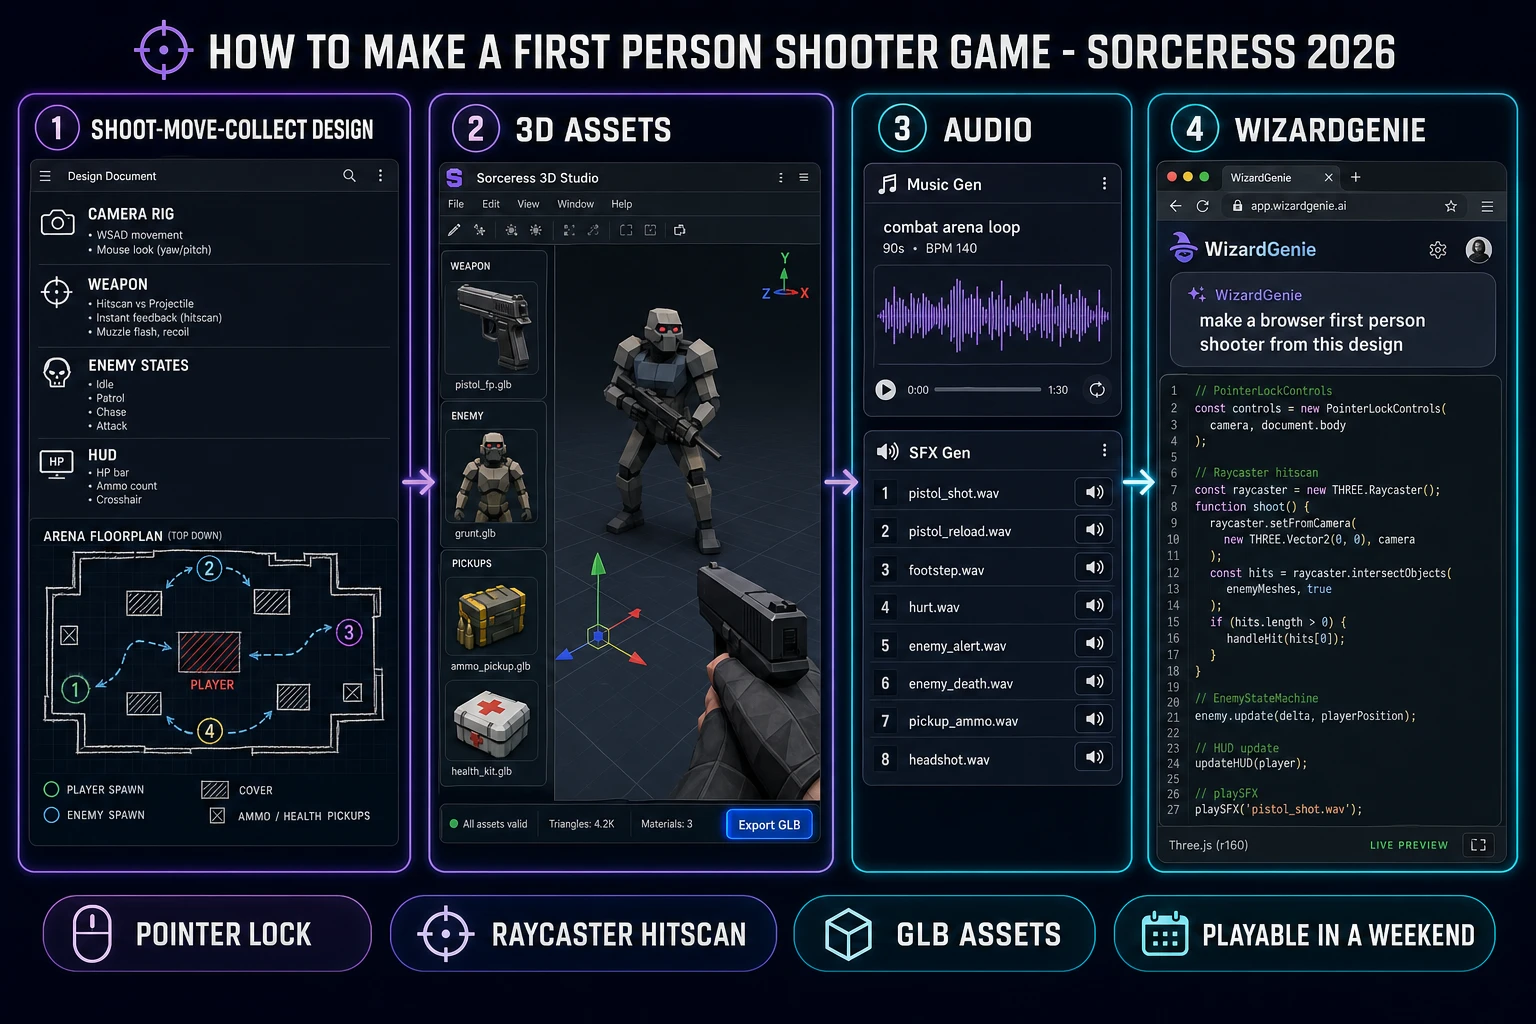
People searching how to make a first person shooter game in 2026 usually get one of two unsatisfying answers: a Unity tutorial that spends four hours on the WSAD camera rig and never gets to the shooting, or a Roblox template that gives you a weapon that only plays a sound. The honest 2026 answer is different. A modern FPS is three tight subsystems bolted together: a pointer-lock camera rig on WSAD keys, a hitscan or projectile weapon that resolves against a raycaster, and a small enemy state machine that walks between Idle, Patrol, Chase, and Attack. Get those three right and everything else — ammo pickups, health kits, level flow, boss encounters — is a small variation on the same pattern. This guide walks the recipe: design the shoot-move-collect loop on paper first, generate weapon plus enemy meshes in Sorceress 3D Studio, generate the combat music and gunfire SFX in Sorceress, then let WizardGenie wire the Three.js browser FPS so a playable arena ships in two weekends.
What "how to make a first person shooter game" actually needs in 2026
The genre label is old and searches for it are dominated by two audiences with very different needs. According to the first-person shooter entry on Wikipedia, the term covers everything from the 1992 Wolfenstein 3D through Doom, Quake, Half-Life, Halo, Call of Duty, Counter-Strike, Overwatch, and modern hero shooters. Half the people searching how to make a first person shooter game want a Counter-Strike-style arena with a gun, a crosshair, and enemies to shoot. The other half want a lore-heavy campaign in the style of Half-Life 2 or the new indie darlings like Cruelty Squad. This tutorial targets the first audience deliberately because the second is a scope trap: campaigns need a level designer, a writer, and a voice-acting budget before the shooting even feels good.
What every FPS shares, regardless of scope, is the shoot-move-collect loop. The player moves through the space, aims a crosshair at an enemy, presses fire, sees damage, collects the ammo and health that drops, and repeats. That loop is what a first person shooter game is. A tutorial that teaches the WSAD camera without teaching the hitscan raycaster is teaching a first-person walker, not an FPS. A tutorial that teaches the raycaster without teaching enemy AI is teaching a target range, not an FPS. This one teaches all three so the recipe produces a real playable shooter, not a first-person tech demo.
The FPS shoot-move-collect loop in one minute
Every first person shooter, arena or campaign, runs the same core moment-to-moment loop. Understanding it in one minute is the difference between a real project and a stalled tech demo:
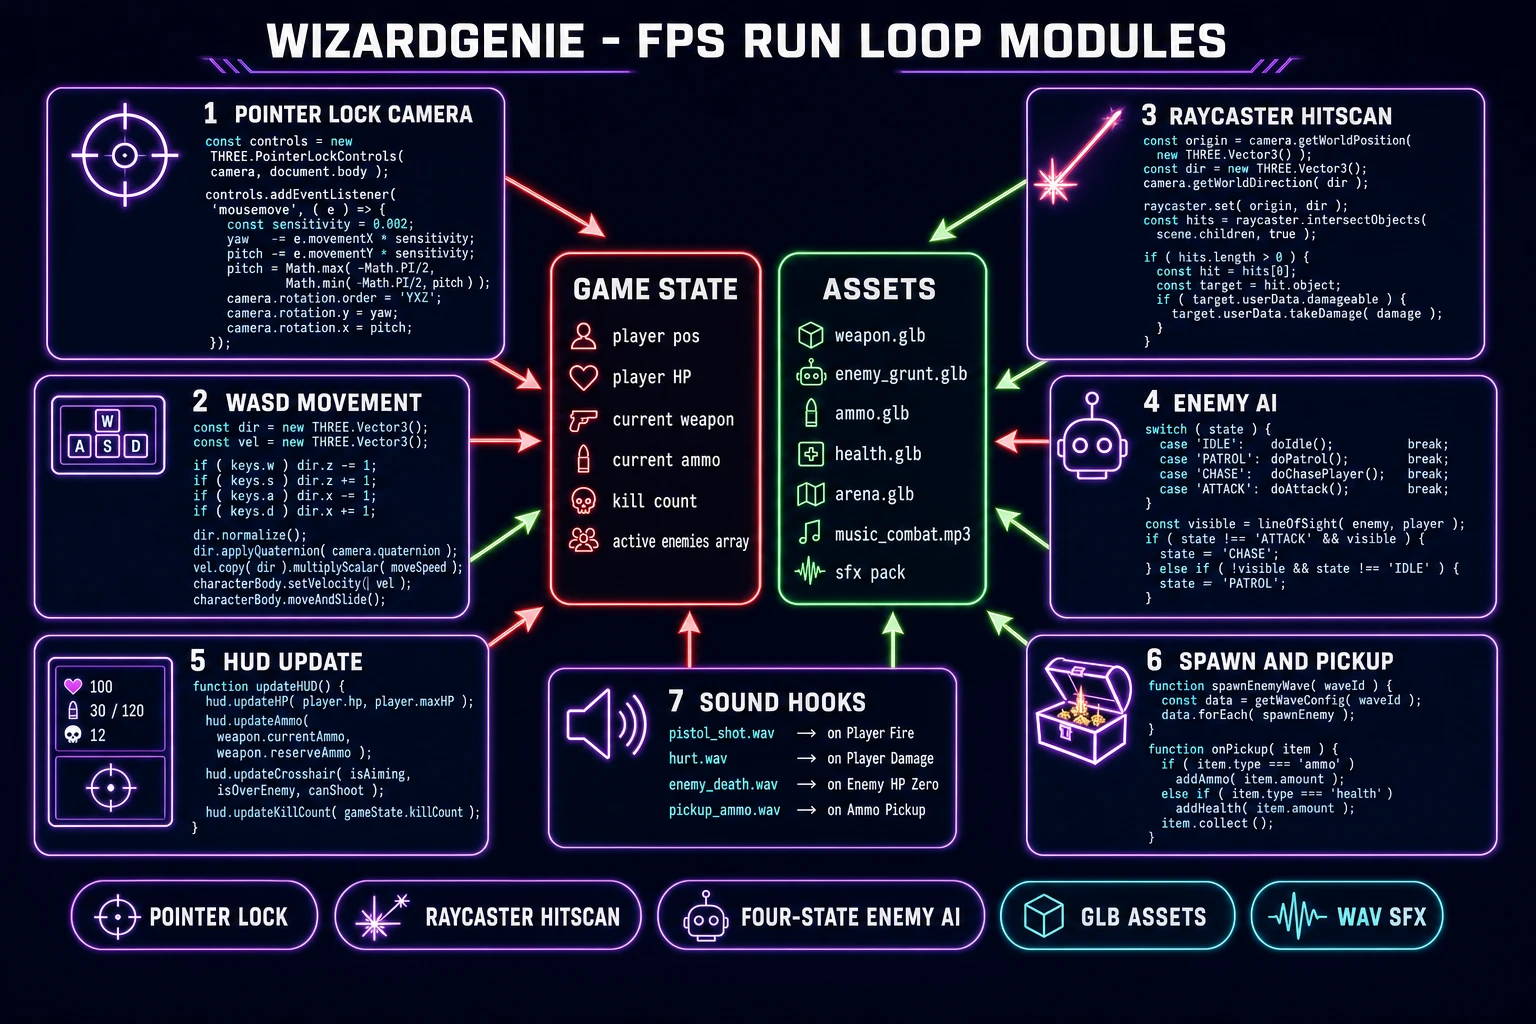
- Move. Player holds W/A/S/D. The camera rig converts each key into a velocity vector relative to the camera's forward and right axes, then adds gravity on the vertical axis and slides the character along the arena's collision geometry. Space triggers a jump impulse, Shift multiplies horizontal velocity by a sprint factor. This is the WSAD camera-relative movement pattern that has powered every FPS since Quake.
- Aim. The mouse locks to the game window using the pointer-lock API. Every mouse delta in X yaws the camera, every mouse delta in Y pitches it (clamped to plus or minus 89 degrees so the camera never flips). A crosshair sits dead center on the screen. The player aligns the crosshair with an enemy silhouette.
- Shoot. Player clicks. The weapon code decides hitscan or projectile. If hitscan, a raycaster fires from the camera forward vector out to the weapon's range, and the first object it hits takes damage. If projectile, a bullet mesh spawns at the muzzle with a velocity vector and moves per-frame until it hits something or expires. Ammo counter decrements. Muzzle flash plays. Gunfire SFX fires.
- Enemy reacts. The enemy's state machine flips from Idle or Patrol to Chase the moment its line-of-sight raycast to the player returns true. The enemy walks toward the player until it is within attack range, then flips to Attack and fires its own weapon (hitscan or projectile) at the player on its own cooldown. If the enemy's HP hits zero, its state flips to Dead, it plays a death animation, and it drops loot.
- Collect. Player walks over dropped ammo or health packs. Trigger volumes on the pickup meshes fire onPickup callbacks that raise the player's ammo counter or HP. The pickup mesh despawns. HUD updates. Loop back to step 1.
Every per-frame update runs off the browser-standard animation loop. The requestAnimationFrame API documented on MDN fires roughly 60 times per second in sync with the display refresh; every tick the game code advances the pointer-lock camera, moves the player, moves every enemy, resolves any active projectiles, checks pickups against the player position, and re-renders the scene. On a modern laptop, a Three.js FPS with 30 to 60 enemy characters and roughly a dozen active pickups runs at 60 fps comfortably.
Pick your engine in 2026: WizardGenie, Three.js r185, or Godot 4
The engine question decides how much boilerplate you write vs how much you skip. Three honest 2026 answers, ranked by "playable slice in two weekends":
- WizardGenie (recommended for a first project). AI-powered game engine that runs in the browser and, on desktop, ships as a Windows installer with auto-updater. You paste the shoot-move-collect design into a paragraph; WizardGenie writes, runs, and iterates on the code in real time using its dual-agent Planner+Executor loop. The Planner (a top-tier reasoner) breaks the FPS into pointer-lock camera, raycaster hitscan, enemy state machine, and HUD tasks. The Executor (a cheap fast typer like DeepSeek V4 Pro or MiniMax M2.7) writes the actual Three.js JavaScript. Model lineup verified 2026-08-07 in
src/app/_home-v2/_data/tools.ts: Claude Opus 4.7, Claude Sonnet 4.6, GPT-5.5, Gemini 3.1 Pro, DeepSeek V4 Pro, Kimi K2.5, Grok 4.2, MiniMax M2.7 — bring your own key or use the fallback trial key. - Three.js r185 (recommended for hand-coding a browser FPS). WebGL wrapper that every serious browser 3D game leans on, currently at revision r185 (verified 2026-08-07 on the official Three.js home page). The Raycaster class (documented in the official Three.js manual) handles hitscan collision directly. The Pointer Lock API on MDN is the primitive PointerLockControls builds on. GLTFLoader imports the weapon and enemy meshes you download from Sorceress 3D Studio. Best if you want to hand-code the engine and understand every draw call.
- Godot 4. Free open-source engine, current build released 14 July 2026 per the official Godot Windows download page verified 2026-08-07. Camera3D plus CharacterBody3D plus RayCast3D is the honest 3D FPS combination for hand-coded desktop builds. Ships a proven first-person template out of the box. Best if you want a desktop-first FPS or if you are more comfortable with GDScript than JavaScript. HTML5 export path works but the WASM bundle is heavier than a hand-rolled Three.js build for a small arena.
The rest of this guide assumes WizardGenie for the code side and Three.js r185 under the hood for the browser output. Every step still applies unchanged if you swap in Godot 4 or hand-write the Three.js by hand — the "AI writes the loop" step becomes "you write the loop against the design doc." Unity and Unreal are fine at commercial scale but heavier than a two-weekend prototype needs, and their web-export paths are noticeably fatter than a hand-rolled JS build for a small arena. Phaser v4.2.1 Giedi (released 9 July 2026 per the official Phaser download page verified 2026-08-07) is 2D-first, so use it only for a Wolfenstein-3D-style raycasting pseudo-FPS, not a true 3D shooter.
Step 1 — design the shoot-move-collect loop and arena flow on paper
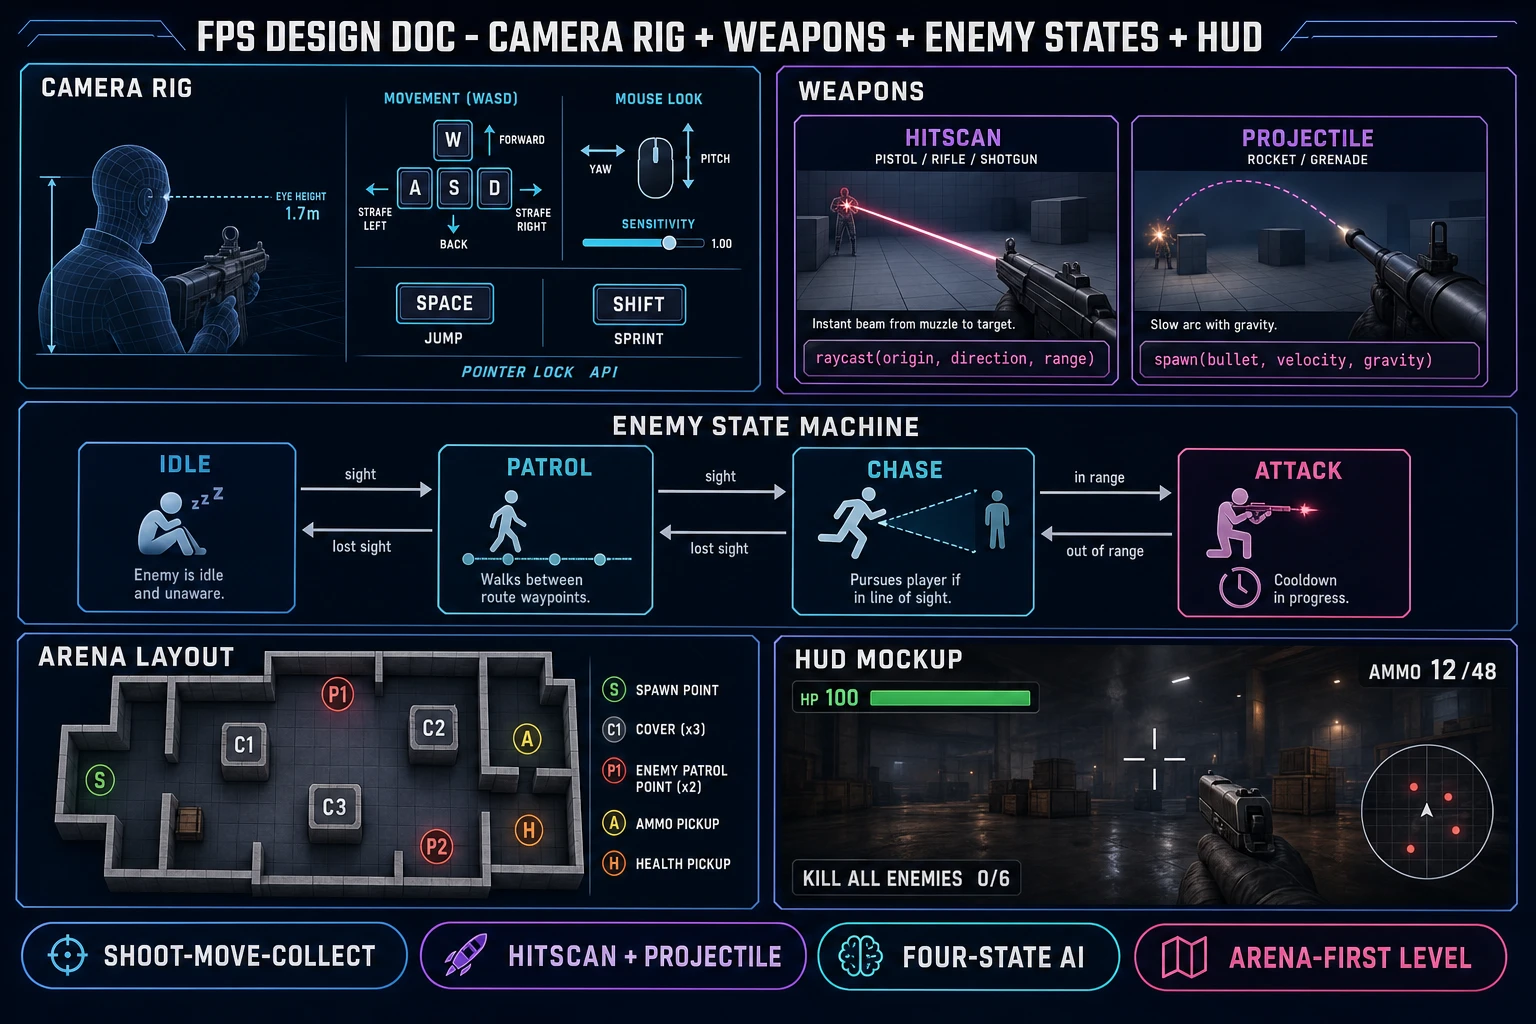
Skip this step and you will rewrite the FPS four times. This is the genre where enemy reaction ranges, weapon recoil, movement speed, and level geometry all interact multiplicatively, and every one of them has to be locked before the code starts. Do the design in 60 minutes on paper (or in a text file) and the AI code generation halves. The design doc needs five sections:
- Camera rig. Eye height (1.7m is the realistic default for a human, 1.5m makes the world feel bigger, 2.0m makes it feel smaller). Walk speed (5 m/s is the Doom default, 4 m/s is Half-Life, 6 m/s is Quake). Sprint multiplier (1.5x is standard). Jump impulse (roughly 4.5 m/s for a 1.2m jump). Mouse sensitivity slider range (0.001 to 0.005 rad per pixel is normal). Y-axis clamp (plus or minus 89 degrees). All of these are numbers, not moods. Write them down.
- Weapon system. One weapon for a first project is fine, more is over-scope. Pick hitscan or projectile. Damage per shot (25 kills a 100 HP enemy in 4 shots — a good default). Fire rate (400 rpm for a pistol, 600 rpm for an SMG, 900 rpm for a rifle). Magazine size (12 to 30 depending on weapon flavor). Reload time (1.2 to 2.5 seconds). Range (50m for a pistol, 100m for a rifle, effectively infinite for hitscan sniper). Recoil pattern (vertical only for a first project, add horizontal drift later). Muzzle flash duration (60ms is standard).
- Enemy design. One enemy type for a first project is fine, two is better. Enemy HP (100 is the baseline). Enemy walk speed (3 to 4 m/s, slower than the player). Enemy weapon (hitscan is easier, matches the player's pistol). Enemy detection range (25 to 40m). Enemy attack range (15m for hitscan, 8m for melee). Enemy attack cooldown (1.0 to 1.5 seconds between shots). State transitions: Idle plus sight equals Chase, Chase plus in-attack-range equals Attack, Chase plus lost-sight-for-5-seconds equals Patrol, Attack plus HP-zero equals Dead.
- Arena layout. One arena for a first project. Draw a top-down floorplan: three-to-five cover blocks, two-to-four spawn points for enemies, one entrance for the player, one ammo pickup, one health pickup, one objective (kill all enemies, or reach an exit). Roughly 30m by 30m is the sweet spot — small enough to feel dense, big enough to allow real movement. Sketch the sightlines: which cover blocks the player behind which spawn points, which cover the player can hide behind. This is the whole level design phase for a first FPS project.
- HUD. HP bar in the top-left (numerical plus green fill bar). Ammo counter in the top-right (12/48 format — magazine slash reserve). Crosshair dead-center (a plus sign is fine, no need for a complex reticle for a first project). Damage numbers floating up from enemies when hit (optional but adds crunch). Kill counter or objective text in the bottom-left. That is the entire HUD. No minimap for a first project.
Put the whole design doc in a single markdown or JSON file. WizardGenie parses this structure well and will use it to seed the pointer-lock camera, the weapon raycaster, the enemy state machine, and the HUD update pass. The same "design doc first, code second" approach powers every genre-specific tutorial in this series: Crawl How to Make a Roguelike (Run + Meta Loop 2026) uses the same approach for run loops and meta layers, Brave How to Make a Survival Game (Hunger + Loot 2026) uses it for hunger meters and loot tables, and Fortify How to Make a Tower Defense Game (Wave Loop 2026) uses it for enemy waves and tower economy.