Hook AI Character Rigging (Browser Skeleton 2026)

By Arron R.13 min read
Sorceress ai character rigging in 2026 is a browser panel with two paths in the same tab: a 15-marker guided walk that ships a fully editable UE-mannequin human

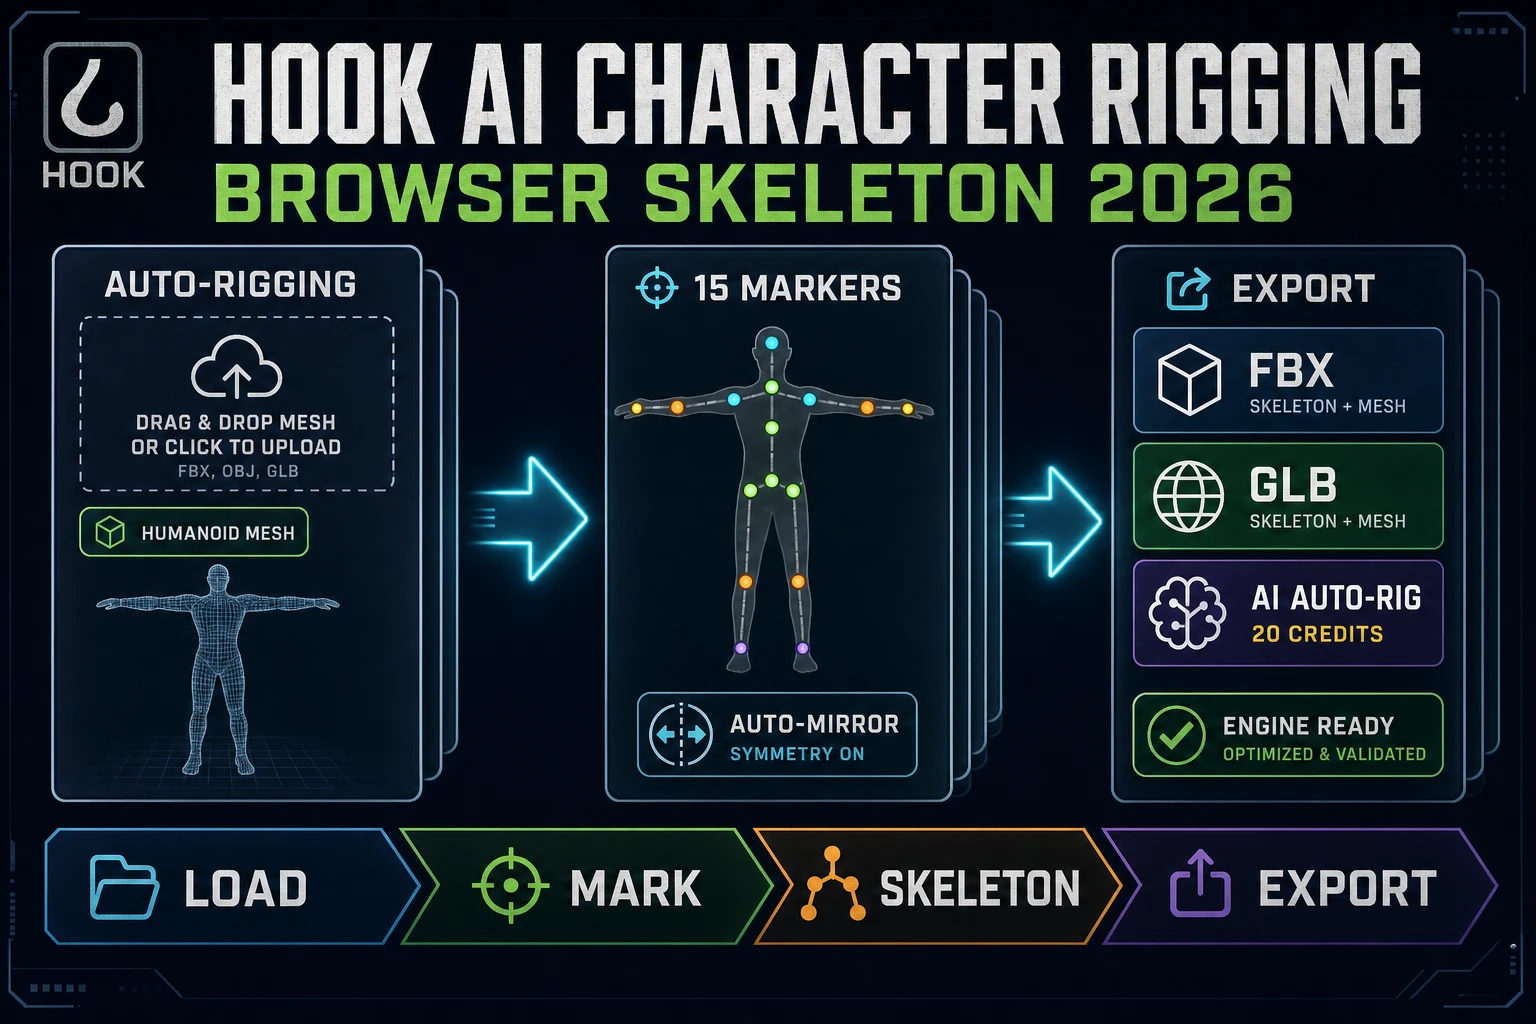
The Sorceress ai character rigging workflow in four panels: load, mark, skeleton, export.

What ai character rigging actually means for a browser tool in 2026

The phrase ai character rigging covers three different products in the same search results, which is why the top of Google is so noisy. The first meaning is a Mixamo-style web uploader that returns a fixed Adobe skeleton with automatic weights - fast, but the skeleton is not editable, the weight paint is not editable, and the upload path assumes the mesh is already scaled and oriented the way the black-box detector expects. The second meaning is a desktop plugin like Auto-Rig Pro or Blender built-in Rigify - powerful, but they live inside Blender, they cost a paid marketplace license or a working Rigify install, and the browser-based indie stack cannot invoke them without a local Python bridge. The third meaning is the game-project meaning: a browser panel that hands the artist a real 15-joint humanoid skeleton, a real editable weight map, and a real export the engine can load, with an optional AI-driven auto-rig for the one-button case. That third meaning is what a jam team, a solo indie, or a WebGL agency actually needs, and it is the meaning worth building around.

Three capabilities crossed the good-enough-for-a-game line in the past year and made the third meaning real. Browser-side geodesic detection learned to snap markers to the correct anatomical crease on a humanoid mesh instead of guessing at world-space coordinates, so a hip marker actually lands on the hip and not somewhere inside the leg volume. Skeleton-profile inference learned to detect the target rig from bone names alone (Unreal mannequin, SMPL, DAZ Genesis 8, Mixamo, Meshy) instead of hard-coding one topology, so the same input mesh can produce a rig compatible with whichever engine or mocap library the project already uses. And browser-hosted automatic weight paint learned to run the same heat-diffusion algorithm that ships inside Blender via a small Python bridge, so the manual weight-painting step that used to gate every rig is now a checkbox instead of a two-hour tour of vertex groups. Stitch the three together inside one panel and the rig ships in one browser session. That is the honest baseline for what a 2026 ai character rigging tool delivers.

The Sorceress ai character rigging loop in one minute (load, mark, skeleton, export)

A game project rarely wants a rig as an abstract object - it wants a humanoid character that walks, gestures, and takes hits without T-posing through the animation. The one-minute mental model of Sorceress Sorceress Auto-Rigging as the ai character rigging surface (15 markers, five skeleton profiles)

Fifteen canonical humanoid markers, thirteen required, two optional, walked in guided order.

Step 1 - place 15 markers with guided mode, auto-mirror, and center-snap

The marker stage is where a rig either becomes anatomically correct or becomes a source of animation artifacts three days from now. Sorceress Auto-Rigging exposes four toggles that turn the placement stage from tedious to fast, all verified 2026-09-05 in src/app/rigging/page.tsx: guidedMode (defaults to true; walks the artist through the marker list one at a time, showing an overlay for each), autoMirror (defaults to true; mirrors any left-side marker placement to the right side across the mesh sagittal plane), centerSnap (defaults to true; snaps center-line markers like pelvis, chin, and neck to the mesh center so they do not drift off-axis), and autoNormalize (defaults to true; normalizes the marker set into a sane world scale before the skeleton solver runs). The honest recipe for a fresh humanoid mesh is: load, keep all four toggles on, click through the guided walk (chin, neck, pelvis, then the four left-side limbs from shoulder to ankle - the right side comes free from auto-mirror), and preview the skeleton.

Manual placement is the escape hatch when the mesh is stylized enough that the guided defaults miss. Turn off guidedMode and the panel exposes the full marker list as clickable placement targets - useful for a chibi character where the chin is actually a giant helmet crest, or for a giant with proportions the auto-mirror plane cannot infer honestly. Turn off autoMirror when the character is deliberately asymmetric - a one-armed pirate, a mecha with a shoulder cannon - and place each side by hand. The markerEditMode flag exposes a per-marker transform gizmo (the Three.js TransformControls, imported directly in the page) for micro-adjustment after the initial pass. That is what turns a first-pass rig into a shippable rig: the guided defaults get the artist to a preview in six minutes, and the manual escape hatch handles the 20 percent of characters that do not fit the humanoid template out of the box.

Step 2 - infer the skeleton with the UE-Mannequin, SMPL, DAZ G8, Mixamo, or Meshy profile

Once the markers are placed, the skeleton solver reads them and produces a bone hierarchy in world-space. Which hierarchy depends on the profile. Sorceress ships five, verified 2026-09-05 in src/lib/rigging/profiles/index.ts: UE_MANNEQUIN_PROFILE (the default, exposed as DEFAULT_PROFILE), SMPL_PROFILE, DAZ_G8_PROFILE, MIXAMO_PROFILE, and MESHY_PROFILE. UE-Mannequin is the studio-standard rig: pelvis as root, then spine_01/02/03, neck_01, head, and the four limb chains named the way Unreal Engine animation blueprint expects. It is the pick for any project that will ever ship to Unreal, and it is the pick for most Unity projects too because Unity Humanoid retargeter maps cleanly onto Unreal-named bones. SMPL is the academic-standard rig used across research papers and mocap datasets - the pick when the project will consume SMPL-hosted motion clips or run pose-estimation pipelines. DAZ G8 is the pick for a project already living in the DAZ Studio ecosystem. Mixamo and Meshy are the picks for projects sharing a library with either of those ecosystems.

The clever part is detectProfileFromBones. Given a bone-name set (from a loaded FBX, from a saved skeleton, from a rigged import), the function iterates the five profiles, checks each profile detect.mustInclude list of required bone names against the input set, and returns the best-matching profile with a confidence score. Profiles without a detect block (UE-Mannequin, SMPL) are never auto-detected - they are explicit picks - which is a deliberate design choice: those two profiles have overlapping bone names with everything else, and auto-detecting either would produce false positives on Mixamo or Meshy input. That is what makes the tool safe to use on a library of mixed-provenance rigs: a Mixamo character auto-detects as Mixamo (not misdetected as UE), a Meshy character auto-detects as Meshy, and a raw import falls back to the UE-Mannequin default. The Step 3 - AI auto-rig one-click path when marker placement is not the point (20 credits)

The 15-marker path is the right pick when the character is bespoke and the rigger cares about the placement. The AI auto-rig path is the right pick when the character is one of forty stock enemies and the point of the session is to ship the whole roster in one afternoon. Sorceress exposes both from the same panel. The AI path is a single button that uploads the mesh to a hosted auto-rig provider (currently

Skinned humanoid ready for engine import, with the AI auto-rig button available for one-click rigs.

Where 3D Studio, Procedural Walk, and AI Text-to-Animation fit around the rigged character

Rigging is one stage of a character pipeline. The other stages - mesh generation, animation, non-humanoid locomotion - live in adjacent Sorceress panels and share the same credit pool. What an ai character rigging run costs on Sorceress in 2026

The credit math for a full ai character rigging pack is transparent and small. Verified 2026-09-05 in src/lib/rigging/external-rig/autoRigPricing.ts and src/lib/models.ts: the AI auto-rig path is 20 credits per rig (flat, published as AUTO_RIG_CREDITS.meshy = 20), 1 credit equals 1 cent (CREDITS_PER_DOLLAR = 100), so one AI-driven rig is exactly .20 at the auto-recharge rate. The 15-marker manual path is not billed per rig at all - marker placement, skeleton inference, and the browser weight-paint pass through the Blender bridge run on the Sorceress side, not on a paid external provider, so the manual path bills against the base Pro-tier subscription rather than a per-generation credit. That is the honest tradeoff: manual is free-per-rig inside a Pro plan and takes six minutes of anatomical placement per character; AI auto-rig is 20 credits per rig and finishes in the time it takes to upload the mesh. A ten-character enemy roster on the AI path is 200 credits, which is .00 - about the wall-clock cost of a coffee, and less time than one round of manual weight-painting inside a desktop DCC.

Two operating modes affect the total. First, the AI auto-rig only fires when the button is clicked, so a mixed session (three bespoke characters manually rigged, seven stock enemies AI-rigged) bills only the seven AI passes for 140 credits. Second, the Blender autoweight pass (requestBlenderAutoweight in src/lib/rigging/blender-client.ts) runs against a local Blender bridge instead of a hosted provider - the finger detection helper (requestBlenderFingerDetect) runs against the same bridge - so the browser tool inherits Blender automatic weight algorithm at zero external credit cost per rig. VIP users bill at zero for the base generation, verified in the credit-deduction code path. The plans page carries the tier-level credit bundles - a jam-length game full character roster (mesh generation on 3D Studio, humanoid rigging on Auto-Rigging, non-biped rigging on Procedural Walk, motion clips on AI Text-to-Animation) ships for a small fraction of what a hand-rigged pack from a freelancer would cost, and every price is published rather than negotiated. Ship the character, wire it into the engine, rig the next one - the ai character rigging workflow in 2026 is a browser session, not a desktop weekend.

Frequently Asked Questions

What is ai character rigging in the 2026 sense for a browser tool?

An ai character rigging tool in the 2026 sense is a browser panel that turns a humanoid mesh into a fully skinned, engine-ready character in one tab, not a desktop plugin the artist has to install or a black-box uploader that returns a fixed skeleton. Sorceress Auto-Rigging at /rigging is that panel: 15 canonical joint markers defined in src/lib/rigging/types.ts (pelvis, hipLeft, hipRight, neck, chin, plus paired shoulder, elbow, wrist, knee, and ankle), a guided walk in GUIDED_LEFT_ORDER and GUIDED_RIGHT_ORDER that tells the artist which marker to place next, and five retargetable skeleton profiles (UE_MANNEQUIN_PROFILE default, plus SMPL, DAZ G8, Mixamo, and Meshy in src/lib/rigging/profiles/index.ts). An optional one-click AI auto-rig button costs a flat 20 credits per model (AUTO_RIG_CREDITS.meshy = 20 in src/lib/rigging/external-rig/autoRigPricing.ts) for projects that do not care about placing markers by hand. All verified 2026-09-05.

How is the ai character rigging flow different from uploading to Mixamo or running Auto-Rig Pro in Blender?

The difference is where the rig lives, and how much of it stays editable. A Mixamo upload returns a fixed Adobe skeleton with automatic weights - the skeleton is not editable and the weight paint is not editable, which is fine for a stock character and painful for a bespoke one. Auto-Rig Pro is a paid Blender marketplace plugin that produces a superb rig but requires a working Blender install and a paid license. Sorceress Auto-Rigging keeps the rig editable at every stage: markers can be nudged with the Three.js TransformControls gizmo (markerEditMode flag in src/app/rigging/page.tsx), the skeleton profile can be swapped from UE-Mannequin to SMPL to DAZ G8 to Mixamo to Meshy without re-placing markers, and the browser weight-paint pass runs through a Blender bridge (requestBlenderAutoweight in src/lib/rigging/blender-client.ts) so the artist gets Blender-quality automatic weights without leaving the browser.

Which of the five skeleton profiles should the first rig use for a game project?

UE_MANNEQUIN_PROFILE is the default (exposed as DEFAULT_PROFILE in src/lib/rigging/profiles/index.ts, verified 2026-09-05) and the right pick for most game projects. Unreal Engine consumes it directly, and Unity Humanoid retargeter maps cleanly onto Unreal-named bones, so a UE-mannequin rig ships to both engines with no manual retargeting. SMPL_PROFILE is the pick when the project will consume SMPL-hosted motion clips or run pose-estimation pipelines. DAZ_G8_PROFILE is the pick for a project already living inside DAZ Studio. MIXAMO_PROFILE is the pick when the project will pull motion clips from Mixamo library and needs bone names to match. MESHY_PROFILE is the pick when the character was originally generated on Meshy and the project wants to keep the source rig topology. If unsure, keep UE-Mannequin; the manual profile switch is one click away, and detectProfileFromBones will pick the correct profile automatically when a rigged import lands in the tool.

What does one ai character rigging run actually cost on Sorceress in 2026?

Two paths, two prices. The 15-marker manual path is not billed per rig - marker placement, skeleton inference, and the browser weight-paint pass through the Blender bridge run on the Sorceress side and bill against the base Pro-tier subscription. The AI auto-rig path is a flat 20 credits per model (AUTO_RIG_CREDITS.meshy = 20 in src/lib/rigging/external-rig/autoRigPricing.ts, verified 2026-09-05). Since 1 credit equals 1 cent (CREDITS_PER_DOLLAR = 100 in src/lib/models.ts), one AI-driven rig is exactly .20 at the auto-recharge rate. A ten-character roster on the AI path is 200 credits or .00 - cheaper than a coffee, and the mesh-to-skinned-character round trip finishes in the time it takes to upload the file. The published /plans page carries the tier-level credit bundles.

How does the exported rig actually load into a Unity, Unreal, or Three.js project?

Auto-Rigging exports the finished character to FBX or GLB, both of which are one-line imports in every mainstream engine. Unity imports FBX directly and applies the Humanoid retargeter when the source bones match the UE-Mannequin naming that Auto-Rigging emits by default. Unreal Engine imports FBX with its native Skeletal Mesh asset workflow; the UE-Mannequin skeleton is the same one Unreal ships with, so the Humanoid animation blueprint slots the character in without further retargeting. Three.js imports GLB via the GLTFLoader and consumes the embedded skeleton and skin weights straight into a SkinnedMesh - the same runtime that AI Text-to-Animation motion clips play back on. For non-humanoid characters, the Procedural Walk panel at /rigging-multileg exports the same FBX and GLB formats with the multi-leg IK rig baked in.

Do I need to hand-fix the weights after the AI character rigging pass?

Usually one small pass. The browser weight-paint pass runs through the Blender autoweight algorithm via requestBlenderAutoweight in src/lib/rigging/blender-client.ts and gets 80 percent of a humanoid rig right on the first pass. The other 20 percent is the shoulder area (where deltoid weight bleeds into the pectoral) and the hip crease (where thigh weight bleeds into the pelvic bone). The Auto-Rigging panel exposes a weight-refinement tab that lets the artist paint the fix directly in the browser preview without exporting to Blender. The AI auto-rig path returns weights already computed by the external provider and needs the same 20 percent shoulder-and-hip pass most of the time. None of that requires leaving the browser or hiring a rigger for a rewrite; taste and cleanup, yes, but the raw rig ships in a browser session.

Sources

  1. Meshy pricing - Meshy AI
  2. Mixamo - Adobe
  3. Auto-Rig Pro - Wikipedia
  4. glTF Overview - Khronos Group
  5. FBX - Wikipedia
  6. Skeletal animation - Wikipedia
Written by Arron R.·2,900 words·13 min read

Related posts