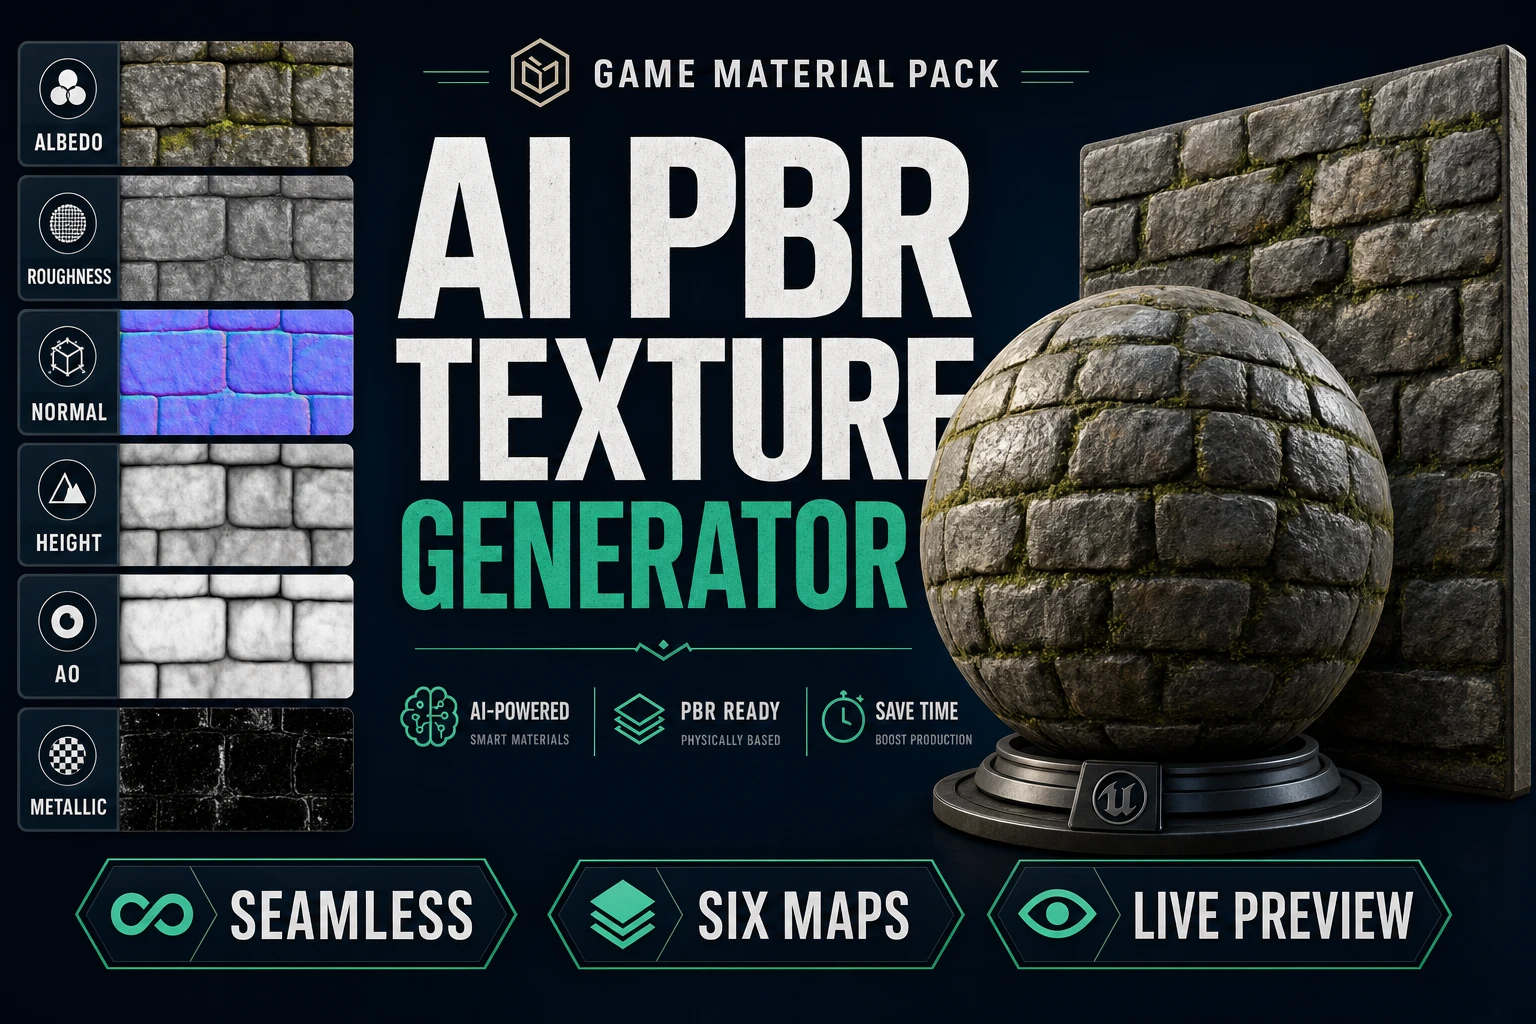
AI PBR Texture Generator (Game Material Pack)

By Arron R.11 min read
An AI PBR texture generator should produce a tested material system, not one attractive image. Material Forge creates the base surface, derives supporting PBR m

A material pack fails long before the renderer throws an error. One stone texture uses fist-sized grain, another uses pebble-sized grain, the metal panel has a painted shadow, and every file follows a different naming rule. This workflow treats Sorceress Material Forge as a production station: define the surface family, generate or upload a clean base, derive the supporting maps, inspect the result under changing light, and export only the versions that pass. Material Forge’s map derivation, seamless prompt path, live preview, saved gallery, and export options were verified against the live Sorceress source on July 19, 2026.
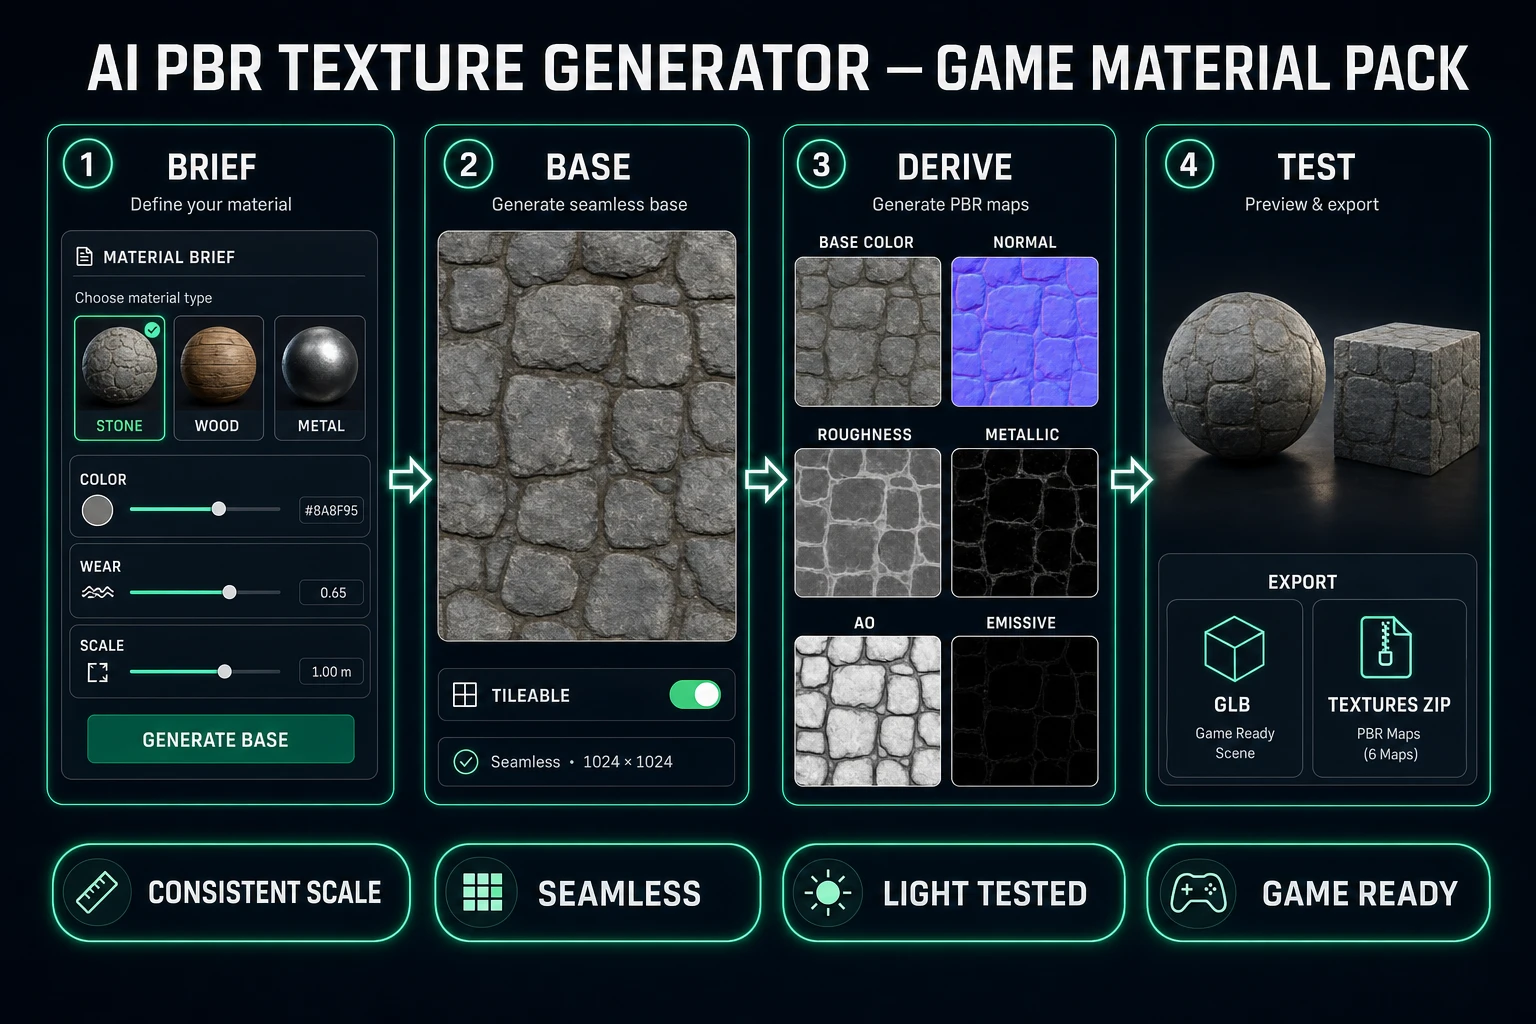
AI PBR texture generator workflow from a material brief through seamless base color and derived maps to lighting tests and game-ready export
A useful material generator connects art direction, map construction, visual testing, and delivery instead of stopping at one attractive square image.

What an AI PBR texture generator should export

The primary keyword ai pbr texture generator has 30 monthly searches and KD 0 in citation-grade DataForSEO research generated July 18, 2026. The small volume hides a precise production need. The reader is not looking for another flat texture preview. They need a surface that reacts correctly when a light moves, repeats across level geometry, and arrives with predictable files.

A practical export contract starts with six possible channels:

  • Base color: the visible surface color without painted highlights or directional shadows.
  • Normal: per-pixel surface direction used to create small lighting detail without extra geometry.
  • Roughness: how broadly or tightly the surface reflects light.
  • Metallic: whether the shaded surface behaves as a metal or a nonmetal.
  • Ambient occlusion: localized darkening for recessed detail.
  • Emissive: the optional mask and color for self-lit areas such as runes, screens, or lava cracks.

The glTF 2.0 material specification defines the metallic-roughness model used by portable GLB assets. It also makes an important distinction: base color is color data, while metallic and roughness values are material data. That difference affects channel packing, color-space handling, and how the renderer interprets each image.

Not every surface needs all six maps. Dry plaster may need base color, normal, roughness, and AO, with metallic fixed to zero. A clean steel panel needs metallic information but may not need an emissive map. A magic control panel can use every channel. The generator should let the material’s physical role decide the map set instead of manufacturing meaningless files for the sake of a larger download.

Naming is part of the contract. Use one material identifier and stable suffixes such as crypt_stone_basecolor.png, crypt_stone_normal.png, and crypt_stone_roughness.png. A coding agent can wire those files reliably. A folder containing final2.png, purple.png, and map_new.png forces the integration step to guess.

Define the material family before generating images

A pack is a set of related surfaces, not a collection of independent prompts. Before opening the generator, write a short family brief that fixes four things: palette, physical scale, wear language, and lighting rule. For a flooded crypt, that might mean cool charcoal stone, thirty-centimeter blocks, dark moss concentrated in joints, chipped edges rather than smooth erosion, and flat ambient source lighting.

Then list the variants the level actually needs. A compact stone family might include clean wall, worn wall, mossy wall, floor slab, carved trim, and broken rubble. Each variant can change condition and composition while preserving block scale, mortar width, palette, and surface response. That consistency matters more than making every tile visually dramatic.

Use a material brief like this:

{
  "family": "crypt_stone",
  "scale": "30 cm blocks",
  "palette": ["cool charcoal", "desaturated blue-gray"],
  "wear": "chipped edges, dark moss in joints",
  "lighting": "flat ambient, no directional shadows",
  "variants": ["clean", "worn", "mossy", "carved"]
}

The last field prevents a common mistake: asking an image model to create “cinematic stone lit from the left.” That can produce an impressive picture, but the painted highlight and shadow remain fixed when the game light moves from the right. Base color should describe the material, while the normal, roughness, AO, and runtime lights describe how illumination behaves.

Scale needs the same discipline. A wood grain that looks correct on a one-meter crate can look absurd on a sword handle. Record an intended real-world size or a repeat count per meter, then test every family member at that scale. If a moss clump covers half a wall panel, it should not reappear at the same size on a small prop merely because both surfaces share a square texture.
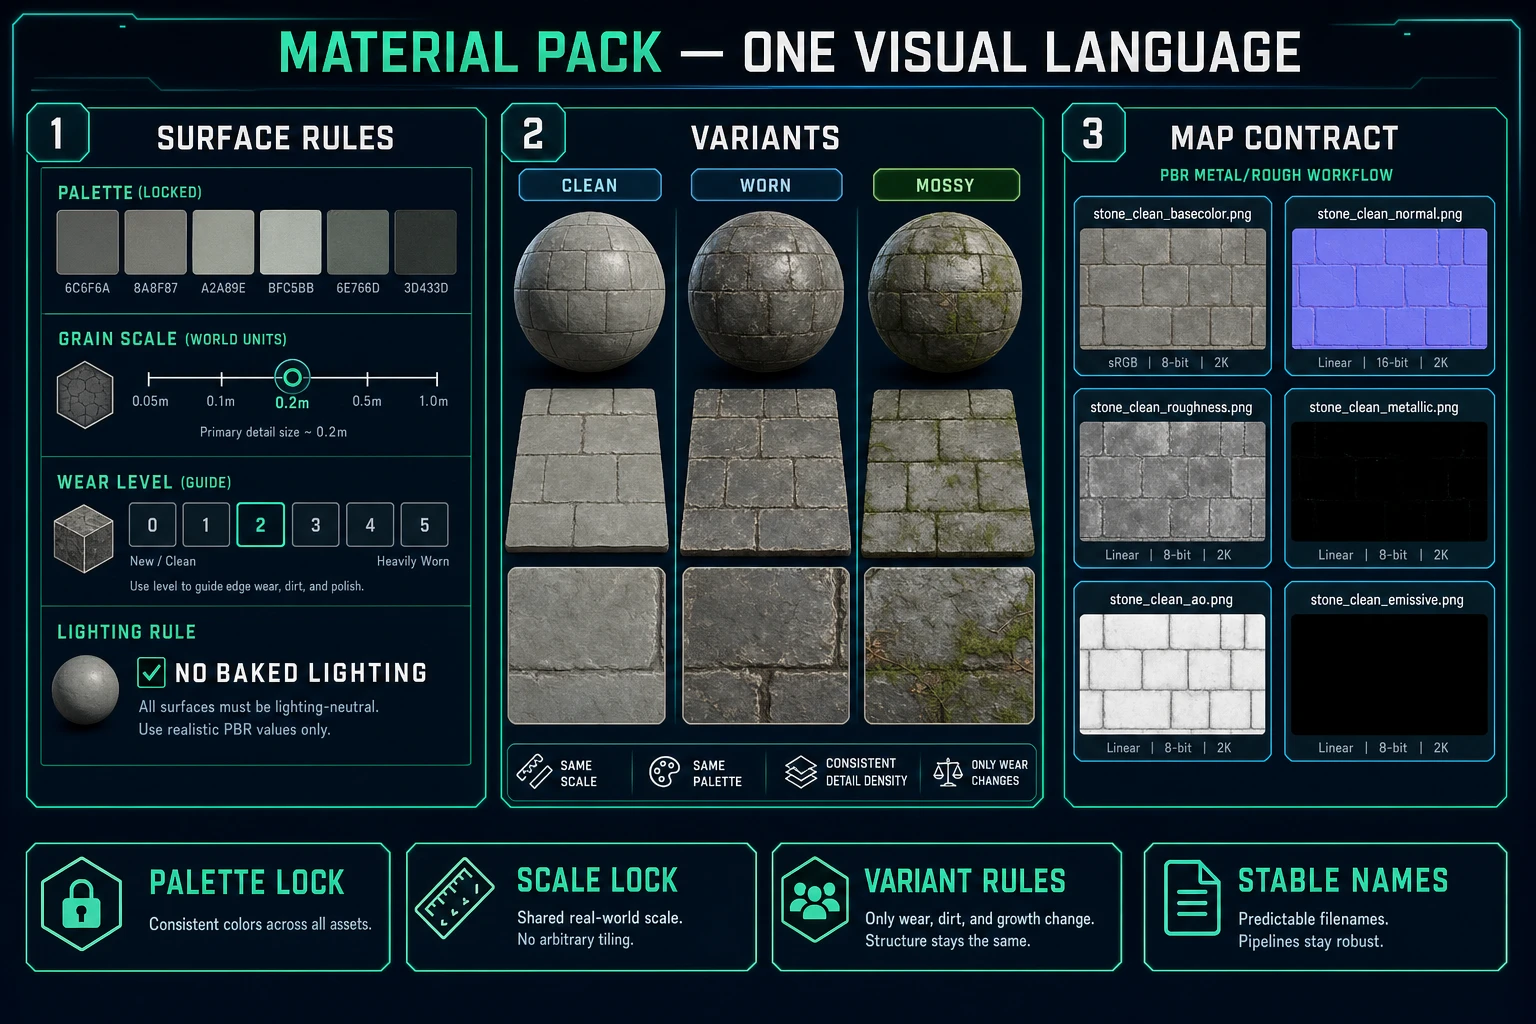
AI PBR texture material family brief showing locked palette, physical scale, clean worn and mossy variants, and stable map filenames
A coherent pack locks the visual rules first, then creates controlled variants and predictable filenames inside those rules.

Use the Sorceress AI PBR texture generator workflow

The Sorceress AI PBR texture generator path in Material Forge is a five-part loop:

  1. Open Material Forge and enter a material description or load a reference image.
  2. Choose whether to generate a new base texture and whether the result must be seamless.
  3. Generate the base-color candidate through the selected image model.
  4. Let Material Forge derive supporting maps, then inspect and adjust the material properties in the live 3D preview.
  5. Save accepted variants to the gallery and export the material in the format needed by the project.

The current source applies a square texture payload and, when Seamless is enabled, wraps the request with explicit tileable and no-visible-seam instructions. After the base color loads, Material Forge derives normal, roughness, AO, metallic, and emissive candidates in browser code. Normal, roughness, and AO derivation are enabled by default. Metallic and emissive derivation begin disabled because brightness alone is not reliable evidence that a pixel is metal or should glow.

That default is physically sensible. Bright limestone is still nonmetallic. A white paint chip on a steel panel may cover metal underneath. A yellow stripe is not automatically emissive. Turn on or tune those channels only when the material brief gives them a real job.

The preview uses a standard physically based material and exposes the texture maps alongside properties such as metalness, roughness, normal intensity, AO intensity, emissive response, tiling, scale, and rotation. The Three.js MeshStandardMaterial documentation describes the same metalness, roughness, normal, AO, and emissive responsibilities used by the browser renderer. That makes the viewport a useful acceptance surface for web-game assets rather than an unrelated beauty render.

Save candidates instead of overwriting the only version. The Material Forge gallery persists generated materials, their map URLs, settings, tags, and prompt metadata. A controlled set of accepted variants gives the project a searchable material library and preserves the generation context when a later level needs a matching surface.
Step 1 — create a seamless base surface

Start with the family brief, then write a surface prompt that describes material, condition, color, scale, and source lighting. A strong crypt-wall prompt is: “Cool charcoal limestone blocks, thirty-centimeter masonry scale, narrow recessed mortar, chipped edges, sparse dark moss in joints, flat ambient illumination, orthographic surface texture, no directional shadow.” Enable Seamless when the material will repeat over walls, floors, terrain, or modular props.

Generate several candidates, but judge them as source data rather than illustrations. Reject a base color when it contains:

  • a bright hotspot or cast shadow that belongs to a particular light direction;
  • deep perspective, a horizon, or a camera angle instead of a flat surface view;
  • one unique crack, stain, skull, or logo that becomes obvious when repeated;
  • scale cues that contradict the family brief;
  • edge transitions that reveal a horizontal or vertical seam.

A seamless image can still tile badly. Matching edges only prevents a hard border. A large, memorable stain can form a visible grid every time the texture repeats. Test the candidate at two-by-two, four-by-four, and eight-by-eight repetition. Look at the pattern from a distance as well as close up. The farther view reveals rhythmic repetition that a single-tile preview hides.

Reference images are useful when the pack must match existing art. Crop a flat, representative region; avoid perspective-distorted corners and directional highlights. Material Forge’s current generation path can upload a reference for models that support reference images, while its derivation path can also work from a loaded base-color texture. The reference should anchor palette and structure, not import baked lighting into every map.

Step 2 — derive and inspect the PBR maps

Once the base is accepted, inspect one map at a time. Material Forge’s browser derivation computes a normal map from luminance gradients, a roughness map from adjustable luminance behavior, AO from local luminance neighborhoods, metallic from an optional threshold, and emissive from an optional bright-pixel threshold. These are useful starting maps, but they are interpretations of one image rather than measurements of a real surface.

Test the normal map first. Rotate the preview light and confirm that mortar, grain, dents, or weave respond in the expected direction. If every color boundary becomes a deep ridge, reduce normal strength or normal intensity. Painted color does not always imply geometric height. A red stripe on a panel should not protrude merely because it contrasts with gray metal.

Next, test roughness. Move a bright light across the object and watch the highlight width. Polished areas should create tighter highlights; dusty or fibrous areas should scatter them. If the whole surface looks wet, raise roughness or correct an overly dark roughness map. If nothing responds, lower roughness enough to reveal variation without turning stone into plastic.

Check metallic as a classification map. Stone, wood, cloth, skin, ceramic, and most paint are nonmetallic. Exposed steel, copper, aluminum, and gold are metallic. For a painted metal panel, the exposed scratches may be metallic while intact paint remains nonmetallic. Do not enable automatic metallic derivation on a stone wall simply because the base image has bright pixels.

Use AO carefully. It should reinforce tight recesses, not paint broad permanent shadows over the object. Too much AO makes a material look dirty and crushes detail under low light. Emissive should also be selective: inspect the material with darker lighting and confirm that only authored marks glow. A bright base-color area and a self-lit area are different concepts.

Texture files are often PNG because the format preserves lossless pixel values and supports well-defined color metadata; the PNG Third Edition specification is the current standards reference. Keep color-space intent in the asset manifest. Base color and emissive color are interpreted as color, while normal, roughness, metallic, and AO are data maps and must not be altered by an sRGB color transform.

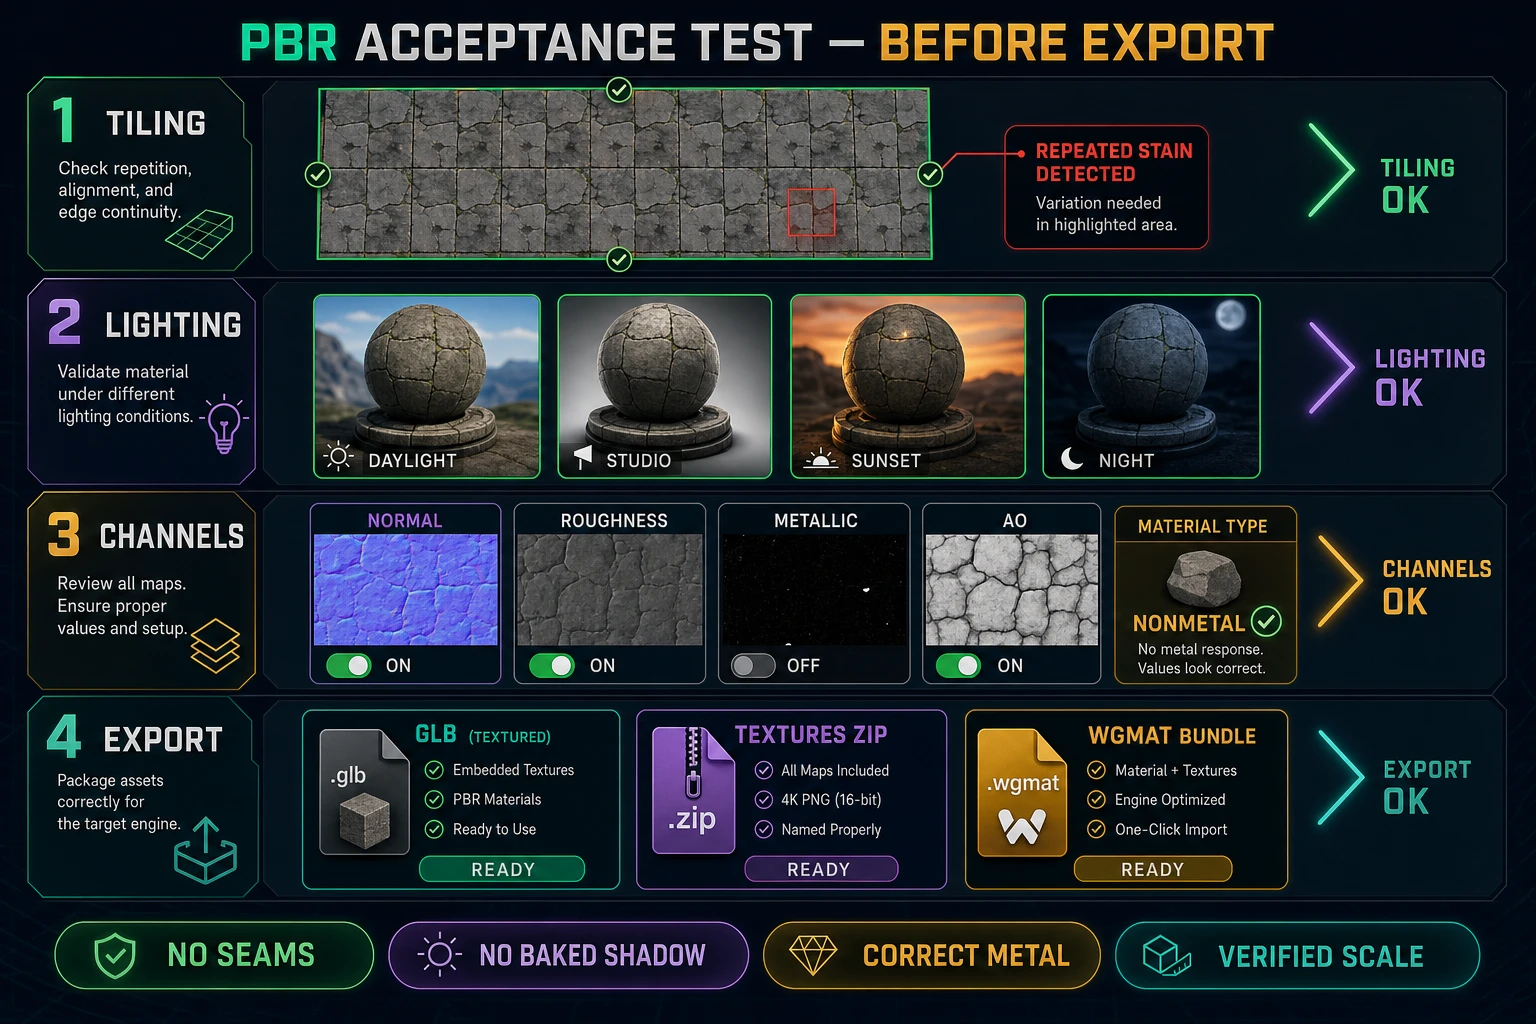
AI PBR texture generator acceptance test for tiling, multiple lighting presets, normal roughness metallic and AO channels, and GLB textures ZIP and WGMAT export
Acceptance testing catches seams, baked illumination, false metallic regions, excessive normal depth, and scale errors before they spread through the level.

Step 3 — test scale and lighting on a 3D asset

A sphere is useful for highlights, but it is not enough. Test each material on at least a plane, a curved object, and a representative asset. Material Forge’s live preview supports multiple simple geometries and changing lighting environments, which exposes different classes of error.

Use this acceptance pass:

  1. Plane test: repeat the texture and inspect seams, pattern rhythm, and physical scale.
  2. Sphere or cylinder test: rotate the light to inspect roughness and normal continuity across changing surface angles.
  3. Cube test: inspect edges and confirm the texture does not depend on one camera-facing orientation.
  4. Representative asset test: apply the material to the prop or environment class it was designed for.
  5. Lighting test: compare bright, neutral, warm, cool, and low-light conditions without changing the maps.

The material should remain recognizable without looking identical under every light. Base color carries identity; the renderer supplies illumination. If the left side always appears brighter, the base likely contains baked lighting. If the surface becomes unreadable except under one studio preset, the roughness or normal range may be too extreme.

WebGL texture sampling also affects delivery. The MDN guide to using textures in WebGL explains image upload, texture coordinates, filtering, wrapping, and mipmapping. Those runtime details are why a material must be tested at gameplay distance. A perfect close-up can shimmer or blur once minified, while an overly fine normal pattern can collapse into noise.

Record repeat scale with the accepted variant. “Looks right at 4×” is not durable production data unless the project also knows the mesh size and UV convention. Store a repeat value, intended meters per tile, or both. Use the same rule across the family so clean, worn, and mossy versions can swap without the masonry suddenly changing size.

Export an AI PBR texture generator material pack

An AI PBR texture generator session is finished when another person or agent can use the output without reopening the authoring history. Material Forge’s current export surface includes textured GLB output, a textures ZIP, engine-oriented export helpers, and a .wgmat bundle for WizardGenie workflows. Pick the format that matches the next step rather than downloading everything by habit.

Use a textured GLB when you need a portable visual proof with material settings attached to geometry. Use the textures ZIP when the target project already owns the mesh and material definitions. Use the .wgmat bundle when the material should move into a WizardGenie project with its texture payload and properties preserved. The broader Sorceress tools guide maps these exports to the rest of the asset pipeline, and 3D Studio handles the mesh, rigging, and animation side when the material belongs to a generated 3D character or prop.

Package each accepted family with:

  • a stable material ID and readable display name;
  • the included map list and channel meanings;
  • intended physical scale or repeat value;
  • metallic, roughness, normal, AO, and emissive settings;
  • the approved color-space treatment for each map;
  • the source prompt or reference ID;
  • the acceptance date and tested preview conditions.

Keep the pack small enough to understand. Six strong crypt materials with controlled variants are more useful than forty disconnected stone squares. Reuse the family brief for new additions, compare them beside the accepted set, and reject candidates that drift in palette, scale, or wear language. For the normal-map-specific inspection pass, the normal map generator guide covers tangent-space handling and runtime checks in more depth.

The final standard is simple: the material tiles without a visible grid, reacts correctly under moving lights, uses physically sensible channels, holds its intended scale, and arrives with names the game can wire automatically. That is the difference between generating textures and building a game material pack. Open Material Forge, start with one tightly defined family, and do not export a variant until it passes the same acceptance test as every other surface in the set.

Frequently Asked Questions

What should an AI PBR texture generator export?

It should export a base-color texture and the non-color maps needed by the target renderer, commonly normal, roughness, metallic, ambient occlusion, and optional emissive data. The useful output is a named, tested set whose scale, channel meaning, and material settings are recorded, not a folder of unlabeled images.

Can Material Forge derive PBR maps from one image?

Yes. Material Forge can use a generated or uploaded base-color image and derive normal, roughness, ambient-occlusion, metallic, and emissive maps in the browser. Normal, roughness, and AO derivation are enabled by default in the current source; metallic and emissive derivation are optional because they only make sense for suitable surfaces.

Why should metallic maps stay nearly binary?

The metallic-roughness workflow distinguishes conductors from nonmetals. Most real surfaces should be clearly metallic or nonmetallic rather than filled with arbitrary gray values. Exceptions can occur around blended dirt, coatings, or authored transitions, but a stone wall should not become partly metallic just because its base color contains bright pixels.

How do I check whether a seamless PBR texture really tiles?

Preview it on a plane or simple mesh at several repeat values, then look for horizontal and vertical seams, repeated landmarks, baked directional shadows, and scale changes. A texture can have matching edges yet still reveal an obvious repeating stain or crack, so both edge continuity and pattern repetition need inspection.

What can Material Forge export for a game project?

The current Material Forge source supports a textured GLB, a textures ZIP, engine-oriented helpers, and a .wgmat bundle for WizardGenie workflows. Export only after the material has passed lighting, scale, tiling, and channel checks, then keep the material name and map suffixes stable in the project.

Sources

  1. glTF 2.0 Specification — Materials
  2. THREE.MeshStandardMaterial — Three.js Documentation
  3. Using Textures in WebGL — MDN Web Docs
  4. Portable Network Graphics (PNG) Specification, Third Edition
Written by Arron R.·2,363 words·11 min read

Related posts